Monthly Archives: January 2013
Authentic San Francisco-style Sourdough Bread
I had a request that I just couldn’t refuse. I lived in San Francisco–actually, Mill Valley in Marin County–across the Golden Gate Bridge to work every day…WOW!–and more than virtually anything else, I fell in love with sourdough bread. On Sundays we would ride our bikes from Mill Valley through Marin City to Sausalito, then ride the ferry to Fisherman’s Wharf and eat crab legs and sourdough bread. I think that was one of the seminal 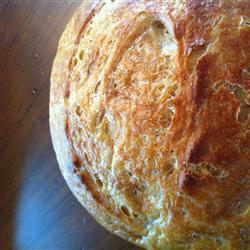 times in my life in terms of cementing my love for food. The really cool thing about that experience was that walking up and down the docks, one could sample the bread from different bakers the way we walk up and down the aisles at Roots and take little tastes here and there from vendors who truly love what they do and the product they represent, which really represents them. We all have favorite vendors at Roots and Central Market and Eastern Market and Millersville Farm Market, and all the others (not forgetting you, Alison Bryan!). The one thing they all have in common is that they try to stay true to their product, because their success and their reputation depends on quality product courteously presented. I’ve found that the vendors at these markets are fine representatives of our wonderful Lancaster way of life. And I appreciate it all the more because of my time in San Francisco, where the bread is the memory I carry with me every time I think about that time in my life.
Here, then is my favorite take on San Francisco sourdough bread. The thing that makes it what it is is that first, you make a starter. This starter is a piece of sour dough that gets added to the bread dough during the process, and then a piece of the new bread dough is separated and stored, to be used in the next loaf. In San Francisco, starters are generations old, always added to the new bread, then kept again for next time, thus keeping the original starter alive. Over time, it gets better and better, and divorces have been known to have the cup of starter be the single bone of custodial contention.
Make a starter. Make a bread. Keep your starter. Make some more bread. Share the secret. Share the love. And don’t forget the butter!
Sourdough Starter
Ingredients:
2 cups all-purpose flour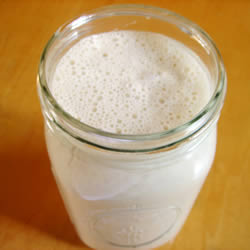
2 cups warm water
1 (.25-oz) package active dry yeast
Preparation:
- In large non-metallic bowl, mix together dry yeast, 2 cups warm water, and 2 cups all purpose flour and cover loosely.
- Leave in a warm place to ferment, 4 to 8 days. Depending on temperature and humidity of kitchen, times may vary. Place on cookie sheet in case of overflow. Check on occasionally.
- When mixture is bubbly and has a pleasant sour smell, it is ready to use. If mixture has a pink, orange, or any other strange color tinge to it, THROW IT OUT! and start over. Keep it in the refrigerator, covered until ready to bake.
- When you use starter to bake, always replace with equal amounts of a flour and water mixture with a pinch of sugar. So, if you remove 1 cup starter, replace with 1 cup water and 1 cup flour. Mix well and leave out on the counter until bubbly again, then refrigerate. If a clear to light brown liquid has accumulated on top, don’t worry, this is an alcohol base liquid that occurs with fermentation. Just stir this back into the starter, the alcohol bakes off and that wonderful sourdough flavor remains! Sourdough starters improve with age, they used to be passed down generation to generation!
Authentic Sourdough Bread
Ingredients: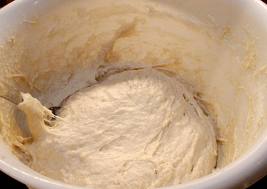
4 3/4 cups all-purpose flour
3 tablespoons white sugar
2 1/2 teaspoons kosher salt
1 (.25-oz) package active dry yeast
1 cup warm milk
2 tablespoons butter, softened
1 1/2 cups sourdough starter
1 large egg
1 tablespoon water
1/4 cup finely chopped onion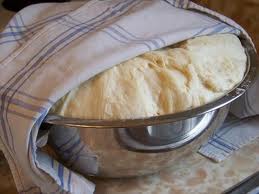
Preparation:
- In a large bowl, combine 1 cup flour, sugar, salt, and dry yeast. Add milk and softened butter or margarine. Stir in starter. Mix in up to 3 3/4 cups flour gradually, you may need more depending on your climate.
- Turn dough out onto a floured surface, and knead for 8 to 10 minutes. Place in a greased bowl, turn once to oil surface, and cover. Allow to rise for 1 hour, or until doubled in volume.
- Punch down, and let rest 15 minutes. Shape into loaves. Place on a greased baking pan. Allow to rise for 1 hour, or until doubled.
- Brush egg wash over tops of loaves, and sprinkle with chopped onion.
- Bake at 375 degrees F (190 degrees C) for 30 minutes, or till done.
Then refresh your starter by following direction number 4 above, using 1.5 cups water and all-purpose flour and a pinch of sugar.
Key Lime Pie with Gluten-Free Crust
I’m placing this recipe on the blog for the second time for an extremely good reason. It was requested again, and what was requested this time was a gluten-free crust recipe. So, being Chefzilla, I decided to give you two, which will follow, after the original recipe. This is the best dessert on the planet (chocolate included). It is the recipe used by a famous restaurant in South Beach, which is famous for its Key Lime Pie. I made those pies for them for many years, so I know 1) that it’s good; and 2) that this is the right recipe; even their web site gives you a different recipe, because they don’t want you to have the real one.
So, try this recipe, and if you need to make a gluten-free crust, use one of the two that follow, whichever one appeals to you. They’re different, but both terrific.
Chefzilla’s Key Lime Pie
Crust:
3/4 cup of Grahm cracker crumbs
3/4 cup toasted pecans chopped fine
1/4 cup light brown sugar
1 stick of melted butter (use margarine and I’ll take this recipe back!).
Filling:
5 room temperature egg yolks
2-14 oz. cans sweetened condensed milk. I use fat-free, and my family can’t tell the difference.
1/2 cup FRESH SQUEEZED lemon juice
1/2 cup FRESH SQUEEZED lime juice
grated zest of 1 lime
1. Preheat oven to 350 degrees.
2. For the crust, combine the cracker crumbs, chopped nuts and butter in a 9-inch straight sided pie plate. Pat firmly and shape the crust a half-inch up the sides of the pie plate.
3. Bake for 15 minutes or until the crust begins to brown on the edges of the sides. Allow to cool to room temperature.
4. Combine all the filling ingredients until they are well mixed. Pour into the crust.
5. Bake the pie for 15 minutes. Remove from oven and cool to room temperature.
6. Cover with plastic wrap, patting down so that the wrap is in contact with the pie surface, and freeze the pie for at least six hours, and preferably overnight.
7. Remove the pie from the freezer 1 half hour before serving. NO MORE!!!!!
8. Serve with a big dollop of fresh-made whipped cream. DO NOT USE READY WHIP OR MERENGUE. PLEASE!!
9. Serve to someone who will repay you handsomely for the most incredible treat you have ever prepared. They will respond, “Damn, this is the best key lime pie I ever ate. It’s better than any I ever got in a restaurant.
Gluten-Free Pie Crust #1
Ingredients:
¾ cup Pamela’s Pecan Shortbread cookies, crushed
¾ cup pecans, toasted and chopped fine
1 stick butter, softened
Preparation:
Mix the crushed cookies and chopped pecans with the butter until the whole mess sticks together and can be pressed flat into a 9″ pie pan or springform pan, with the crust coming up the sides about a half inch. Preheat oven to 325 and bake this crust only for about 5 to 10 minutes, until it just begins to turn brown; then remove from the oven and cool. Pour in the filling and finish the pie as directed above.
Gluten-Free Pie Crust # 2
Ingredients:
1 cup crushed Pamela’s Lemon Shortbread cookies, crushed
2 tablespoons light brown sugar
½ cup sweetened shredded coconut
1 stick butter, softened.
Preparation:
Process the cookies and brown sugar until they are fine crumbs. Sprinkle the coconut evenly over the crumbs and pour in the melted butter. Pulse a few times until blended. Turn the crumb into a 9-inch pie pan or springform pan and press flat and up the sides about a half inch. Bake 5-10 minutes until lightly browned. Remove from the oven and allow to cool completely. Pour in the pie filling and complete the pie as directed above.
YUM!!!
