Monthly Archives: April 2019
Oven- Prepared Kansas City Barbecue Ribs
Kansas City Style Ribs are typically characterized by the thick, sticky sauce brushed on in the last 30 minutes of cooking. The dry rub and sauce are on the sweet side using a brown sugar base, but are balanced with chili powder and pepper, producing some truly finger licking good ribs.
Included are step by step directions to make the KC-style dry rub, an authentic KC-style BBQ sauce, and how to make these killer ribs in the oven, baked first, then broiled to finish.
Use only baby back ribs, and be sure to ask your butcher to remove the membrane from the back of the rack, and trim the pork ribs of any excess fat.
With a 2/1 ratio of brown sugar to paprika and the usual dry rub spices like garlic and onion powders, salt and pepper, chili and cayenne pepper, this is a great balance of sweet and savory with a slight kick. Use less cayenne if heat is not your thing. Bump up the heat if you like, too.
After the dry rub the baby backs are wrapped in aluminum foil and refrigerated to marinate for a minimum of 2 hours, but overnight is better.
If the grill or smoker isn’t an option, you can still get that smoky Kansas City flavor by adding a little liquid smoke seasoning, available at most grocery stores.
Preheat oven to 300°F. Place the ribs, bone side down, on top of a wire rack set in an aluminum foil lined baking tray and bake for 2-1/2 hours. Halfway through, cover ribs with aluminum foil to protect them from drying out. They will be done when a kitchen fork inserted into the meat between the middle two bones slides out easily without lifting the rack at all.
In the last hour, baste the top of each rack with the reserved marinade or BBQ sauce every 15 minutes. At this point they should be tender enough to pull apart with your fingers. Then remove the foil cover and set the ribs under a broiler set to low and broil just until the sauce begins to blacken (be careful here not to let the sauce burn. It can happen very quickly at this point. The ribs should have an internal temperature of 145°F. Allow to rest, covered loosely with a foil tent, for 5-10 minutes prior to cutting.
Ingredients:
2 racks baby back ribs
DRY RUB
- 1/2 cup brown sugar
- 1/4 cup paprika
- 1 tbsp black pepper
- 1 tbsp kosher salt
- 1 tbsp garlic powder
- 1 tbsp onion powder
- 1 tbsp chili powder
- 1 tsp to 1 tbsp cayenne pepper
- 1 tsp Liquid Smoke
Preparation:
-
Whisk together the Kansas City Style Dry Rub spices together and set aside.
-
Remove the membrane from the back of the rack, and trim the pork ribs of any excess fat. Rub each rack liberally with the rub on both sides. Wrap ribs in foil or large container and refrigerate over night (optional, minimum 2 hours).
-
Remove the ribs from the fridge and allow to come to room temperature.
-
In advance, make the Kansas City Style barbecue sauce recipe (see bottom of this post) and set aside (or use your favorite).
-
Preheat oven to 325°F.
-
Place the ribs, bone side down, on top of a wire rack set in an aluminum foil lined baking tray and bake for 2 1/2 to 3 hours for spare ribs or 1 1/2 to 2 hours for baby back ribs. Halfway through, cover ribs with aluminum foil to protect them from drying out.
-
In the last 1/2 hour of baking, baste the top of each rack with the barbecue sauce, re-cover with foil, and finish cooking. At this point they should be tender enough to pull apart with your fingers. You want the ribs to have an internal temperature of 145°F. Allow to rest 5-10 minutes prior to cutting.
Ingredients:
2 tbsp butter
1 small onion diced
3 garlic cloves minced
1/2 tsp kosher salt
2 cups ketchup
1/3 cup dark molasses
1/3 cup brown sugar
1/3 cup apple cider vinegar
2 tbsp yellow mustard
2 tbsp chili powder
2 tsp black pepper
1/2 tsp cayenne pepper
Preparation:
-
In a medium saucepan over medium heat melt butter. Add onion and cook until softened, about 5 minutes. Add garlic and cook for another minute.
-
Add ketchup, molasses, brown sugar, vinegar, mustard, chili powder, black and cayenne peppers and whisk to combine.
-
Bring to a boil, reduce heat to low and simmer until thickened, about 30 minutes, stirring frequently.
-
Use a hand blender or carefully pour into a blender and purée until smooth. Let cool to room temperature. Use immediately or transfer to a clean jar with lid and keep refrigerated for up to a month.
Cauliflower Fried Rice. Incredible. Vegan. Gluten free. Healthy. Who could ask for anything more?i
Speaking of cauliflower…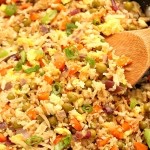
Were we? Of course we were. That vegetable Americans love to hate.
I can’t get over how many ways I’ve found to use this wonderful vegetable the rest of the world understands. So flavorful. So simple to use. So misunderstood.
I’m out to demystify this white (usually) head of tasty goodness. This time with an Asian twist.
Cauliflower fried rice. My wonderful partner served it up the other night with an “empty-the-veggie-bin” stir fry, and to speak the real truth, I liked it better than rice.
You will too.
Cauliflower Fried Rice
- 1 medium head cauliflower, all green parts removed (2 1/2 cups cauliflower rice)
- 2 tablespoons toasted dark sesame-seed oil
- 1/2 medium onion, chopped medium
- 1 large carrot, cubed
- 2 garlic cloves, minced fine
- 1 cup frozen edamame
- 3/4 cup frozen peas
- 2 eggs, lightly beaten
- 4 tablespoons light soy sauce
- 6 green onions, minced
Preparation:
- Shred the cauliflower with the large holes of a box grater or pulse in a food processor until the pieces resemble rice grains
- Heat 1tablespoon sesame oil in a wok or large skillet over medium-low heat. Add the onion, garlic, and carrot and stir fry until fragrant, about 5 minutes. Add the cauliflower, edamame, peas, and remaining sesame oil to the pan; stir fry quickly to cook the cauliflower to a soft (but not mushy) texture.
- Make a well in the middle, turn the heat down, and add he eggs. Stir gently and continuously until the eggs are fully cooked. Add the soy sauce and green onions, turn off the heat, toss to mix and serve immediately alone or with your favorite stir fry.
Note: for the last add of soy sauce, you could make a mixture of 1 tablespoon each soy sauce, sesame oil, honey, and oyster sauce for a slightly different, and most interesting flavor.
Roasted Curry and Cumin Cauliflower
Cauliflower. The very mention of the word sends children running screaming into the night, right? To which I respond, “Good! More for me.” Inspired by the most wonderful small Indian restaurant in our town–that would be The Himalayan Curry and Grill on East Orange Street–and at the request of my sweetheart, who craves vegetables almost as much as I crave her, I found a most tasty, zesty, and bursting-with-flavor and aroma cauliflower recipe (truth be told, she found it, not I).
But with a tiny bit of skill and knowledge I managed to make it even better that what it looked like on paper, and even more healthy.
Cauliflower is one of those vegetables that you either love or hate–there doesn’t stem to be many take-it-or-leave-it opinions–so I decided to make it so deeply savory that even the doubters would not find it objectionable. It’s about the curry, actually, and of course there’s no shortage of opinions about curry, but that’s a discussion for another time.
So…curried cauliflower. It’s a good marriage. As a soup it’s unparalleled. As a roasted vegetable, even better. So let’s get to it…
Roasted Curry and Cumin Cauliflower
Ingredients:
- 6 heaping cups cauliflower florets from 1-1/2 pound cauliflower cut into 1-inch florets
- 3 garlic cloves smashed
- 2 tablespoons extra-virgin olive oil
- 1 tsp turmeric
- 1 tsp ground cumin
- 1/2 teaspoon sweet curry
- 1/4 teaspoon finely ground white pepper
- Kosher salt to taste
- 1/4 teaspoon crushed red pepper flakes
- 2 tbsp chopped fresh cilantro for garnish
Preparation:
