Category Archives: Bread
Meyer Lemon Marmalade
E posted a photo on her Pinterest page suggesting that Meyer lemon marmalade  is one of her favorite things, even as she spread a wonderful Trader Joe’s rendition of orange marmalade on her rosemary-olive-oil bread from Thom’s. Given that whatever E thinks is a “favorite thing” ought to be made a reality, I decided to make a batch of the jelled gold for her. Not a marmalade fan myself, I needed to learn how marmalade is made, and I discovered how simple it is.
So off to market I go, ISO ripe Meyer lemons. The good news is that I knew just where to find them–at John and Ethel Stoner’s little stand in the middle of our local jewel, the Lancaster Central Market.
The Meyer lemon, in case you’re not familiar with it, is rounder than a true lemon. The skin is fragrant and thin, colored a deep yellow with a slight orange tint when ripe. Meyer lemons have a sweeter, less acidic flavor than the more common supermarket lemon varieties. The Meyer lemon is commonly grown in China in garden pots as an ornamental tree. It became popular as a food item in the United States after being rediscovered by chefs such as Alice Waters at Chez Panisse in San Francisco at the end of the 1990s, and even more so when Martha Stewart began featuring them in her recipes.
Citrus marmalades are basically reductions of the fruit, water, and sugar, cooked slowly until the sugars begin to caramelize. Orange marmalade has been a staple of British and American breakfasts for generations, certainly around here. So the idea of Meyer lemon marmalade seemed like such a natural for us, given E’s sudden “pinterest” in the stuff and my constant desire to please her with surprising cooking choices.
Ergo Meyer lemon marmalade. Sweet, tart, and tasty, it’s wonderful on English muffins and any good artisan bread you can imagine.
Here’s my take:
Meyer Lemon Marmalade
Ingredients:
6 Meyer lemons (about 1 1/2 pounds)
4 cups water
4 cups sugar
Preparation:
Quarter the lemons and separate the seeds (save the seeds!). Remove the ends and slice the lemons as thinly as possible, and reslice any larger bits of lemon rind to small pieces. Place all the lemon seeds in a cheesecloth bag and tie off the ends. Combine the lemon slices, the seed bag, and water in a large non-reactive pot, stir to mix well, cover and allow to stand at room temperature for 24 hours. (I used an enamel-coated cast-iron pot–Le Creuset–but you could also use a stainless-steel pot. I actually have a favorite stainless-steel pot I will use in the future, a $15.00 gem from Ikea. It holds five quarts, and has quart- and liter- markings etched ON THE INSIDE OF THE POT: BRILLIANT! This feature will work you your amazing advantage for this recipe, as you will see).
After the lemons have rested in the water for 24 hours, remove the seed bag and bring the mixture to a boil, reduce the heat and simmer slowly until the mixture is reduced to 4 cups (or 1 quart! See why the inside-the-pot etchings on the Ikea pot are so terrific for this recipe?). Add the sugar to the lemons, stir well to dissolve the sugar, and boil over moderate heat, stirring occasionally and skimming off any foam that develops, for 15-20 minutes, until a teaspoonful of the marmalade dropped on a cold plate gels (you can skip this test if you wish, it really works).
In the meantime, prepare six 1/2-pint jars for canning: wash and rinse the jars, lids, and rings, set them in a large pot of water and bring to a boil; allow the jars to simmer at a slow boil for 30 minutes, then turn the fire off under the pot.
When the marmalade is ready, ladle hot marmalade into the hot jars to within 1/4 inch of the rim, wipe the rim of the jar with a damp towel, and seal the jars with the hot lids and rings. Set the jars back into the hot water, bring to a boil, cover the pot and boil the jars for ten minutes, then turn off the heat, remove the cover, and allow to rest in the hot water five minutes more. Using jar tongs, transfer the jars to a wire rack and allow the marmalade to cool completely, then rest unmoved for twenty-four hours. Check to ensure that the lids have popped inward and the jars have sealed. If any jars haven’t popped, refrigerate them and use immediately. The sealed jars will keep in a cool, dark place for 1 year.
Next batch I’ll make will include 1 teaspoon of finely chopped fresh rosemary.
Just sayin’.
Bacon-Maple Slow-Cooker Baked Beans
Got a hankering for baked beans.
Sure, it’s cute watching Jay Bush and his golden retriever Duke, who seems to be on a mission to sell the secret recipe, like any capitalist dog would be. Makes you want some beans. Or a golden retriever. Makes me want neither. Bush’s Beans are probably a perfectly fine product, but I’ve always been a B&M kind of guy, and I’m not particularly fond of dogs, although I’ve grown to love my wild and crazy German shorthaired pointers, Argos and Maggie (Argos, I should point out, has no interest in selling any of my recipes; he has a one-track agenda, which is to eat everything I cook. Maggie, on the other hand, would sell my recipes in a heartbeat if she thought she could turn a profit; she’s probably the most dedicated capitalist in the family).
But I digress (I hate when I do that).
I was reading someplace recently that some kid’s favorite food was baked-bean sandwiches–homemade baked beans on fresh homemade bread–and I got to thinking about that. Could that be nature’s perfect food? The writer was recounting how such sandwiches ignited his love of all things food and how they inspired him to become a chef. It started, he says, because he couldn’t find a pile of baked beans anywhere near as good as the scratch batches his grandmother made for him. I can relate. I was raised on the cooking of a wonderful woman who came from the Piedmont of Virginia, where home-grown pork and chickens and corn and cabbages and greens were on the table every day. She made her baked beans (and everything else) from scratch, and the tale of baked-bean sandwiches massaged a longing in me I hadn’t felt in quite a while.
Consequently, I got a hankering for baked beans.
Lily Jones was not available to make me beans, and I’ve never really worked up a recipe of my own. So I decided to do some research, find a recipe to start with, and then make it my own. Something hearty, flavorful, bold, and memorable.
I must have read 500 recipes. What I kept coming back to was a fabulous website chock full of recipes that use beer as the principal ingredient. Beer! That’s the ticket! But not just any beer. It needed to be thick, dark, malty, nutty–hair-raising. I found a recipe that resonated, and then kept reading, comparing each next one I found to the one that sang to me, and not one measured up.
And then, I made the beans. Incredible. Salved my hankering, my wife, the remarkable Ellen, followed up with a honey-Hefeweisen boule made with a locally brewed winter wheat beer, and voila! Baked-bean sandwiches for the Gods.
Next, I had to make the recipe my own. The recipe on the website is perfect as is. But it’s not mine, alas, and I thought I could improve it. Guess what: I couldn’t. It’s perfect as is. The only thing I did change was to use turkey bacon (we don’t eat much pork around here) cooked in two teaspoons of extra-virgin olive oil; and instead of a smoky porter I used Sierra Nevada Coffee Stout.
Try this if you want perfect beans. And if you want a perfect bean sandwich, make the bread, too. It’s almost as simple to make as the beans–no kneading, just rest and love.
Slow Cooker Maple Bacon Beer Baked Beans
Ingredients:
- ½ pound Great Northern beans
- ½ lbs Navy beans
- 4 strips thick cut bacon (I used turkey bacon)
- 1 large sweet onion, chopped
- 3 tablespoons full-flavor molasses
- ¼ cup real maple syrup
- 2 cups smoked porter beer (I used Sierra Nevada Coffee Stout)
- 2 cups water
- 1 teaspoon smoked paprika
- 1 tablespoon liquid smoke
- 1 teaspoon granulated garlic
- 3 tablespoon balsamic vinegar
- 2 teaspoon Worcestershire sauce
- 1 teaspoon kosher salt
- 1 teaspoon fine ground white pepper
- 1/2 teaspoon freshly ground black pepper
- 1 teaspoon dry mustard
Preparation:
- Place the beans in a large pot with 3 cups of water. Cover and bring the pot to a boil, and cook for 3 minutes. Remove from the heat and soak for 8-12 hours; overnight is good. Rinse with cold water and drain.
- Cook the bacon in a skillet over medium high heat, remove bacon from pan. Add the onions to the bacon grease, cook until soft, about 5 minutes. Chop the bacon.
- Add the bacon, onions, drained beans and remaining ingredients to a slow cooker. Cook for 8 hours on low, stirring once or twice during cooking. If beans are still firm after 8-10 hours, turn to high and cook for an additional 2 hours.
And now the bread:
Honey Hefeweizen Boule Loaf
Ingredients:
- 4 ¼ (19 wt oz) cups all-purpose flour
- 1 package (2 ¼ tsp) rapid rise yeast
- ¼ cup honey
- pinch salt
- 12 ounces wheat beer*
- egg wash (1 egg, 1 teaspoon water, beaten)
Preparation:
- In the bowl of a stand mixer fitted with a dough hook add the flour and yeast, mix to combine.
- Heat the beer to between 120 and 130F degrees.
- Add the beer and the honey to the flour, beat on high until dough gathers around the hook and is no longer sticky, about 6 minutes.
- Transfer the dough to a lightly oiled bowl, cover and allow to rise in a warm place until doubled in size, about 1 hour.
- Place a baking stone in the oven, preheat for 30 minutes prior to baking.
- Once the dough has risen, place a bread peel (or a sheet of parchment paper) on a flat surface, cover in cornmeal or semolina flour. Grab the dough in your heads, folding it into itself gently a few times, then form into a tight ball. Place on the peel (or parchment paper), allowing to rise for about 30 minutes.
- Brush the top with egg wash, slash an “X” on top of the loaf using a sharp knife.
- Transfer the dough to the pizza stone using either the peel or by simply placing the parchment paper on top of the heated stone (if you don’t own a bread stone, just place the parchment on top of a baking sheet and set that into the oven when you are ready to bake).
- Bake at 400 until top is a dark golden brown and makes a hollow “thump” sound when tapped, about 30 minutes.
- Allow to cool slightly before slicing.
Notes
*This recipe is for a very low IBU (low hop) beer. If all you have is a pale ale, IPA or hoppy wheat, use 3/4 cup beer and 3/4 cup hot water or the beer taste will be overpowering.
And to Jackie Dodd, “The Beeroness,” I offer a toast: Jackie (wwwthebeeroness.com), you’ve won my heart. Or more accurately, my appetite.
Butterflied Turkey, Root Vegetable Panzanella, and Mushroom Barley Pilaf
And what, pray tell, do you think Cheffzilla might be doing for Thanksgiving this year? Really adventurous, I might say, but mighty tasty, too. Allow me to elaborate:
I adapted these recipes a few years ago from ones featured on his “Good Eats” show a couple of years ago by Alton Brown, that wacky TV chef at the Food Network. It turned out so well that it’s become my go-to turkey presentation. I’ve become a devoted advocate of the “spatchcock” method of poultry cooking, as it both cuts down on cooking times, and also allows for a wide range of possibilities in preparing companion dishes. Also, I’m a big fan of panzanella, and this recipe demonstrated to me that it’s not just a summer salad. Beautiful root vegetables, winter squash, shredded Brussels sprouts, a fine sourdough bread, and some fresh herbs from my garden (yes, it is still producing, under a big window in the garage!) make for a really fine-looking and grand holiday dinner, a wide stray from the usual turkey-and-stuffing tradition of years past. Here’s what’s for dinner:
Great any night.
A holiday feast? Priceless!
 3 1/2 tablespoons kosher salt
1 1/2 teaspoons rubbed sage
1 1/2 teaspoons dried thyme
1 1/4 teaspoons whole black peppercorns
1/2 teaspoon whole allspice berries
1 12- to 15-pound whole turkey, neck and giblets removed and reserved for Giblet Stock
Panzanella:
1 1/2 pounds parsnips, peeled and cubed into 1/2-inch pieces
1 1/2 pounds rutabaga, peeled and cubed into 1/2-inch pieces
2 tablespoons extra-virgin olive oil
1/2 pound red onion, diced into 1/2-inch pieces
8 ounces butternut squash, diced into 1/2-inch pieces
1 quart container fresh Brussels sprouts, sliced
8 ounces stale, hearty sourdough or multi-grain bread, cut into 3/4-inch cubes
2 cloves garlic, minced
1/4 cup apple cider vinegar
1/4 cup fresh thyme leaves, finely minced
Kosher salt
Freshly ground black pepper
Directions
For the turkey: Four days before service, place the salt, sage, thyme, black peppercorns, and allspice into a spice grinder and pulse until the peppercorns and allspice are coarsely ground, 5 to 6 pulses. Set aside.
Set the turkey, breast-side down, on a large cutting board with the tail closest to you. Use heavy-duty kitchen shears or a large chef’s knife to cut up one side of the backbone. Turn the bird around and cut back down the other side of the spine. Reserve the backbone for Giblet Stock. Discard any fat pockets or excess skin found inside the turkey. Turn the turkey breast-side up and use the heel of your hands to press down on both breasts, until you hear a cracking sound and the bird has flattened slightly.
Rub the seasoned salt on both sides of the turkey. Place the turkey on a parchment paper lined half sheet pan, breast-side up with legs running with the long side of the pan. Store, uncovered, in the refrigerator for 4 days.
Remove the turkey from the refrigerator and leave at room temperature for 1 hour.
For the panzanella: Place the parsnips and rutabaga in a large bowl, toss lightly to coat with the oil, and set aside.
Place one rack in the middle of the oven and a second one far enough below so the roasting pan will fit. Heat the oven to 425 degrees F.
Place the turkey directly on the olive-oil-coated middle rack of the oven with the legs perpendicular to the metal bars of the rack. Place the roasting pan with the parsnips and rutabaga on the rack below the turkey and roast both for 30 minutes.
Reduce the heat to 350 degrees F. Add the red onion to the roasting vegetables and stir to combine. Continue to roast both the vegetables and the turkey until a probe thermometer inserted into the thickest part of the breast registers 155 degrees F, an additional 40 to 50 minutes.
Remove the turkey from the oven onto a cooling rack set inside a half sheet pan and rest for 30 minutes.
Add the butternut squash, Brussels sprouts, bread cubes and garlic to the roasting vegetables, stir to combine and roast for an additional 15 minutes. Remove the vegetables from the oven and immediately transfer to a serving bowl. Pour the apple cider vinegar in the warm roasting pan, stir and scrape off any browned bits from the pan. Pour the vinegar mixture over the salad, add the thyme and toss to combine. Season with salt and pepper as desired. Serve warm or at room temperature.
Carve the turkey and serve with the panzanella.
Barley and Portabella Pilaf
Ingredients:
1/2 cup fresh sliced Portabella mushrooms
2 teaspoons olive oil
2 cup pearled barley
2-1/2 cups turkey (or vegetable) stock
2 tablespoons green onions (scallions)
1/4 tsp crushed dried rosemary
2 tablespoons grated fresh Parmesan cheese
Preparation:
Heat olive oil in a saucepan; add mushrooms and saute’ until limp. Add barley, stock, green onion, and rosemary. Bring to a boil. Reduce heat to low, cover and cook 45 minutes, or until the barley is tender and the liquid is completely absorbed. Sprinkle Parmesan cheese over pilaf and toss to mix well. Garnish with a little more Parmesan and some fresh-chopped green onions.
Serve immediately.
We’re serving this with fresh green beans sauteed in butter with sesame seeds and cranberry-orange relish.
Yum.
Authentic San Francisco-style Sourdough Bread
I had a request that I just couldn’t refuse. I lived in San Francisco–actually, Mill Valley in Marin County–across the Golden Gate Bridge to work every day…WOW!–and more than virtually anything else, I fell in love with sourdough bread. On Sundays we would ride our bikes from Mill Valley through Marin City to Sausalito, then ride the ferry to Fisherman’s Wharf and eat crab legs and sourdough bread. I think that was one of the seminal 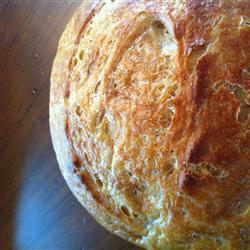 times in my life in terms of cementing my love for food. The really cool thing about that experience was that walking up and down the docks, one could sample the bread from different bakers the way we walk up and down the aisles at Roots and take little tastes here and there from vendors who truly love what they do and the product they represent, which really represents them. We all have favorite vendors at Roots and Central Market and Eastern Market and Millersville Farm Market, and all the others (not forgetting you, Alison Bryan!). The one thing they all have in common is that they try to stay true to their product, because their success and their reputation depends on quality product courteously presented. I’ve found that the vendors at these markets are fine representatives of our wonderful Lancaster way of life. And I appreciate it all the more because of my time in San Francisco, where the bread is the memory I carry with me every time I think about that time in my life.
Here, then is my favorite take on San Francisco sourdough bread. The thing that makes it what it is is that first, you make a starter. This starter is a piece of sour dough that gets added to the bread dough during the process, and then a piece of the new bread dough is separated and stored, to be used in the next loaf. In San Francisco, starters are generations old, always added to the new bread, then kept again for next time, thus keeping the original starter alive. Over time, it gets better and better, and divorces have been known to have the cup of starter be the single bone of custodial contention.
Make a starter. Make a bread. Keep your starter. Make some more bread. Share the secret. Share the love. And don’t forget the butter!
Sourdough Starter
Ingredients:
2 cups all-purpose flour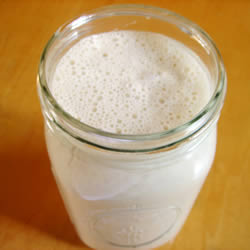
2 cups warm water
1 (.25-oz) package active dry yeast
Preparation:
- In large non-metallic bowl, mix together dry yeast, 2 cups warm water, and 2 cups all purpose flour and cover loosely.
- Leave in a warm place to ferment, 4 to 8 days. Depending on temperature and humidity of kitchen, times may vary. Place on cookie sheet in case of overflow. Check on occasionally.
- When mixture is bubbly and has a pleasant sour smell, it is ready to use. If mixture has a pink, orange, or any other strange color tinge to it, THROW IT OUT! and start over. Keep it in the refrigerator, covered until ready to bake.
- When you use starter to bake, always replace with equal amounts of a flour and water mixture with a pinch of sugar. So, if you remove 1 cup starter, replace with 1 cup water and 1 cup flour. Mix well and leave out on the counter until bubbly again, then refrigerate. If a clear to light brown liquid has accumulated on top, don’t worry, this is an alcohol base liquid that occurs with fermentation. Just stir this back into the starter, the alcohol bakes off and that wonderful sourdough flavor remains! Sourdough starters improve with age, they used to be passed down generation to generation!
Authentic Sourdough Bread
Ingredients: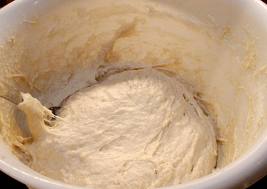
4 3/4 cups all-purpose flour
3 tablespoons white sugar
2 1/2 teaspoons kosher salt
1 (.25-oz) package active dry yeast
1 cup warm milk
2 tablespoons butter, softened
1 1/2 cups sourdough starter
1 large egg
1 tablespoon water
1/4 cup finely chopped onion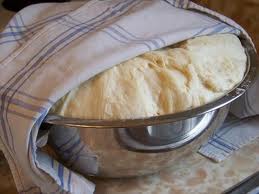
Preparation:
- In a large bowl, combine 1 cup flour, sugar, salt, and dry yeast. Add milk and softened butter or margarine. Stir in starter. Mix in up to 3 3/4 cups flour gradually, you may need more depending on your climate.
- Turn dough out onto a floured surface, and knead for 8 to 10 minutes. Place in a greased bowl, turn once to oil surface, and cover. Allow to rise for 1 hour, or until doubled in volume.
- Punch down, and let rest 15 minutes. Shape into loaves. Place on a greased baking pan. Allow to rise for 1 hour, or until doubled.
- Brush egg wash over tops of loaves, and sprinkle with chopped onion.
- Bake at 375 degrees F (190 degrees C) for 30 minutes, or till done.
Then refresh your starter by following direction number 4 above, using 1.5 cups water and all-purpose flour and a pinch of sugar.
