Monthly Archives: March 2020
Turkey Vegetable Noodle Soup with White Beans
Friday in the Quarantine Kitchen…
Okay, this one’s easy, it’s really good and hearty, and it’s made from found stuff in the fridge, freezer, or cupboards. I should point out that the base of this is a stock that I made back at Thanksgiving. On Black Friday, when the fam all headed out at 5 am to the outlets I a) slept in; and b) threw the turkey bones, and other leavings in a pot with lots of water, an onion, a celery stalk, a carrot, and some garlic. I do this every year—you should, too (I also do that with all my vegetable peelings and scraps to make a veggie stock). I simmer the stocks until four quarts of water are reduced to two, then pour the strained stock into Chinese-restaurant soup containers and freeze them. So I always have “no-sodium stock on hand when the need arises.
In this time of “Love in the Time of Corona,” E wanted to use up old stuff to make room for the restock we were about to do because of the “stay-at-home” thing. So a-hunting we did go.
She found stock in the freezer and a bag full of undetermined turkey things (they ended up being a whole thigh and some bits picked from the backbone—including the “oysters”), and asked me to do something with them, something the kids might like (have I mentioned that we currently have two college kids attending school while they are living in our “empty nest?”).
Thus, soup.
Most everything in the soup is “found;” I simply used up stuff. It’s the best way to go. Here’s what I did:
Ingredients:
2 Tablespoons garlic-infused olive oil (I make it myself–see NOTE*)
1 medium onion
2 celery hearts (leftovers from something else)
2 large carrots
1 teaspoon dried thyme (from last summer’s patio garden)
1/2 teaspoon dried dill weed (ditto)
2 Tablespoons all-purpose flour
1 bag of turkey remains (also previously discussed—about 2 cups diced)
1/2 cup elbow macaroni (the bottom of a box—too little for a normal recipe). Any noodle will do, even lasagna noodles, broken up.
1 cup white beans (left over from last week’s amazing bean/pizza casserole—March 23, two posts previous).
Preparation:
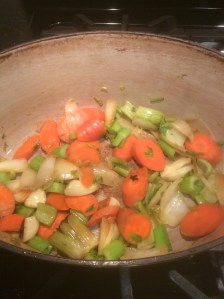
1. Heat a large soup pot over medium heat; add the olive oil to the hot pot.
2. Halve then onion, cut 1 inch from the top of the carrots, and remove 1 inch of the celery from the root end (shave off the brown end). Place them all, cut side down, in the hot oil and cook, unmoved, until they begin to brown.
3. Remove the vegetables from the pot and chop them—and the remaining carrots and celery—into bite-size pieces and return them to the pot. Cook them, stirring frequently, until they begin to soften, 7-10 minutes.
4. Add the flour to the oil in the pot and cook, stirring constantly, until it begins to brown. Add the thyme and dill and stir one more minute.
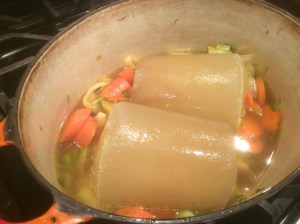
5. Add the stock (mine was still somewhat frozen), stirring until the flour is incorporated—about two minutes. Then add the turkey, cut into bite-size pieces. Cover, reduce the heat, and simmer
, stirring occasionally, for 45 minutes.
6. Bring to a rolling boil and add the noodles (I used elbow macaroni—it’s what I had in the cupboard), stirring occasionally to prevent sticking to the bottom of the pot, and cooking to the time recommended on the box.
7. Place the beans in the cup of a blender; Add 2 cups of the hot stock and blend until completely mashed up (or do it in a bowl with an immersion blender—I did). Return the bean/stock mixture to the pot and simmer 15 minutes, mixing well.
8. Serve with crusty bread.
This soup stores well in the fridge for about three days (no longer!), and gets better as it sits. And, it’s creamy, but the kids won’t know that it’s from the beans (plus, it’s a little extra protein).
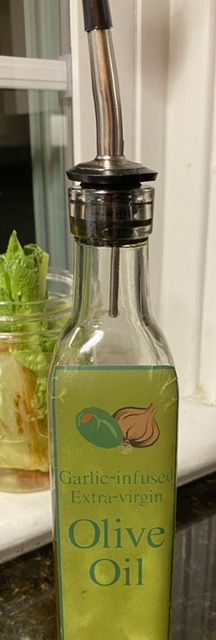
*NOTE: Garlic-infused olive oil: peel and smash the cloves from one head of garlic. Place 1 cup extra-virgin olive oil and the smashed garlic cloves in a saucepan. Cook, uncovered, over medium heat until the oil begins to bubble. Turn the heat down to a low simmer and heat for 30 minutes, turning the garlic cloves once, until they just begin to brown; don’t let them burn. If they are browning too quickly turn the heat down a bit. After 30 minutes, turn the heat off and let the oil cool for another 30 minutes. Funnel the oil through two layers of paper towel (or a coffee filter) into an opaque or dark colored glass bottle. Close the bottle with an air-tight lid. Light and air are the enemies of good olive oil.
Caramelized Red Onion and Apple Chutney
Thursday in Jeff’s Quarantine Kitchen…
In today’s episode I will compete my onion trilogy—caramelized red onion chutney. So far I’ve done a sweet-onion jam and a shallot marmalade. To complete the circuit, I think a chutney is called for, so here is the one I’ve chosen, mostly because this is what I have on hand. Chutneys like to have a fruit base—mango or peach or pear—but it’s not the season for those things, and I do have a bunch of Granny Smith apples in the fridge and lots of red onions, ergo…
I’ve been making chutney for several years now, and they’ve been met with some amount of positive feedback. Additionally, I really do like the flavor of sweet and savory condiments—oyster and hoisin sauces being among my favorites—and chutney is a wonderful extension of those culinary favorites.
This one is a simple spread, delicious on meats, fish, and cheeses, mixed into a savory crepe (I just got that idea the other day from a Facebook post), or just about anyplace where a flavorful dollop of goodness will make a sandwich taste better. The trick with this recipe—as with most things onion—is to go low and slow; be patient with the process. Burnt onions are no one’s favorite flavor.
So, caramelized red onion chutney with apples is just the ticket. Here’s how it goes:
Ingredients:
4 large red onions, quartered and thinly sliced
1 Granny Smith apple, minced
1 fresh or 2 dried red chili peppers (I used dried Thai chilies), sliced and seeded
3 tablespoons extra-virgin olive oil
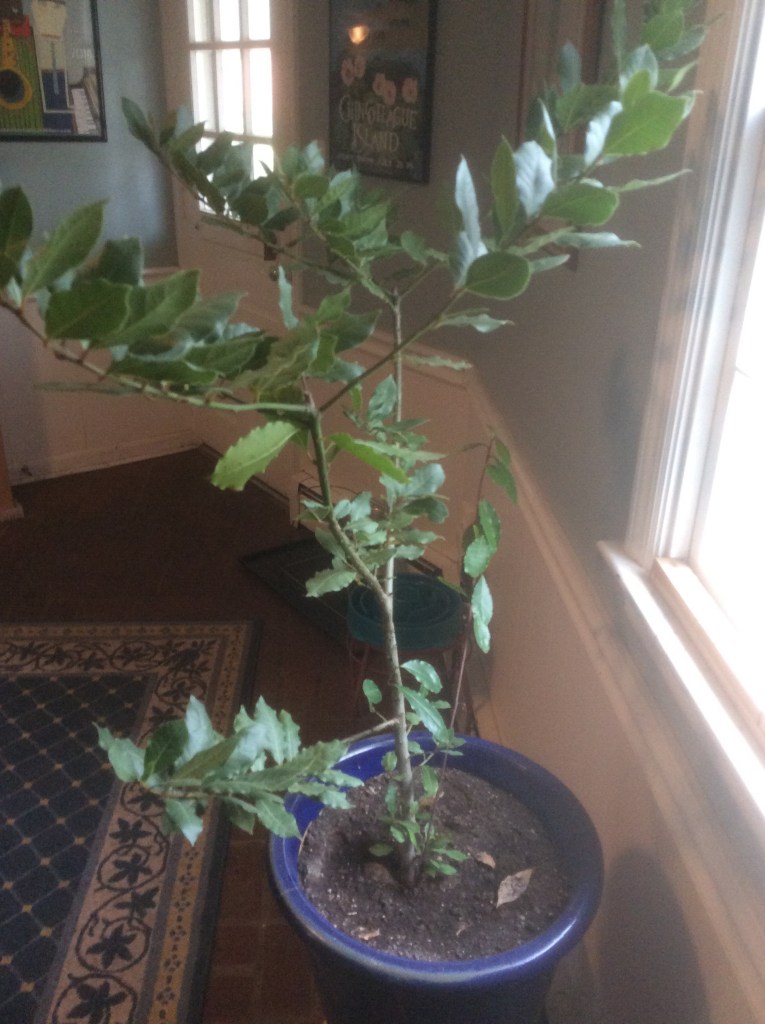
3 bay leaves (from my very own bay laurel tree) ——- >
2 sprigs fresh or 1 teaspoon dried thyme
1/2 cup balsamic vinegar
1/2 cup red wine vinegar
1/2 cup plus 2 tablespoons light brown sugar
A few turns or 1/4 teaspoon finely ground WHITE pepper
2 teaspoons mustard seeds
Preparation:
1. Slice the onions and chili peppers thinly.
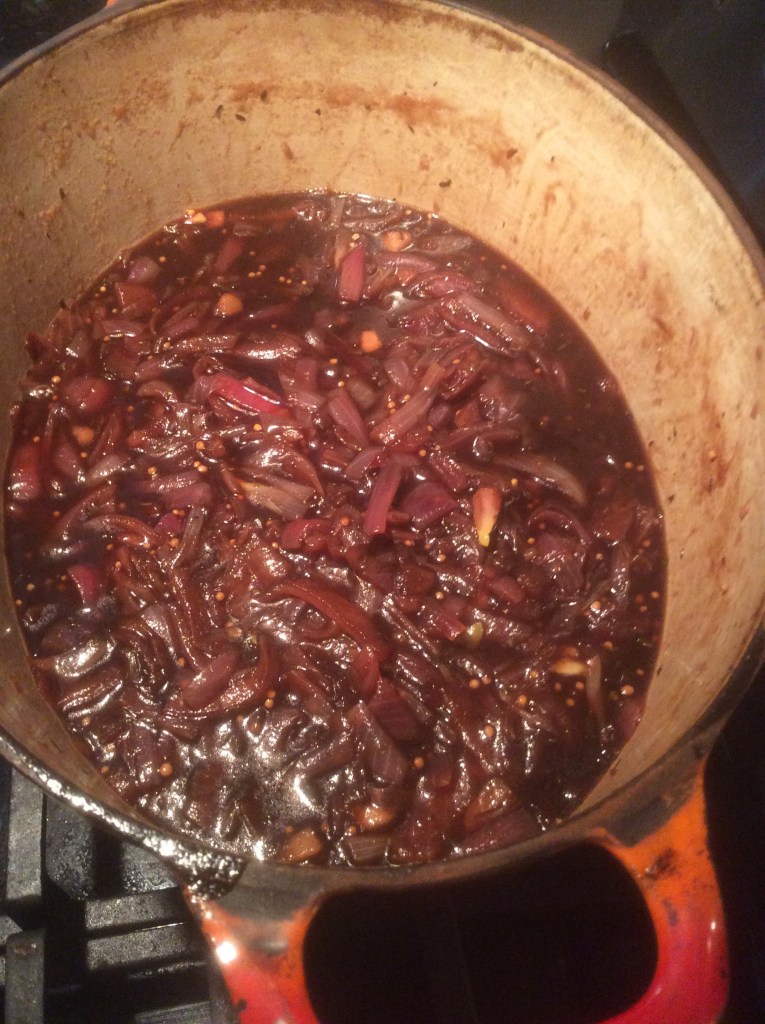
2. Place the olive oil, onions, apple, pepper slices, bay leaves and thyme in a large, heavy non-reactive pot and mix well to coat with the olive oil. Bring to a slow boil, then cover the pot, reduce the heat, and cook at low temperature for 20 minutes, stirring every five minutes to prevent the onions from sticking. Remove the lid and cook for 30 minutes more, stirring frequently—again to prevent sticking.
3. Remove the bay leaves and the thyme stalks, and add the vinegar, sugar, white pepper, and mustard seeds; stir well to mix thoroughly, reduce the heat to a low simmer, and cook, stirring occasionally, until the liquid is reduced to a thick, syrupy consistency.
4. Spoon into sterilized jars and lids, leaving a half-inch headspace, and remove the bubbles from the product. Either process in a water bath for 15 minutes or cool completely and refrigerate. If you process the jars in a water bath, after the 15-minute process time turn off the heat and allow the jars to sit in the water for five minutes undisturbed, then place on a wire rack or a towel and allow to sit undisturbed tor 24 hours. Canned chutney will keep about a year, but it won’t last that long.
You may be tempted to open and use the chutney immediately, but it will be much, MUCH better if you allow it to sit in storage for a month before opening. this allows the flavors to marry, and the product will be way better
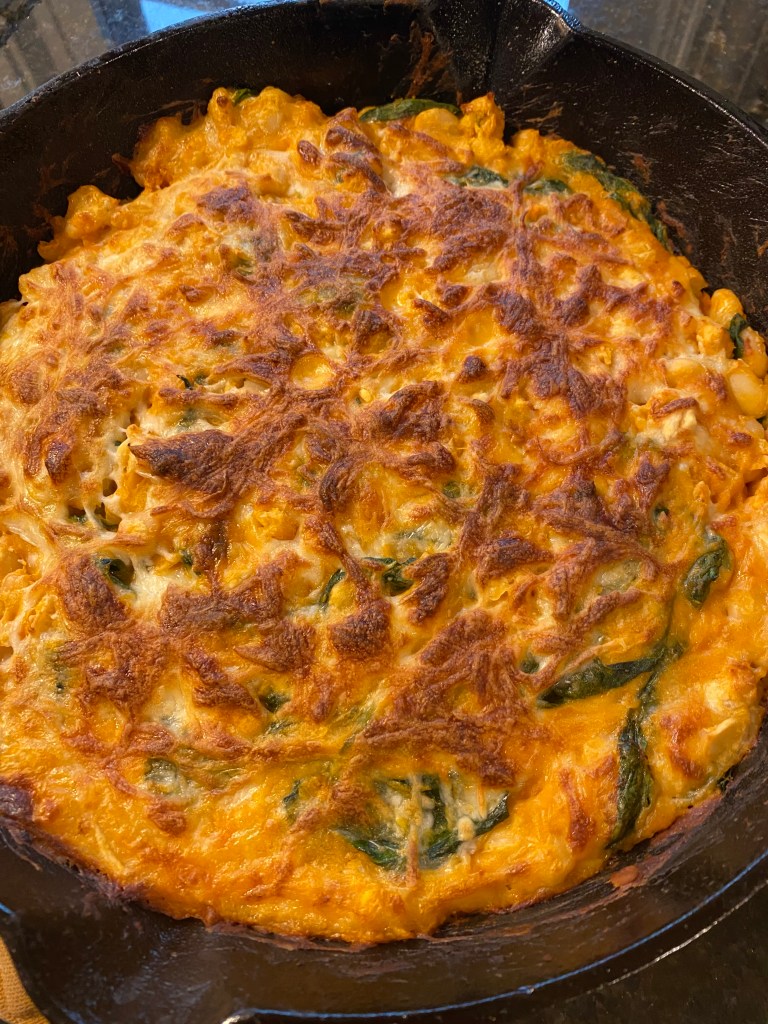
Cheesy White-Bean Pizza
Today in Jeff’s Quarantine Kitchen…
The New York Times Cooking section (@NYTCooking, recipe by Ali Slagle) calls this dish “Cheesy White-Bean Tomato Bake.” So I gotta’ tell ya’ folks, that title just doesn’t grab my attention.
Nope! Not even a little bit.
Let’s be honest here. If you saw that title on a recipe, would you be compelled to make it for your family? The same night you stumbled across it on someone’s Pinterest page? Not me.
What caught my attention was the photo, proving once again that a picture is worth…well, you know.
What it looked like in the photo was a bubbly, crispy, pebbly, yummy-looking pizza. And who can’t resist reading a recipe that is topped with a beauteous picture of a steaming-hot, bubbling mass of mozzarella? Certainly not me.
But reading further, what I discovered was that this dish looked like it might be the best-looking white-bean stew I have ever seen; it was, after all, white-bean stew that had me browsing all those Pinterest pages in the first place. But I just couldn’t find one that would suit the dreadfully picky tastes that are currently taking up residence and space in our empty nest.
But this dish looked so good in the photo that if it had been topped with pepperoni or caramelized onions and peppers, I might have been tempted to break out an actual Corona or two (see what I did there?). In fact, it looked so good that I decided right then and there that it was going to be dinner tonight; I already had the white beans soaking on the stove top and I had been, so far, uninspired.
So, cheesy white-bean pizza.
It’s not really a pizza; there isn’t a beautifully thin and crispy crust—actually, it’s more like a protein-laden, gluten-free, deep-dish thing, a pizza in name only. Rather it’s a casserole masquerading as a pizza-flavored white-bean stew. Plus, if you make it right the bottom just might get a crispy crust anyway.
And it’s delicious. You can make it simple—just the base ingredients, or add whatever toppings and fillings that suit your whimsy; I’m thinking next time I might go Tex-Mex-style, adding a can of chopped green chilies to the tomatoes or replacing the tomatoes with salsa, adding a jolt of cilantro and using Jack cheese instead of mozzarella. Just imagine the possibilities.
And try this one at home. Here’s the plan…
Ingredients:
- ¼ cup extra-virgin olive oil
- 3 fat garlic cloves, thinly sliced
- 3 tablespoons tomato paste
- 2 (15-ounce) cans white beans, drained and rinsed
- ½ cup boiling water
- Kosher salt and black pepper
- 2 cups washed baby spinach
- 1 8-ounce can crushed tomatoes
- A few fresh basil leaves
- ⅓ pound mozzarella, coarsely grated (about 1 1/3 cups)
- Very thin slices of red onion, or Caramelized onion jam for topping (see recipe from 3/17)
Preparation:
- Heat the oven to 475 degrees. In a 10-inch ovenproof (I used cast iron) skillet, heat the olive oil over medium-high heat. Fry the garlic until it’s lightly golden, about 1 minute. Stir in the tomato paste (be careful of splattering) and fry for 30 seconds, reducing the heat as needed to prevent the garlic from burning.
- Add the beans, water, tomatoes, spinach, and generous pinches of salt and pepper and stir to combine. Sprinkle the cheese evenly over the top, spread the onion jam (or thinly sliced red onions) over the cheese, then bake until the cheese has melted and browned in spots, 5 to 10 minutes. If the top is not as toasted as you’d like, run the skillet under the broiler for a minute or 2. Serve at once.
PS: and by the way, we fed the sourdough starter again this morning, with three tablespoons of flour and two tablespoons of water (dechlorinated, remember?). It’s growing. In fact, it looks like any day now it might take over the kitchen.
#FeedMe!!!
Foolproof (Even in Jeff's Kitchen) Artisan Bread
So someone on Facebook posed a request for a foolproof bread recipe.
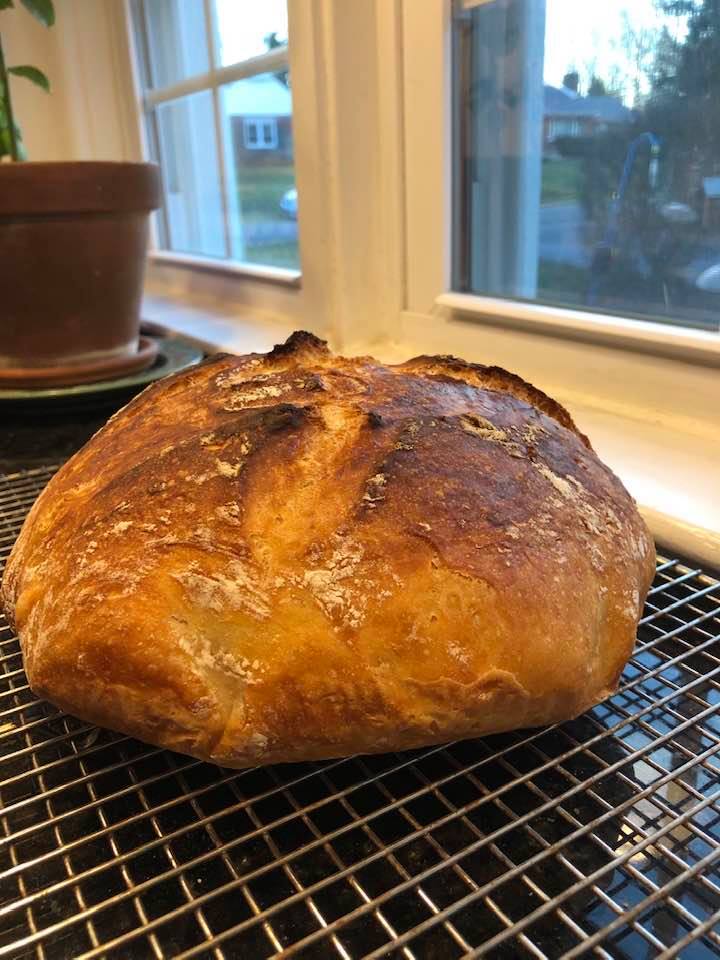
Now, I can’t take credit for this; Ellen found and made this recipe (three times so far, and another batch is in the fridge even as we speak) while I was in California a few weeks ago, and I got none of the first batch, but I did get some of the second, which included fresh rosemary and was fabulous.
I watched her make the last batch, and I can attest to A) the fact that it is delicious; and B) it’s foolproof.
The recipe comes from https://sallysbakingadiction.com. I suggest you check this site out. I should also point out, as I have recently discovered, that this recipe is fundamentally the legendary New York Times No-Knead bread, with a couple of small tweaks.
Immediately!
I won’t bore you with a long and dragged out essay for this recipe; it’s long all by itself, and I know you simply can’t wait. So here it is:
Homemade Artisan Bread in a Dutch Oven
Ingredients:
3 1/4 cups bread flour (spoon and level), plus more for hands and pan
2 teaspoons instant yeast
2 teaspoons coarse salt
1 1/2 cups cool water
Optional: cornmeal for dusting the pan
Preparation:
1. In a large ungreased bowl, whisk the flour, yeast, and salt together. pour in the cool water and gently mix together with a wooden spoon or rubber spatula. The dough may seem dry. Stick with it. Keep mixing (use your hands if you must) until all the flour is moist. The dough will be sticky. Do the best you can, and shape it into a ball. Cover tightly with plastic wrap or foil and set aside at room temperature; allow to rise 2-3 hours. It should about double in size, stick to the bowl, and be full of bubbles.
You can proceed immediately, but it is better if the dough rests in the fridge for at least 12 hours, and up to three days. We usually rest the dough overnight. After a couple of days it might begin to deflate. That’s okay.
Turn the dough out onto a lightly floured work surface, and using floured hands shale into a ball as best you can; doesn’t have to be perfect. Transfer the dough onto a large piece of parchment paper, large enough to fit into a Dutch oven using a sharp knife, score an “X” into the top of the dough, about a half inch deep. Cover the dough loosely with plastic wrap and leave it alone for about a half hour.
During the resting period, preheat your oven to 475 degrees F., with the Dutch oven and the lid inside the oven. After the 30-minute rest, takethe Dutch oven out of the oven (BE CAREFUL; IT’S VERY HOT!!). Carefully lift the paper and place it into the pot—paper and all—and cover it. Bake for 25 minutes with the lid on. Then remove the lid and continue baking 8-10 minutes longer, or until the bread is golden brown. Remove the pot from the oven and carefully remove the bread from the pot. Allow to cool on a rack for at least 30 minutes.
In reality, you shouldn’t cut into the bread until it is completely cool, but no one I know can wait that long, and besides, what’s better than warm bread slathered with butter or some fresh jam?Store loosely covered at room temperature for 4-5 days (like it might actually last that long??? or in the fridge for 10 days (Yeah, Right!!!).
If you don’t have a Dutch oven, or would rather bake the bread in loaves on a baking sheet, go to Sally’s website (link above) and follow the instructions for that variation.
The bread also freezes nicely; allow to cool completely and wrap air tight and place in a freezer container before freezing.
Sourdough. Day 2
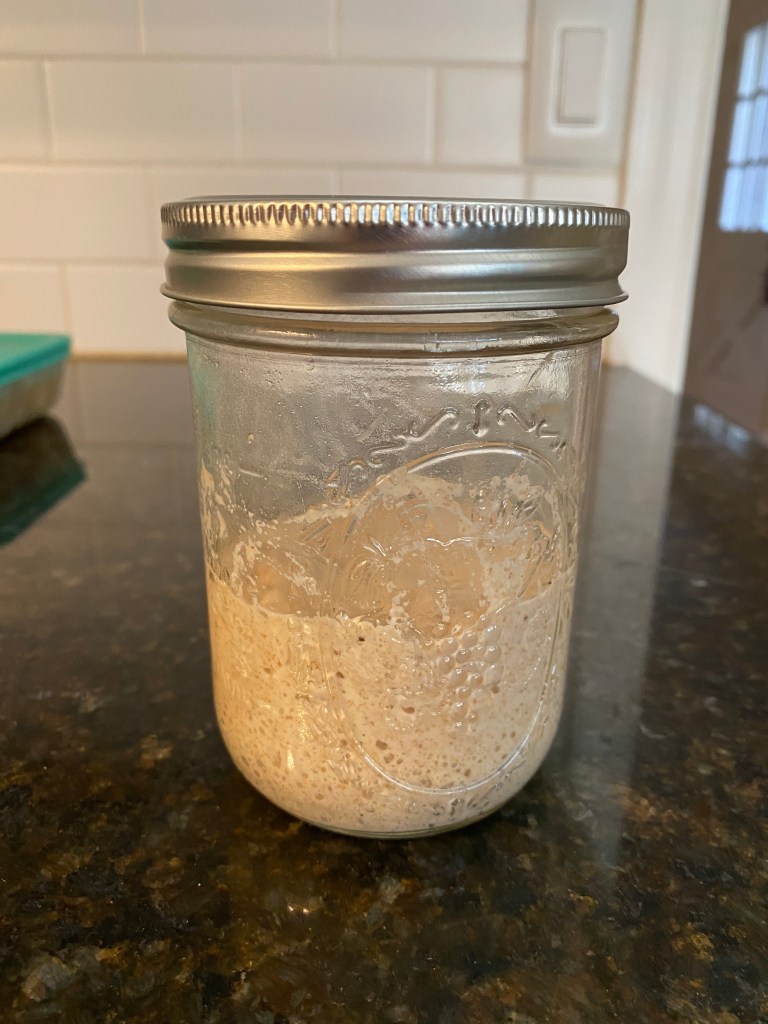
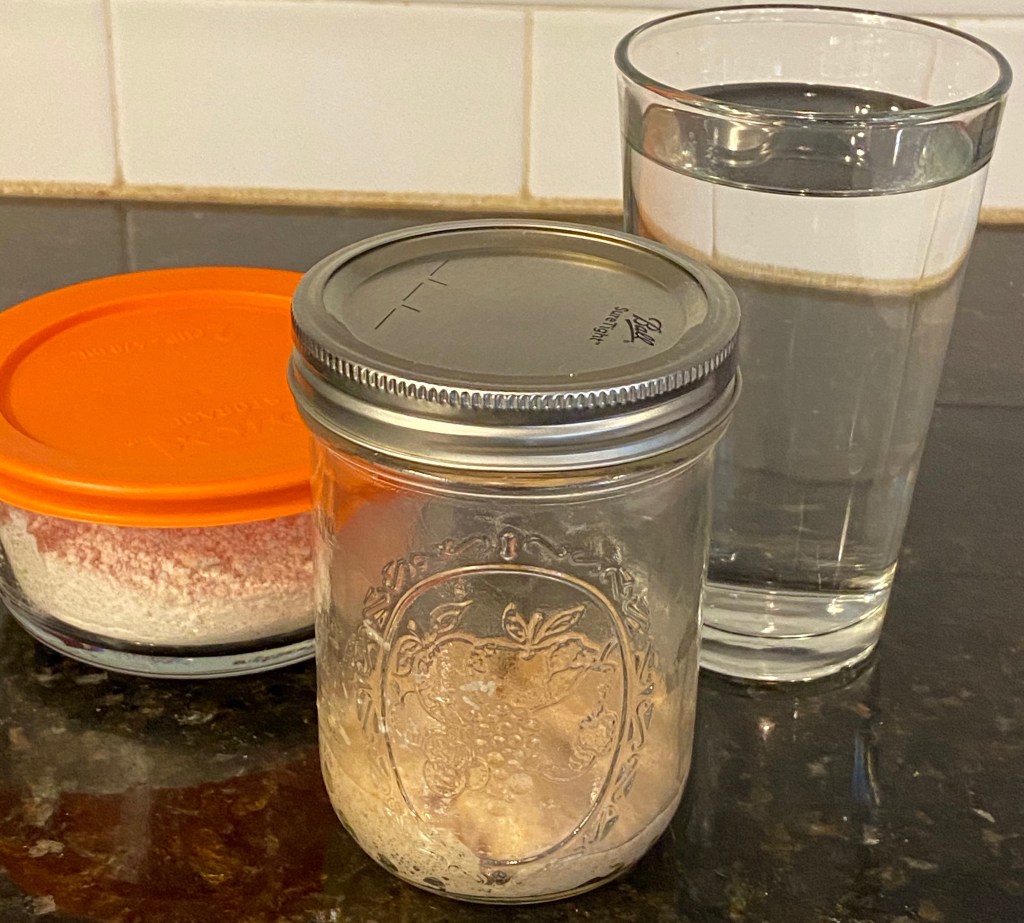
Yesterday we discussed the approach we are taking with our attempt at making a sourdough starter. As we discussed, we started with three tablespoons of a 50-50 mixture of organic bread and whole-wheat flours, two tablespoons of pineapple juice, and a pinch of active dry yeasts.
Today–and every day hereafter–we will feed the starter with three more tablespoons of flour and two tablespoons of dechlorinated water. As I mentioned yesterday, dechlorinated water is merely water that is sitting in an open container on the kitchen counter–in this case a pint-size ale glass.
I wanted to show you the video of E. doing the feeding, but because I am a technological dolt, the video won’t transfer from my phone to this computer. In the meantime, she simply added the two ingredients to the jar on the counter and mixed them well to incorporate all the flour to the mix we made yesterday.
After sitting on the counter overnight, the mixture had begun to bubble, and when opened, the jar emitted the most wonderful “yeasty” fragrance of rising bread. The brew was bubbling nicely; it was clearly working.
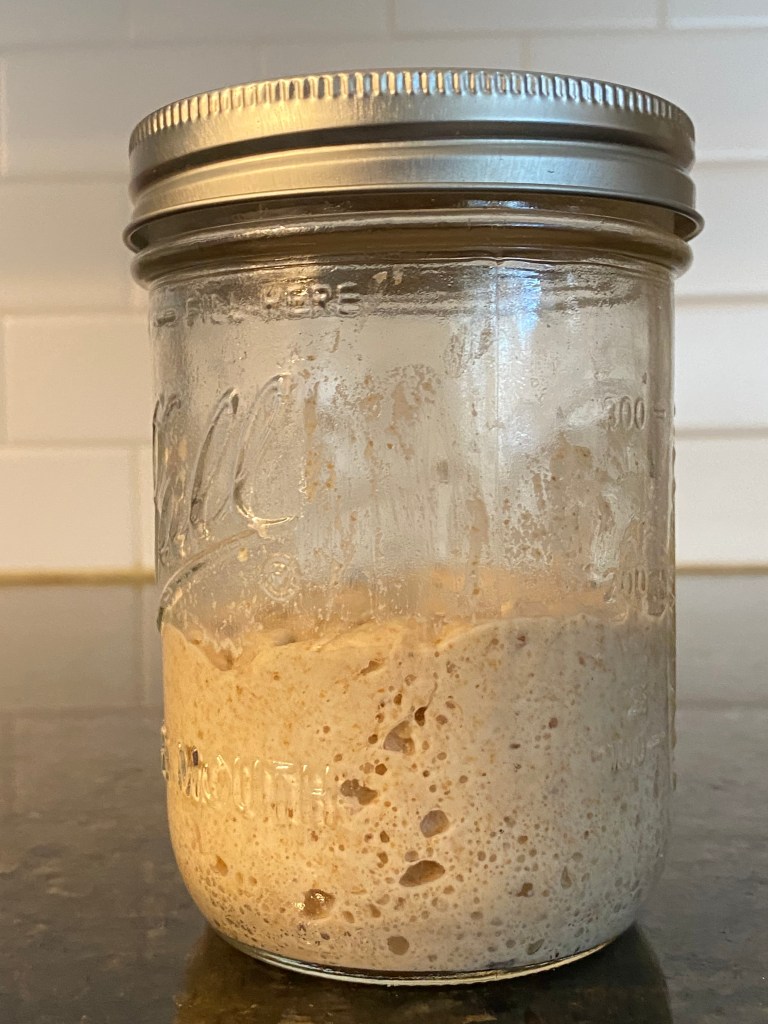
So today we fed the beast. After four hours, here’s what it now looks like: Look there: there’s bubbles and the volume has increased more than the earlier photo (by a little bit, but still…)
Tomorrow (Sunday) we’ll feed it again, and once a day the rest of the week. Hopefully by next week some time we’ll make our first sourdough bread. Can’t wait. Stay tuned.
Sourdough!
Today I’ve turned the reins of Jeff’s Quarantine Kitchen over to the boss (I surely have come to understand which side of the bread is buttered), because she is the baker extraordinaire in this confederacy of equals. When it comes to baking I am truly only the woke little sous-y (see what I did there?).
For several years we’ve entertained the notion of doing a sourdough, but because none of us REALLY need all the bread we’d have to bake to keep a sourdough starter alive and productive, and the thought of discarding food is inherently foreign to my training and my sensibility, we’ve never really considered it seriously.
Until now.
In my constant quest for the next new and different cooking challenge—the latest, greatest take on mac and cheese holds absolutely no interest for me—I stumbled across a take on a small-batch sourdough starter that seems to be both workable from a task standpoint (we surely didn’t wish to become slaves to the idea of keeping yet another creature alive) and manageable in terms of quantity (and really, could this sentence be any more complex and befuddling? I’d like to see Miss Appleby try to diagram this baby).
But I digress (I hate when I do that). Sourdough!
The guy calls himself “The Pressured Prepper,” and he has a whole YouTube channel chock full of ideas for when the SHTF (google it). I haven’t located a web site for the guy, but his videos are, to say the least, entertaining. He posits that a credible sourdough starter can be made and maintained with just a tiny bit of flour and water and no added yeast. I showed the video to E., and she was intrigued. So we’ve tried it. I did find that (and he did reference) a similar idea on the King Arthur Flour (heretofore referred to as KAF) web site, so it really must be a thing.
So here’s the scoop: The Pressured Prepper says to combine three tablespoons of flour—he suggests a mix of bread and whole wheat flours, and a bit of rye flour if you have it on hand— with two tablespoons of dechlorinated water, and mix well in a pint-size canning jar, cover and set it on the counter at room temperature (dechlorinated water is just really tap water that has sat overnight in an open container, so that the chlorine gas evaporates). The mix of flour—it doesn’t want any all-purpose flour—provides the starter additional capabilities for capturing wild yeasts that are in the air. The Prepper goes on to say that you can speed up the process by using pineapple juice instead of water, and adding just a pinch of active dry yeast.
This morning E opted for the quick-start method, and made her original starter (pictured above) using three tablespoons of a 50-50 blend of bread and whole-wheat flours, two tablespoons of pineapple juice, and that pinch of yeast (she said that it felt a bit like cheating, but wanted to give it every chance of succeeding). Now we’ll let it sit on the counter in the jar. The directions say to feed the starter three tablespoons of flour and two tablespoons of water once a day.
So that’s what we’ll do.
My plan is to try to blog something every day here in the JQK, so the likelihood is that you will get daily updates on the progress of this small-batch sourdough starter.
Here’s hoping, and we’ll see you soon. Stay well, be careful, and WASH YOUR HANDS!!!
Shallot Marmalade
Today in Jeff’s Quarantine Kitchen, 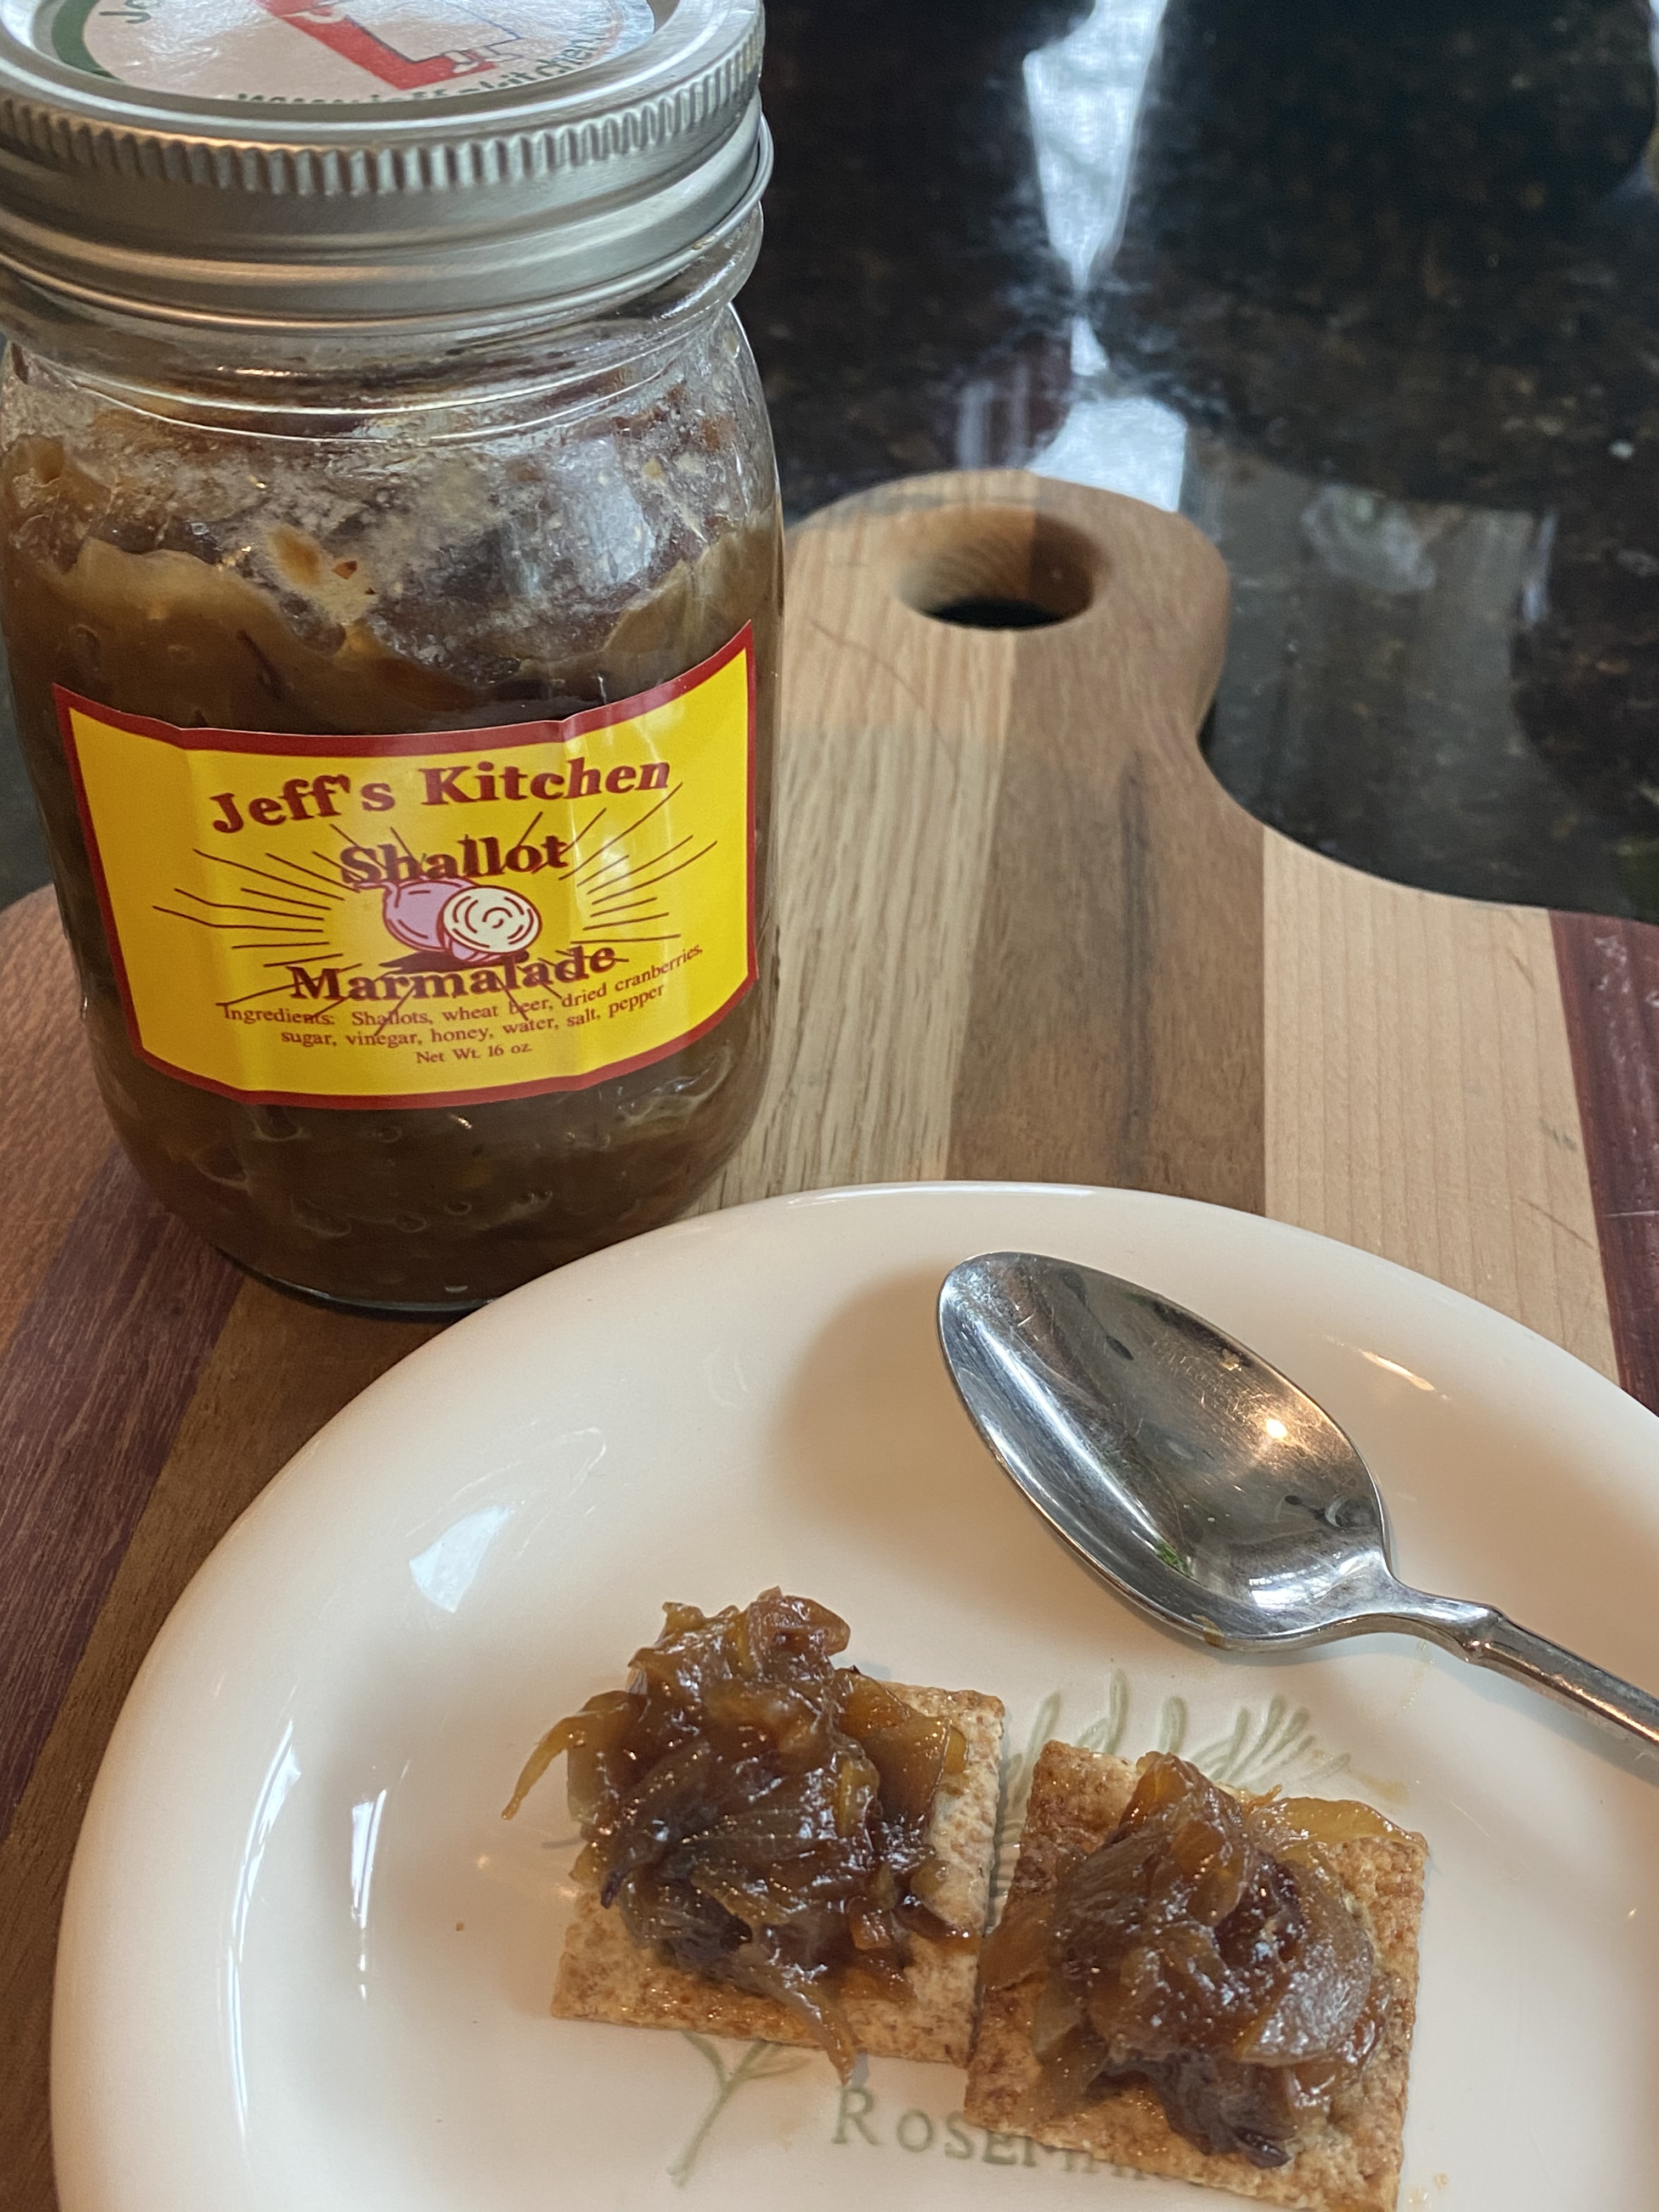 we’re cooking up an experiment…shallot marmalade. I’ve been working on different takes on marmalade for about three years now, starting when Ellen showed me a Pinterest post about Meyer Lemon marmalade; now I’m growing my own Meyer lemons. I’ve made marmalade from these lemons, Key limes, Valencia and navel oranges, blood oranges, clementines, red grapefruits, both red and Vidalia onions—have I missed anything?
I found this recipe in search of a better recipe for orange marmalade. My search took me to the web site of the Paris- and New York-based chef David Leibovitz. He has a whole section of his blog (www.davidliebovitz.com) dedicated to jams and jellies, and a lot of the recipes are just rockin’. If you’re in the hunt for good alternative takes on homemade condiments I recommend this site highly.
So…shallot marmalade: what is it good for? Try it as a condiment on burgers, grilled chicken or salmon, spread a dollop over a wedge of Brie or Camembert (wrap the whole cheese in foil and bake in a 325-degree oven for 15 minutes, unwrap and add the marmalade), or simply spooned onto a toasted baguette slice. The fact is, shallots have a wonderful flavor, and with quality ingredients, the result ought to be spectacular. We’ll see.
So what’s the roadmap for this new and interesting new product? Here it is, altered slightly (as I am wont to do) from David Liebovitz’s original recipe. The fragrance is amazing. The flavor is, too.
Almost David Liebovitz’s Shallot Marmalade
Ingredients:
1 lb. shallots, peeled and thinly sliced
2 tablespoon unflavored vegetable oil
big pinch of coarse salt
a few turns of freshly-cracked black pepper
1/2 cup Belgian White beer
1/4 cup sugar
2 tablespoons honey
3 tablespoons apple cider or balsamic vinegar
1/2 cup raisins, dried currants, or cranberries
Preparation:
1. In a medium-sized saucepan, warm the oil and saute the shallots over moderate heat with a pinch of salt and pepper, stirring frequently, until the shallots are soft and wilted, which should take about 10 minutes.
2. Add the beer, sugar, honey, vinegar, and dried cranberries (or raisins or currants), and continue cooking, stirring frequently, until the shallots begin to caramelize. While cooking, continue stirring them just enough to keep them from burning. If the mixture seems to be very dry, add a small splash of water toward the end of cooking, to encourage a little juiciness.
3. The jam is done when the shallots are nicely-caramelized to a deep, dark brown. Do not overcook; there should still be a bit of juices in the pot when it’s ready. Transfer to a jar.
Storaage: You can keep the marmalade in the refrigerator for about two months.
Caramelized Sweet Onion Jam with Balsamic Vinegar
I’m bored to tears. 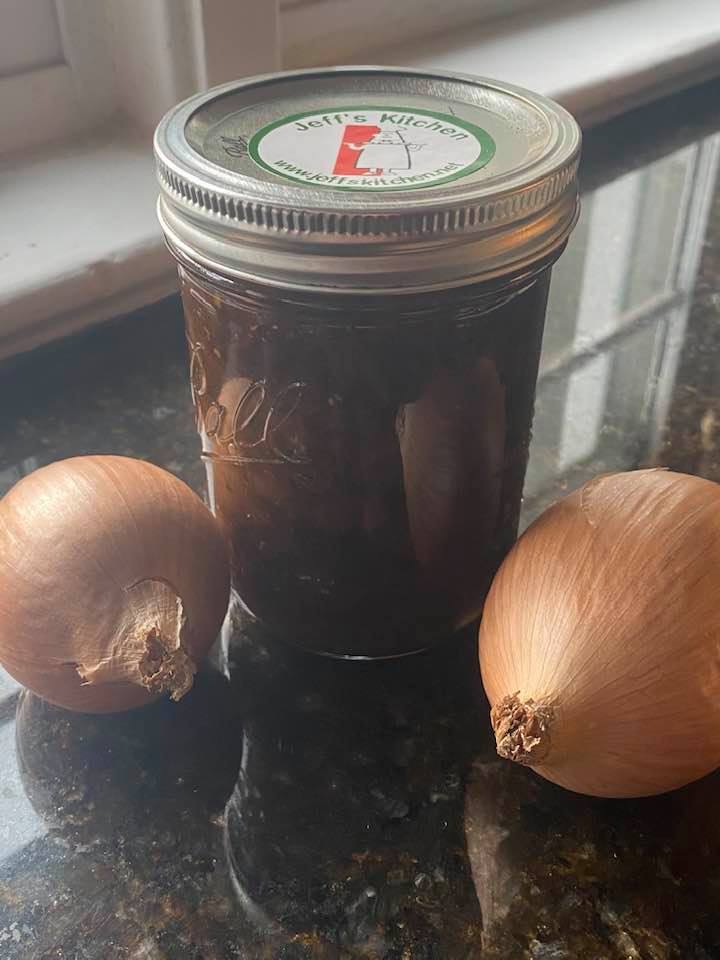 There’s only so much house cleaning and yard work person can do each day…okay, I can do more, but I’m trying to pace myself.
So what do do with all the time I have now that the schools are closed and I’m not working?
Why, cook. Naturally.
Today’s effort is a simple one, short and sweet (literally). I’ve been hankering to cook up a batch of orange marmalade, but it turns out I have a bunch of it on the shelf (along with myriad beans, tomatoes, and sauce), and the pantry is short on chutneys and savory jams. And so, caramelized sweet onion jam with a nice shot of really fine Balsamic vinegar from Seasons Lancaster and some herbs that are growing in pots on the kitchen counter, waiting patiently for the weather to change so they can get back outside.
So I made a small batch of this wonderful condiment–it goes marvelously on grilled chicken or fish, and it’s a winner on crusty bread like the stuff Ellen has been baking the last few weeks.
So let’s have a quick course on sweet onion jam–this is a really good one. Two pounds of onions made about three pints. Doubling the recipe would make a terrific batch, and fill that hole on the pantry shelf. A while back I made a batch of red onion marmalade, and it was terrific. But this stuff, as easy as it is, makes an absolute killer condiment for all your dinner choices. Try this one if you’ve got a couple of hours.
I’ll bet you do!
Ingredients:
Preparation:
1. Put olive oil and onions in a large, heavy bottomed saucepan. Cook over medium-high heat stirring only occasionally; cook until golden, about 10-15 minutes.
2. Add sugar and balsamic vinegar and cook until thickened and somewhat syrup-y. Add salt, pepper, and herbs.
3. Ladle into sterilized half pint jars, leaving about ½” headspace. Wipe rims clean and place prepared lids and rings on finger tight.
4. If you cannot test for pH, it is safest to freeze the jam at this point. Be sure to leave sufficient headspace for expansion.
5. Process in a water bath canner at a rolling boil for 15 minutes. After processing, carefully remove jars and allow to cool undisturbed for 24 hours. Check for seal and store in pantry for up to a year; refrigerate after opening.
Improvised Veggie Lasagna
I would love to say, “…back by popular demand…” But the fact is, I’ve never done this one before.
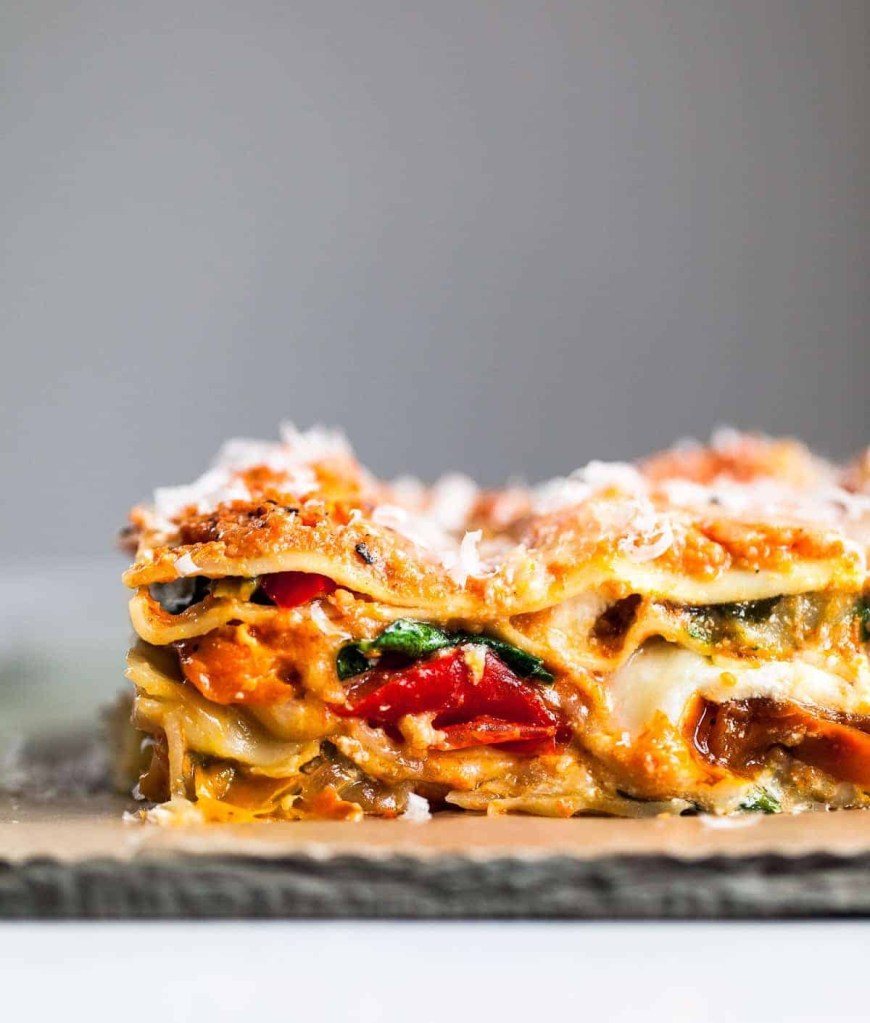
Oh, sure, lasagna is everyone’s favorite. It surely is one of mine. On the other hand, making a truly great lasagna is a whole lot of work. But, you say, “It’s worth it in the end,” don’t you? I think it is.
On the other hand, I still can’t bring myself to put all that effort into a really great dinner dish and settle for sauce from a jar. That offends me. You certainly can if you wish, but not me. If I’m going there, I will, every time, opt to make my own sauce.
It’s not that hard, really. Some herbs, lots of garlic, good tomatoes, some wine (both for the sauce and for the chef), and away we go.
This time I found myself 3000 miles from home—visiting family in LA—and was asked to make dinner for family I hadn’t seen in a few years. A chance to show off the skills. But it was in an unfamiliar kitchen, with many unfamiliar ingredients in the cupboards, so the game was on.
The challenges were interesting. One guest was vegetarian, one was Kosher, one I had never met before but who knew from the grapevine that I do have some skills. So the pressure was on.
What to make? What would satisfy all the disparate tastes. Can’t ever go wrong with lasagna. In deference to my vegetarian daughter-in-law—the one who has made an honest man of my fabulous son—veggie lasagna was on the board.
I took full advantage of the year-long bounty that is the SoCal food market. Off to Ralph’s. And then I just sort of winged it. What looked good. What didn’t.
And so, I made up a recipe, one that sounded good on paper, and gave me the opportunity to do something I hadn’t done in a while—make a good marinara. I DO make a good marinara, and it’s so easy it almost isn’t fair.
Follow along, and try this, it’s a show stopper. Oh yeah, and don’t bother boiling the noodles first. Just use them right out of the box. And you don’t need those “no-boil” noodles. They’re a scam. Regular old lasagna noodles are just fine.
The recipe looks long and involved. It’s not, if you do all the prep work at once. The only “must have” is really good tomatoes. For this recipe I used canned San Marzano tomatoes, because my home-grown, personally canned San Marzanos were 3000 miles from LA. Alas, I will be making this again soon for my family, it’s that good. Here’s the blueprint:
Improvised Veggie Lasagna
Ingredients:
For the sauce
1/4 cup extra-virgin olive oil
• 6 cloves garlic, sliced very thin
• 1 bunch Italian parsley, chopped and divided
• 1 bunch basil, chopped
• 1/2 large yellow onion, chopped
• 4 Tbsp. tomato paste
• 3 28-oz cans San Marzano tomatoes
• 1 cup Chianti, divided
• 1/2 cup Balsamic vinegar
• 3 teaspoons kosher salt
• 1 teaspoon freshly ground pepper
For the lasagna
• 9-12 sheets lasagna noodles, uncooked
• 1/2 large yellow onion, coarsely chopped
• 1 large carrot, coarsely chopped
• 1 large zucchini, half-moon sliced
• 8 ounces white or Cremini mushrooms, sliced
• 1 large eggplant, peeled and sliced
• 1 large container whole-milk ricotta
• 1 cup finely grated Parmesan, divided
• 2 cloves garlic, finely minced
• chopped parsley (see above)—two Tablespoons for the cheese and more for garnish
Preparation:
1. Heat a large pot over low-medium heat about three minutes; Add olive oil (reserving 1 Tablespoon) and garlic slices. Cook until the slices just begin to brown.
2. Add the basil and parsley, reserving 2 tablespoons, cook until completely wilted, 3-5 minutes. Add 1/2 onion and cook, stirring constantly until transparent, about 5 minutes.
3. Add the tomato paste and cook, stirring constantly, until fully browned. Add 1/2 cup wine, deglaze the pan, and continue cooking until the wine is almost fully evaporated.
4. Add the tomatoes, vinegar, the remaining wine, and salt and pepper, turn up the heat and stir well, bring to a soft boil, then reduce the heat to low, and cook, partially covered and stirring occasionally, for 45 minutes.
While the sauce is cooking…
5. Heat a 12-inch sauté pan over medium heat, and then the remaining olive oil. Add and sauté—one at a time, in this order—the carrots, onions, zucchini, and mushrooms, and cook until just soft. Remove from heat.
6. Slice the eggplant the long way into 1/4-inch slices, brush both sides with olive oil, and broil under low heat, until just beginning to brown; turn over and broil the second side. Remove from the heat and set aside with the sautéed vegetables.
7. In a large bowl, combine the cheeses (reserving 2 Tablespoons Parmesan), minced garlic, and reserved chopped parsley, and mix well.
Assemble the lasagna
8. Preheat the oven to 350 degrees F.
9. Spoon 2 cups sauce into a 9×13 glass baking dish.
10. Arrange one layer noodles on the sauce. Spoon half the sautéed vegetables over the noodles, add half the mixed cheeses, then layer half the eggplant over the cheese.
11. Spoon and spread 1 cup sauce over the eggplant, then repeat the noodle, veggie, cheese, and eggplant layers.
12. Add one more layer of noodles over the eggplant, then 2 more cups sauce, and spread completely over the noodles.
13. Top with mozzarella and the remaining Parmesan, cover with foil and bake for 30 minutes. Remove the foil and continue baking until the cheese begins to brown, about 15 to 30 minutes. Remove from the oven when it browns to your liking (I like mine very brown and a bit crispy on top). Remove from the oven, cover loosely with the foil, and allow to rest for 10 minutes before serving.
Servings: a lot! This is a big-ass lasagna, and rich.
14. Sprinkle some chopped parsley over the top and serve.
