Monthly Archives: July 2013
That Richard is One Crazy Guy
Today I want to talk about one of my favorite foods: peanut butter.
And that guy Crazy Richard.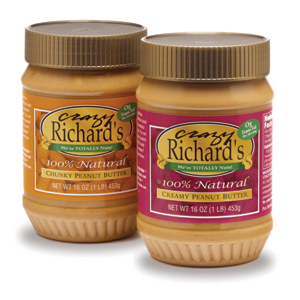
A staple of most kitchens, it is also extremely overlooked as an important food. We all think of peanut butter as a sandwich spread to be partnered with jelly, usually Concord grape jelly.
Oh, but peanut butter is so much more.
It is one of nature’s most perfect foods. High in protein, high in the good kind of fats we all need some of in our bodies to stoke the furnace, filling, tasty, and in ingredient in so many more recipes than the simple PB&J sandwich.
But what peanut butter are you using? What’s in it? When was the last time you read the label on your peanut-butter jar? Are you buying all natural? Do you know what that even means?
Let’s talk peanut butter.
How many ingredients does the peanut butter in your cupboard contain? Two? Three? Four? More? Even the products that call themselves “all natural” contain at least two or three. Why? Usually to make them taste better. Salt? Sugar? Honey? What else? Emulsifiers? Know what that’s all about? So that you don’t have to deal with the oil at the top of the jar.
Did you know that the majority of peanut-butter buyers won’t buy a jar of peanut butter that has oil on the top. “Who wants all that oil?” I’ve been asked. “I don’t want all that oil in my peanut butter, and I certainly don’t want to stir the jar. Too much trouble. Hey! It’s only peanut butter.”
Really?
What about that oil? Comes from the peanuts. It’s a natural part of the peanuts. It’s not added later (of course, in some cheap products, it IS !). It’s just a little bit, and it’s in the peanuts, and it’s a healthy fat. Get used to it.
Too much trouble to stir? C’mon. Really?
I’ll even give you tips for that.
But here’s the deal. There’s only one peanut butter to live in our cupboard. Only one.
Crazy Richard’s.
Smooth or crunchy, certain people in our family like only one or the other. But still, it’s only Crazy Richards in our house.
Want to know why? Read the label. One ingredient. Only one.
Peanuts.
What else does peanut butter need? Salt? Sugar? Honey? None of the above, and none of those ingredients ever find their way into our peanut butter. We buy the only product I’ve found that contains nothing but peanuts.
Crazy Richards.
And if you live in the Midwest, it’s Krema. Same product, different name.
There is no other.
Crazy Richards. Available at Giant here in Lancaster, other stores in other places, and on their web site, http://www.kremaproducts.com/Crazy-Richards-Peanut-Butter/products/1/.
I won’t get crazy with the details about Crazy Richard’s versus other brands; I’ll leave that to you. But suffice it to say, if you want the real deal, it’s got to be Crazy Richard’s. Just peanuts. Nuttin’ else!
So what do you do with peanut butter? Here’s a few ideas beyond the simple peanut butter sandwich:
I call this first dish “Vicki’s Noodles” because I got the recipe from an old friend named, Vicki, a nurse and confessed Jersey Girl I knew many years ago. She could cook, and was especially adept at Asian cuisine. I have several of her recipes in my notebook. This one is Cold Sesame Noodles. The ingredients beyond the sauce are completely optional. I like to use fresh, crispy bean sprouts. A chef I once worked with suggested I add red cabbage and some shredded carrot for color and texture. I liked the way that worked out, and I have also variously included chopped snow peas or sugar-snap peas, which we grow in our garden. You can also give it a note of Thai by adding some fresh chopped basil and maybe a touch of fish sauce. If you like meat in your salad, add grilled slices of chicken, or try it with cubes of premium dry tofu. Play with this one and see what you like. There’s almost no ingredient you could add that would not make it better. The sauce is a nice sweet and tangy one, but it doesn’t get in the way of any kind of additional ingredient.
As for the noodles, I make it with whole wheat linguine, but it is just as good with Asian buckwheat noodles, rice noodles, plain spaghetti, or whatever pasta you prefer. Adjust the heat to your own liking. This one is not too spicy. To kick it up, increase the hot chile oil to 1 tablespoon instead of a teaspoon.
Ingredients:
1 lb. noodles
3 Tbsp Crazy Richard’s smooth peanut butter
3 Tbsp rice wine vinegar
3 Tbsp brown sugar
3 Tbsp soy sauce
3 tsp dark sesame oil
1 tsp red chili oil
1/2 cup chopped peanuts
¼ finely-chopped small red cabbage
1 finely grated carrot
1 handful FRESH (!) bean sprouts
1/3 cup chopped scallions (just the green tops)
Procedure:
Prepare the noodles al-dente’ per the package. Cool under warm, then cold running water, coat with 2 tsp sesame oil, set aside.
In a small bowl, combine the next six ingredients (peanut butter through chile oil) with a whisk until smooth and completely blended. Set aside at room temperature.
One half hour before serving, combine noodles with the tofu, peanuts, cabbage, bean sprouts, and half the scallions. Add the peanut sauce and toss to coat all the ingredients with sauce. Allow to rest for a half hour, sprinkle the rest of the scallions over the noodles, then serve (don’t allow this to sit too long. The sauce will eventually break.)
Both the noodles and the sauce can be made ahead of time, but not overnight. They should not be refrigerated. This dish is meant to be served at room temperature. If you plan to add chicken, it should be grilled ahead of time and chilled.
Here’s a very special recipe that absolutely hits the spot on a chilly winter evening. We’ve made this wonderful soup a number of times, and it always surprises. Warms the soul.
Ingredients:

2 tablespoons olive oil
2 medium onions, chopped
2 large red bell peppers, chopped
4 cloves garlic, minced
1 28-ounce can crushed tomatoes, with liquid
8 cups vegetable broth
1 teaspoon kosher salt
¼ teaspoon white pepper
¼ teaspoon chili powder
¼ teaspoon Cayenne pepper (optional)
2/3 cup Crazy Richard’s crunchy peanut butter
chopped peanuts
chopped cilantro
½ cup uncooked brown rice
Preparation:
- Heat the oil in a large soup pot over medium heat. Cook onions and peppers until lightly browned. Add garlic and stir for 30 seconds, but don’t allow to burn. Add tomatoes, stock, salt, and spices and mix well. Reduce heat to low and simmer, uncovered for 30 minutes.
- Stir in the brown rice, cover and simmer another 30 minutes, or until the rice is tender. Stir in the peanut butter until well blended.Garnish with chopped peanuts and chopped cilantro. Serve immediately with warm, crusty bread.
* * *
And last but not least, here’s a terrific recipe for grilled satay, one of my favorite grilled dishes, wonderful as an appetizer, as part of a tapas presentation, or as a stand-alone entree served with Pad Thai or apple-cilantro slaw,  which I’ll present next time.
Ingredients:
- 8-12 skinless chicken thighs or beef top-round cut into 1/4-inch strips
- 1 package wooden skewers
- SATAY MARINADE:
- 1/4 cup minced fresh lemongrass
- 2 shallots OR 1 small onion, sliced
- 3 cloves garlic
- 1-2 fresh red chilies, sliced, OR 1/2 tsp. to 1 tsp. cayenne pepper, to taste
- 1 thumb-size piece galangal OR ginger, thinly sliced
- 1 tsp. minced fresh turmeric OR 1/2 tsp. dried turmeric
- 2 Tbsp. ground coriander
- 2 tsp. cumin
- 3 Tbsp. dark soy sauce (available at Asian food stores)
- 4 Tbsp. fish sauce
- 5-6 Tbsp. brown sugar
- 2 Tbsp. vegetable oil
Peanut Sauce
- 1 cup fresh-tasting dry roasted peanuts, unsalted or 1/2 cup Crazy Richard’s crunchy peanut butter
- 1/3 cup water
- 1-2 cloves garlic, minced
- 1/2 tsp. dark soy sauce
- 2 tsp. sesame oil
- 2 Tbsp. brown sugar
- 1 to 2 Tbsp. fish sauce, depending on desired saltiness/flavor – Vegetarians substitute 1.5 -2.5 Tbsp. regular soy sauce
- 1/2 tsp tamarind paste OR 1/2 Tbsp. lime juice
- 1/2 tsp. cayenne pepper, OR 1 tsp. Thai chili sauce (more or less to taste)
- 1/3 cup coconut milk
Preparation:
For the meat:
- If using wooden skewers, soak them in water while you prepare the meat (to prevent burning). The kitchen sink works well for this.
- Cut the meat into thin strips and place in a bowl.
- Place all marinade ingredients in a food processor or chopper. Process well.
- Taste-test the marinade – you will taste sweet, spicy, and salty. The strongest tastes should be SWEET and SALTY in order for the finished satay to taste its best. Add more sugar or more fish sauce (in place of salt) to adjust the taste. You can also add more chili if you want it spicier.
- Pour the marinade over the meat and stir well to combine. Allow at least 1 hour for marinating, or longer (up to 24 hours).
- When ready to cook, thread meat onto the skewers. Tip: Fill up to 3/4 of the skewer, leaving the lower half empty so that the person grilling has a “handle” to easily turn the satay during cooking.
- Grill the satay on your BBQ, OR on an indoor grill, basting the first time you time it with a little of the leftover marinade from the bottom of the bowl. OR you can broil in the oven on a broiling pan or baking sheet with the oven set to “broil” Place satay close beneath the heating element and turn the meat every 5 minutes until cooked (be sure to soak your wooden satay sticks in water before skewering). Depending on how thin your meat is, the satay should cook in 10 to 20 minutes.
- Serve with Jasmine rice and the Satay Peanut dipping sauce:
For the sauce:
- Place all ingredients in a blender or food processor. Blend or process until sauce is smooth. If you prefer a runnier peanut sauce, add a little more water or coconut milk.
- Do a taste test, adding more fish sauce (or soy sauce) if not salty enough, or more cayenne if not spicy enough. If too salty, add a squeeze of fresh lime juice. If you’d prefer it sweeter, add a little more sugar.
- Serve warm or at room temperature with any Satay meat dish, and it also makes a great dip with fresh veggies, fresh rolls, or other Asian finger foods. Or combine with noodles to create a Thai-style noodle dish or cold noodle salad. Enjoy!
Cheffzilla’s Gazpacho With a Kick
Ingredients:
1 1/2 pounds vine-ripened Roma tomatoes, peeled, seeded and quartered

Bottled non-alcoholic Bloody Mary mix (like Mr. & Mrs. T’s)
1 1/2 cup chopped red bell pepper, divided
1/2 cup chopped red onion
1 small jalapeno, seeded, ribs removed, and minced
2-4 medium garlic cloves, minced
1/4 cup extra-virgin olive oil
1 lime, juiced
2 teaspoons balsamic vinegar
2 teaspoons Worcestershire sauce
1/2 teaspoon ground cumin
1 teaspoon kosher salt
1/2 teaspoon freshly ground black pepper
2 tablespoons fresh basil leaves, chiffonadePreparation:
Place the tomatoes and juice into a large mixing bowl. Add the 1 cup cucumber, 1/2 cup bell pepper, red onion, jalapeno, garlic clove, olive oil, lime juice, balsamic vinegar, Worcestershire, cumin, salt and pepper and stir to combine. Transfer 1 1/2 cups of the mixture and the soaked bread to a blender and puree for 15 to 20 seconds on high speed. Return the pureed mixture to the bowl and stir to combine. Cover and chill for 2 hours and up to overnight. Garnish with with chiffonade of basil, serve with bowls of the remaining cucumber and bell pepper, a black-pepper grinder, and a bottle of red pepper sauce such as Tabasco or Sriracha.
The recipe doubles extremely well.
Serves 4
Half-Sours — Serious Deli-style Kosher Dill Pickles
Ever been to a real deli? Like the Stage in New York. Hymies or Murray’s in the Philly ‘burbs. Wolfies at 26th and Collins in Miami Beach. Not to sound too chauvenistic, there are great kosher delis in most large American cities on the east coast, and probably in the near Midwest (Cleveland, Baltimore, Boston…). I used to absolutely love Jack and Marion’s in Boston and the Fairlawn Deli in Akron. I know you have one. We even have Mort’s Delicatessen here in Lancaster, and it’s not bad. Andy at Mort’s grew up on Hymie’s Merion Delicatessen so his roots are legitimate. He’s created a pretty good place.
Then, and only then, do you know what a real pickle tastes like.
There are pickles in jars out there that are acceptable as deli pickles, but they just don’t approximate the taste (or the experience) of pulling a pickle out of a wooden barrel and eating it then and there.
Real deli pickles are fermented in the brine in large barrels with lots of garlic and pickling spices and dill (never, EVER vinegar). I used to grab a pickle from the Epicure’s barrel on the way into work, just to start my day. Nothing like garlic for breakfast!
But then, I grew up on half-sour deli pickles. My mom made them in the kitchen–always had a big jarful in the fridge at the ready. They never got fully pickled, the way store-bought pickles are. They were only ever half done; ergo “half-sour.” That’s the way we always got them at the deli. The day after the barrel arrived was the best time to get them. They’d get softer and softer the longer they sat, but we really liked them best when they still resembled cucumbers and had a lot of the crunch.
Some of you prefer the full-done kosher dills, and that’s okay too. You can make them yourself and get them done right to where you like them.
The secret to my mother’s approach–and most really good deli pickles–is fresh cucumbers. She’d only make them when she could get fresh pickles from the farmer’s market. She never got her pickle cucumbers at the grocery store. They’ve GOT to be fresh-picked to be right. Fortunately, here in Lancaster we can get fresh Kirby cucumbers in the summer. Thanks to John and Ethel Stoner for that.
So here’s the pickle deal:
Get a clear glass gallon jar with a wide mouth. You could use a plastic jar, but they are rarely clear, so it’s hard to watch the pickles–that’s how you know when they’re ready. It’s a sight thing. Have a hank of cheesecloth–enough to cover the mouth of the jar with two or three layers–and some string or rubber band to secure the cheesecloth. Now you’re ready to begin.
Get enough large Kirby cucumbers to fill the jar, so that they’re packed pretty tight. I can’t tell you how much or how many–it depends on the size of the cukes. Bigger is better, and get enough. Better to have too many. They’re good eating as cucumbers, too.
Other ingredients to have on hand:
- Diamond Crystal kosher salt. I’m pretty specific on this brand, but Morton’s kosher salt will do in a pinch. Don’t use table salt.
- Fresh garlic cloves. I use six to eight cloves, depending on their size. I like mine garlicky. Use anywhere from two to ten.
- A bunch of fresh dill.
- 3 bay leaves
- 3-4 dried red hot peppers (the kind you can get at an Asian market) or dried red pepper flakes
- Mustard seeds
- Coriander seeds
- Whole black peppercorns
How to do this:
Sterilize the jar: fill it full of boiling water, allow the jar to sit 30 minutes filled with the boiling water, then empty the jar, allow it to cool naturally. While it’s cooling, wash your hands with antibacterial soap and rinse well.
While the jar is cooling, wash the pickles well. But don’t scrub them; rub them down with your hands under cold running water. Rinse well, place them in a large bowl and run cold water over the bowl for 10 minutes. DO NOT SKIP THIS STEP!!! This is a good time to eliminate any soft cucumbers. Make sure you use only the firm ones. And nip off the ends of each cuke; just a little nip–this will help keep the pickles crisper longer.
Place two sprigs of the dill in the bottom of the jar; smash two to four of the garlic cloves (leave the skins on) and place them on the dill. Pack the cukes tightly into the jar, being careful not to bruise them. But a tight pack is crucial. When the jar is half full, add two or more smashed garlic cloves, a tablespoon each of mustard and coriander seeds, peppercorns, three bay leaves broken into pieces, three or four dried red peppers (or a teaspoon of red pepper flakes), then fill the jar with more cucumbers until the jar is just about full. Pack them tight.
Then mix two quarts of cold water with four tablespoons kosher salt. Mix well to dissolve all the salt. Pour the water over the cukes until the jar is full. Do it in the kitchen sink. The cukes will want to float. Keep pushing them down while you fill the jar with water. Maybe even try to get one more cucumber in the jar.
Place the remaining garlic (smashed, of course) and then the dill on top. It’s vital to keep the cucumbers completely submerged. Make sure there is enough dill at the top of the jar to hold the cukes under water. Reserve the remaining salt water in a jar in the fridge.
Cover the jar with cheesecloth and wrap it around the sides of the jar top. Tie it in place so that it is tight on top of the open jar mouth. Set on the counter away from direct sunlight and allow to ferment, adding a bit more brine if necessary to keep the pickles under water. After three days, the pickles should be half sour and ready to taste. If there is foam on top of the jar, scoop it off, refill the jar with a little more salt water. If there is foam under the dill, remove and rinse it, and reposition it before adding more brine.
After three days, place the jar in the refrigerator. The pickles will continue to “cook” in the fridge, but the process will slow down considerably under refrigeration. You can keep them on the counter, but they will be full sour pickles in about a week. That may be okay too, but I love mine half sour.
Enjoy real homemade half-sour (or whole-sour) pickles right at home.
Oh, and by the way, this works really well using firm green unripe Roma tomatoes, too. Pickled green tomatoes are a really wonderful treat.
What??? Living in Lancaster Ain’t Chopped Liver
I had a request.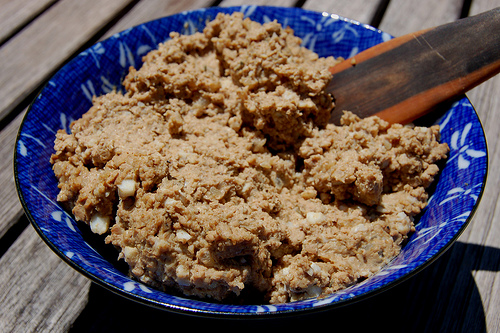
I’m honoring it, with one of my favorite recipes of all time. I made it at the Epicure in Miami Beach, usually 120 pounds a week. They sell a lot of chopped liver in Miami Beach–at least they did when I was there. Of course, Miami Beach wasn’t then what it is now; it was full of people who ate chopped liver and died young (young in Miami Beach back then was defined as 88). But we made chopped liver. Legend had it it was my grandmother’s recipe. I can’t say for sure; she never made it for me, and my father used to say that the rumors of her cooking skills were greatly exaggerated. She was, after all, a working woman from the time she arrived in the US at Providence, R.I. back at the turn of the twentieth century until she had her first heart attack at the age of sixty-something. Grandma Jenny was the greatest. Big, full of life, typical of the American Jewish grandmother but with none of the passive-aggressiveness. Nothing passive about Jenny. Her aggressiveness was right there in your face. Ask Uncle Sidney. But she was very kind.
But a cook? I think not so much. But she used to make me a mean saucer full of hot water with lemon.
Anyway here’s our chopped liver recipe, scaled down from the 120-pound recipe to a more manageable quantity. You might think this is a lot of chopped liver–who needs this much anyway??–but resist the temptation to halve the recipe. This will lose almost half its weight in water during the cooking process. Make at least this much, maybe even double it. This recipe will serve six nicely as an appetizer.
Jenny’s (?) Chopped Liver
Ingredients:
2 pounds fresh chicken livers
2 pounds sweet Vidalia (or large yellow) onions, halved, then thinly sliced
2 tablespoons sweet paprika
1/2 cup plus two tablespoons rendered chicken fat* (see note below)
8 hard-cooked eggs
2 teaspoons kosher salt
1/2 teaspoon fine-ground white pepper
2 tablespoons honey
2 tablespoons Maggi Seasoning (available at many good specialty grocery stores, and at my local Asian market)
Preparation:
Heat 1/4 cup chicken fat or vegetable shortening until shimmering in each of two large saute pans. Don’t go short here. Hey! This ain’t health food!
In one pan place the chicken livers and saute at medium heat until there is no more pink in the middle and they just begin to crisp up. A little crispiness in the liver is good. A lot is bad Be careful here.. Drain and cool to room temperature in a colander over the sink.
In the other pan saute the onions with paprika, salt, and pepper, over medium-low heat until they caramelize. Cook them slowly–don’t let them burn. Caramelizing onions is a skill a cook needs to learn, then use often. It takes patience. Patience is extremely important. Real caramelized onions are one of the world’s finest treats; they get so sweet you could die. Use them here. After they are caramelized, set them aside to cool completely. Don’t rush this process. The onions and livers need to be completely cooled to room temperature or the final product will be mushy. And nobody likes mushy chopped liver!
When cooled, mix the onions and livers in a bowl, tossing them with your hands to mix well. Use your hands. That’s the way real cooks cook. Then cut the eggs in half and toss them in with the rest of the mess and toss well to combine.
Then run the whole mess through a food grinder attachment to a stand mixer using the largest holes. Alternately, chop the mess up with a pastry cutter in a wooden bowl, but don’t cut the stuff up too fine. There really needs to be a bit of bite to the finished product. This isn’t pate.
Add the honey and Maggi seasoning and mix well. If the chopped liver is too dry, melt the remaining two tablespoons of fat and add it to the bowl a little at a time and mix until it reaches the consistency of tight peanut butter. Just don’t overmix here. You don’t want to chop the stuff up more in the mixing process.
Taste as you mix, adding a bit more salt and white pepper if necessary. Use just a bit more white pepper than you think you need. Chopped liver is soooo much better when it’s just slightly peppery (resist the temptation to use black pepper. It’s the wrong product. Fine-ground white pepper here, please. It should be a staple condiment in your kitchen.
Finally, coat a serving dish with a wee bit of the chicken fat or shortening and put the finished product in the bowl and chill in the fridge for at least six hours. It will be really tempting to eat it all freshly made, but don’t. Let it set up in fridge for a while. It gets better.

Serve the chopped liver with toasted bagel chips, available in bags at the deli counter at most grocery stores. It’s the best way. You’ll thank me later. Melba toast rounds or cocktail rye or pump slices are okay too, but not nearly as good. If you use rye or pump slices, toast them lightly before serving.
* To render chicken fat, place 1 cup raw chicken fat, 1/2 tsp kosher salt and (optionally) half a thinly sliced small onion in a heavy-bottom pot over medium heat, stirring occasionally, until the fat is liquified and the cracklings are golden brown. Strain over a Mason jar, toss the solids, cover and refrigerate until you need it.
Mexican Cold Bean Salad
Talking Fresh
Talking Fresh has taken a left turn. I hope you will stay with me, because I find this new phase of the column liberating.
A bit of history:
Make this as spicy (or not spicy) as you wish. Add more Tabasco sauce, jalapeno peppers, whatever–or not!
Talking Fresh came about as the result of a conversation I had at church one Sunday morning with Jen Kopf, one of the editors at the erstwhile “Lifestyle” section of the Lancaster Sunday News. I admire Jen and her remarkable writing, her sense of the history and culture of Lancaster, and her obvious love for Lancaster. I asked her why the paper didn’t have a restaurant critic, and if they would be interested in entertaining the idea. I pointed her toward my blog so that she could get a sense of my writing, my style, my sensibility, and my slight leaning toward anarchy (I should point out that before I gave her the URL, I had to clean it up a bit—I’d been blogging for a couple of years at that point, and I tend to write in frenetic bursts, thinking that everything I write is just what everyone else wants to read—my bad!).
A few weeks later Jen got back to me with several reasons why the paper didn’t think a restaurant critic was on their radar, and admittedly, the reasons were sound. But she liked what she read on the blog—she actually used the word “interesting.” I was ecstatic. But not yet a published writer here in Lancaster.
A couple months later I got an email from another editor at Lifestyle, Lynn Schmidt Miller, who suggested that they might be interested in running a semi-weekly column if I could present it just as I present entries in the blog.
“Why sure I can,” I responded. Ulp. Suddenly I’m a food writer in Lancaster, with you all and the rest of the county as my readers, and I owe a column every other week.
No matter what.
With photos.
Of stuff I made myself.
Ulp!
But I took up the challenge, went in to the offices of the paper on King Street, got a photo taken of my former fat self, balloon chin and all, and suddenly I’m a columnist in Lancaster.
In the same newspaper as Gil Smart and Louis Butcher and Larry Alexander and Jeff Hawkes and Tom Murse and all the other fabulous writers we are blessed with in this town.
Ulp.
For me, because Lynn asked me to write the column just as I had been writing my blog, I took that to mean that I was wanted as much for my writing as for my recipes. The truth is, I always considered the blog—and now the column—as an outlet for my writing, and the recipes were simply the device to get people to read the entries. To this day, I don’t know, and don’t really care, whether they were more interested in the writing or the recipes.
Being on a word count made it all the more challenging, but for me it was always about the essay up front. My wife always reminded me that the column had to be about something.
“What’s it about?” she always asked.
When space was tight and the columns got edited, it was always the writing that got snipped, which made me feel a little sad. But I understood—still do—the demands of space in the paper, and half a recipe is worthless.
Which brings me back full circle to this column, which is that I now feel liberated, because the restriction of word counts is off, and now my only task is to be interesting and produce wonderful food and recipes. If I bore you half way down the column, that’s on me.
But I’ll continue to write the column, and continue to love doing it, and hope you continue to read it and to share it with your friends—Facebook and otherwise—so that maybe I can gather some steam for the column and gain some readership.
Here’s hoping.
As I’m writing this, I munching on one of my all-time summer favorites, a Mexican Bean salad Ellen conjured up from her little tin recipe box about which I’ve written more than once. This salad is a killer. It’s cool and spicy and flavorful and filling and simple and festive and…for now I’ve run out of adjectives, but suffice it to say make it, and it will become one of your go-to summer dishes. Lots of ingredients, but lots of flavor. It’ll win raves!
Mexican Bean Salad
- Make this as spicy (or not spicy) as you wish. Add more Tabasco sauce, jalapeno peppers, whatever–or not!
Ingredients:
1 15-oz can black beans
1 15-oz can red kidney beans
1 15-oz can cannellini (white) beans
1 green bell pepper, cored, seeded, ribs removed, and diced
1 red bell pepper, cored, seeded, ribs removed, and diced
1 yellow bell pepper, cored, seeded, ribs removed, and diced
1 medium spicy yellow banana pepper, cored, seeded, ribs removed, and diced
2 ears of corn, lightly steamed, cut from the cob
or
1 10-oz package frozen corn, defrosted
1 red onion, diced
2-3 scallions, white and light green parts only, 1/2-inch chop
½ cup extra-virgin olive oil
½ cup red wine vinegar
2 tablespoons freshly squeezed lemon juice
2 tablespoons freshly squeezed lime juice
1 tablespoons white sugar
2 cloves finely minced garlic cloves
¼ cup chopped fresh cilantro
½ tablespoon ground cumin
½ teaspoon freshly ground black pepper
1 dash (or more—wayyyyy more) red pepper (read: Tabasco) sauce
1 teaspoon chili powder
Preparation:
In a large bowl, combine beans, peppers, corn, and red onion.
In a small food chopper, add all remaining ingredients and pulse until they are well mixed. Pour dressing over salad fixin’s and toss well to coat. Chill thoroughly and serve cold.
Serves 8
- Make this as spicy (or not spicy) as you wish. Add more Tabasco sauce, jalapeno peppers, whatever–or not!
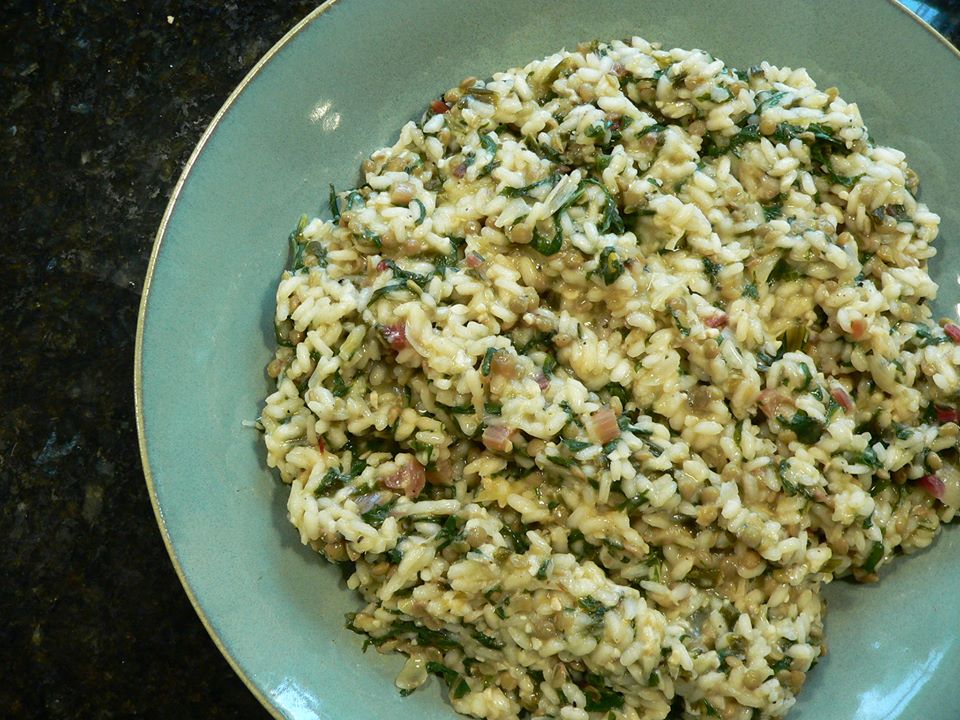
French Lentil and Swiss Chard Risotto
Okay, so the Sunday News won’t be carrying my column anymore, but that doesn’t mean you can’t access my kitchen. I plan to continue writing Talking Fresh, and hope all of you Facebook friends will Like Jeff’s Kitchen here, and share my posts with your friends, and encourage them to like my page as well. It takes a village, and all those six degrees and such can turn this into a movement, if you’re willing.
That said, I’m also going to put up a post on opposite Sundays featuring what I get in my CSA bag from Caitlin and EmmaKate at Blue Rock farm. Today I got lettuce, mustard and beet greens, beets, fresh dill, a perfect head of garlic, one yellow squash, snow peas and mixed (pole or bush?) beans, and chard.
Here’s what I’ll be making for supper tonight, all the fresh ingredients coming from the young women’s wonderful little farm in Willow Street, PA.
Thanks indeed to Martha Stewart for the inspiration for this recipe. I’ve altered it a bit from her original to make it my own, and to feature the fine ladies of Blue Rock Farm. By the way, it is wonderful cold, and reheats beautifully.
Please enjoy responsibly.
French Lentil and Swiss Chard Risotto
Ingredients:
1 bay leaf
6 sprigs fresh thyme plus 2 teaspoons leaves
1/3 cup French green lentils
1 bunch Swiss chard
1 cup finely chopped onion and the onion greens
4 cups low-sodium chicken stock
1 tablespoon olive oil
1 ½ teaspoons minced garlic
1 ¼ cups Arborio rice
½ cup dry white wine
1 teaspoon kosher salt
¼ cup freshly ground white pepper
¼ cup freshly grated Parmesan cheese
1/3 cup freshly shredded chard or beet greens, for garnish
Preparation:
1. In a medium saucepan, combine 6 cups water, bay leaf, and thyme sprigs and bring to a boil. Simmer for 5 minutes; add lentils, reduce heat to low and simmer until tender, about 20 minutes. Drain lentils and set aside; discard the rest.
2. Wash chard and remove stalks; slice leaves into very thin 2-inch strips, and dice the smaller stems into ¼-inch dice. Discard the larger stems. Sauté with a bit of olive oil in a large skillet, tossing constantly over high heat until just wilted; set aside in a colander.
3. Finely chop the onions and slice the greens into ½-inch rings.
4. Bring the stock to a boil, reduce the heat to low, and keep at a bare simmer.
5. Heat olive oil in a large heavy pot over medium heat. Add onion, onion greens, and garlic and cook, stirring frequently until soft but not browned, about 6 minutes. Add rice and thyme leaves and continue stirring until the edges of the rice become translucent, 3-4 minutes. Add the wine, stirring constantly, until nearly all the wine is absorbed.
6. Raise the heat to medium-high, add the salt and pepper and ½ cup stock and cook, stirring constantly until nearly all the stock is absorbed. Repeat this process, adding ½ cup stock at a time, until the rice is creamy but still a little firm, 15-20 minutes.
7. Remove the pot from the heat, and stir in the lentils, chard, and Parmesan. Season to taste with salt and pepper, plate and serve immediately garnished with the shredded greens.
Serves 6
