Category Archives: Finger Foods
New York-Style Kosher Dill Pickles
It’s almost summer.
My favorite time of the year. Yes Friends, I am a summer animal. There’s not much that I can think of that I enjoy more than a great summer day with my feet in the sand, the ocean pounding in my ears, and an outrageous mystery thriller or six to put my brain on pause (well, there IS one thing, but hey, this is a family website).
Summer means fresh produce growing in the garden—we’ve got sugar snap peas; three kinds tomatoes (who doesn’t); three kinds peppers (two hot and one sweet); eggplants; lots of romaine lettuce; scallions; and herbs, herbs, herbs. The rose bushes are in full bloom, the grass is growing way too fast (so are the weeds); and the air conditioners have been put in place for the ladies of the house.
Summer means the kids are off from school and home all the time…oh, wait…
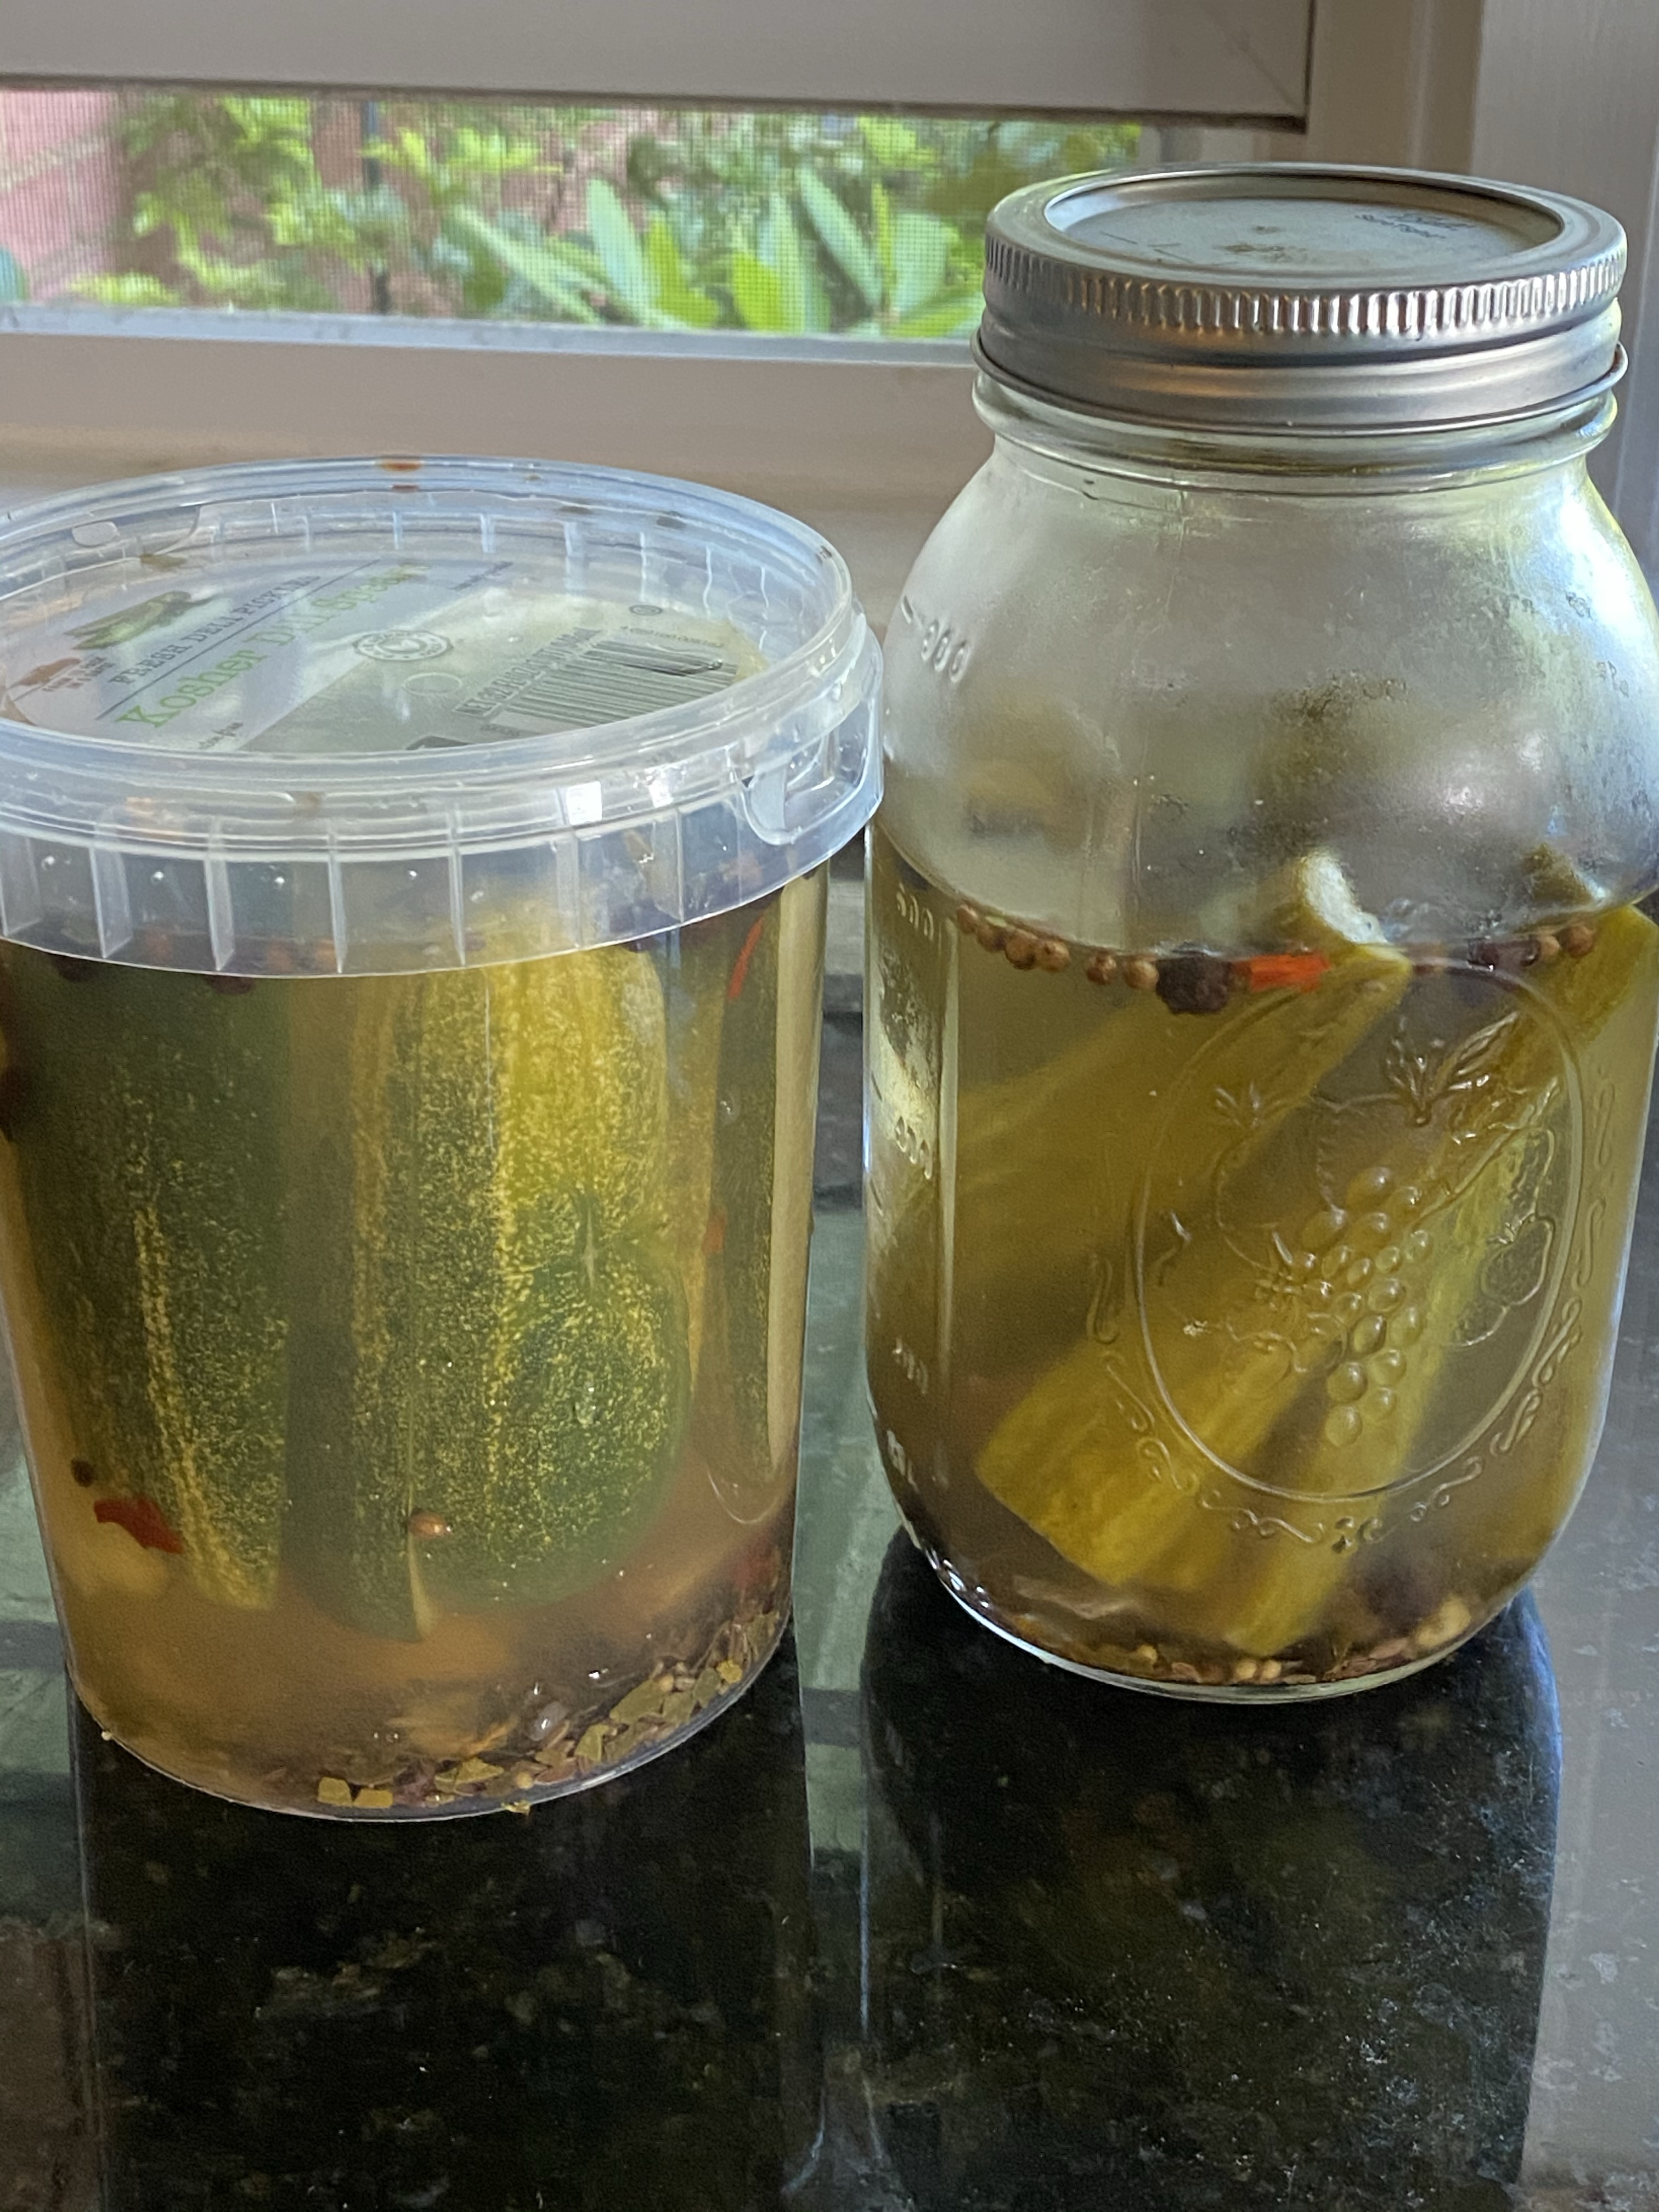
And for me the summer means pickles. I mean to say I make pickles. By the bushel full. If you know me at all, you likely know that pickles means kosher-style, vinegary and garlic-laden, salty, spicy, dilly, genuine New York deli-style pickles. I have been getting my cucumbers, Kirbys and baby English cukes, from our favorite neighborhood farmer’s markets, Brook Lawn Farm Market in Neffsville and Harvest Lane Farm Market, on Oregon Road in Manheim Township. I make them all summer long, as long as the Kirbys are available, because they’re a great low-calorie snack, and because they replace some of the salt I lose when walking Stella the dog in the summer heat.
I’m following my mother’s recipe—about the only thing she made in the summertime, because it doesn’t require cooking—and the pickles are every bit as good as the ones we got at the Epicure or from Murray’s in Merion, and way better than the ones I get now at the grocery store. Because I can determine just how much garlic, just how much vinegar, just how much spices. I did riff a bit on Mom’s recipe, because she didn’t like them as spicy as I do. But when you read the recipe you can back off on the heat or the vinegar if you wish, but they will be…well…different.
But as I always do, I’ll share the recipe with you here as I make them—no cooking required, just patience. And I promise that if you like real New York-style kosher dills, you’ll get them.
Every time.
Here’s the road map:
New York Deli-style Straight Outta’-the-barrel Kosher Dills
Ingredients:
- 8-9 Kirby cucumbers
- 2 Tablespoons pickling or kosher salt (pickling salt is better)
- 24 ounces BOTTLED water (DON’T USE LOCAL SINK WATER—IMPORTANT!)
- 8 ounces white vinegar
- 4 (or more or less—you get to decide here) cloves fresh garlic, smashed, skins on
- 4 Tablespoons pickling spice
- 2 teaspoons dill seeds (you could use fresh dill, but trust me, the seeds are a better option—you will be fermenting, and fresh dill could be a problem)
- 2 dried Thai chili peppers (optional, makes the pickles spicier)—I grow my own and dry them; you can get them at the Asian market.
Preparation:
- Wash the cucumbers well and cut off both ends—just barely nip them—about ¼ inch, but this is important.
- Stir the water, vinegar, and salt together until the salt is completely dissolved.
- Place 2 cloves garlic, 2 Tbsp pickling spice, 1 tsp. dill seeds and 1dried pepper in each of 2 quart-size containers. I use plastic containers I’ve saved from buying dill pickles from the refrigerator case at Aldi (see photo)—they’re the best I’ve found—or restaurant take-out quart-size soup containers (also saved). Wide-mouth canning jars are okay too, but it’s harder to get the pickles out later
- Cut the cucumbers in half or quarters lengthwise and pack them the into the containers. Pack them as tight as you can, so they won’t float when you add the brine. You could do them whole, but you’ll get fewer pickles per batch. If you like your pickles whole, use a half-gallon or gallon wide-mouth container, and keep the ingredient ratios exactly the same; if you make a gallon at a time, double the ingredients. The important thing is the salt-to liquid ratio—it must be 2 tablespoons salt to each quart of liquid.
- Add the brine to each container, leaving 1/2-inch head space. Make sure the cucumbers are completely submerged in the brine. They will want to float to the surface. Try getting another quarter cucumber in to make them tighter, or weigh them down with a fermenting weight or a small zipper-close bag with water in it. It’s important that they stay submerged, or the exposed ends will mold, and ruin the whole batch.
- Place the lids LOOSELY on top of the container, so the jars can breathe and the pickles can ferment. You don’t want to close the lids, as this will prevent the fermenting process from happening.
- Store the pickles in a cool dark location for anywhere from 24 hours to 7 days, depending on how crunchy or soft you like your pickles—the longer they ferment, the softer they get, and also the more intense the flavor. I ferment mine for 48 hours; I like the crunch and the flavor of 2-day pickles. Remove the weight, close the lids tight, and place them in the fridge.
The pickles will keep in the fridge for about a month, but they’ll never last that long. They will continue to get more flavorful as they sit in the brine.
Shallot Marmalade
Today in Jeff’s Quarantine Kitchen, 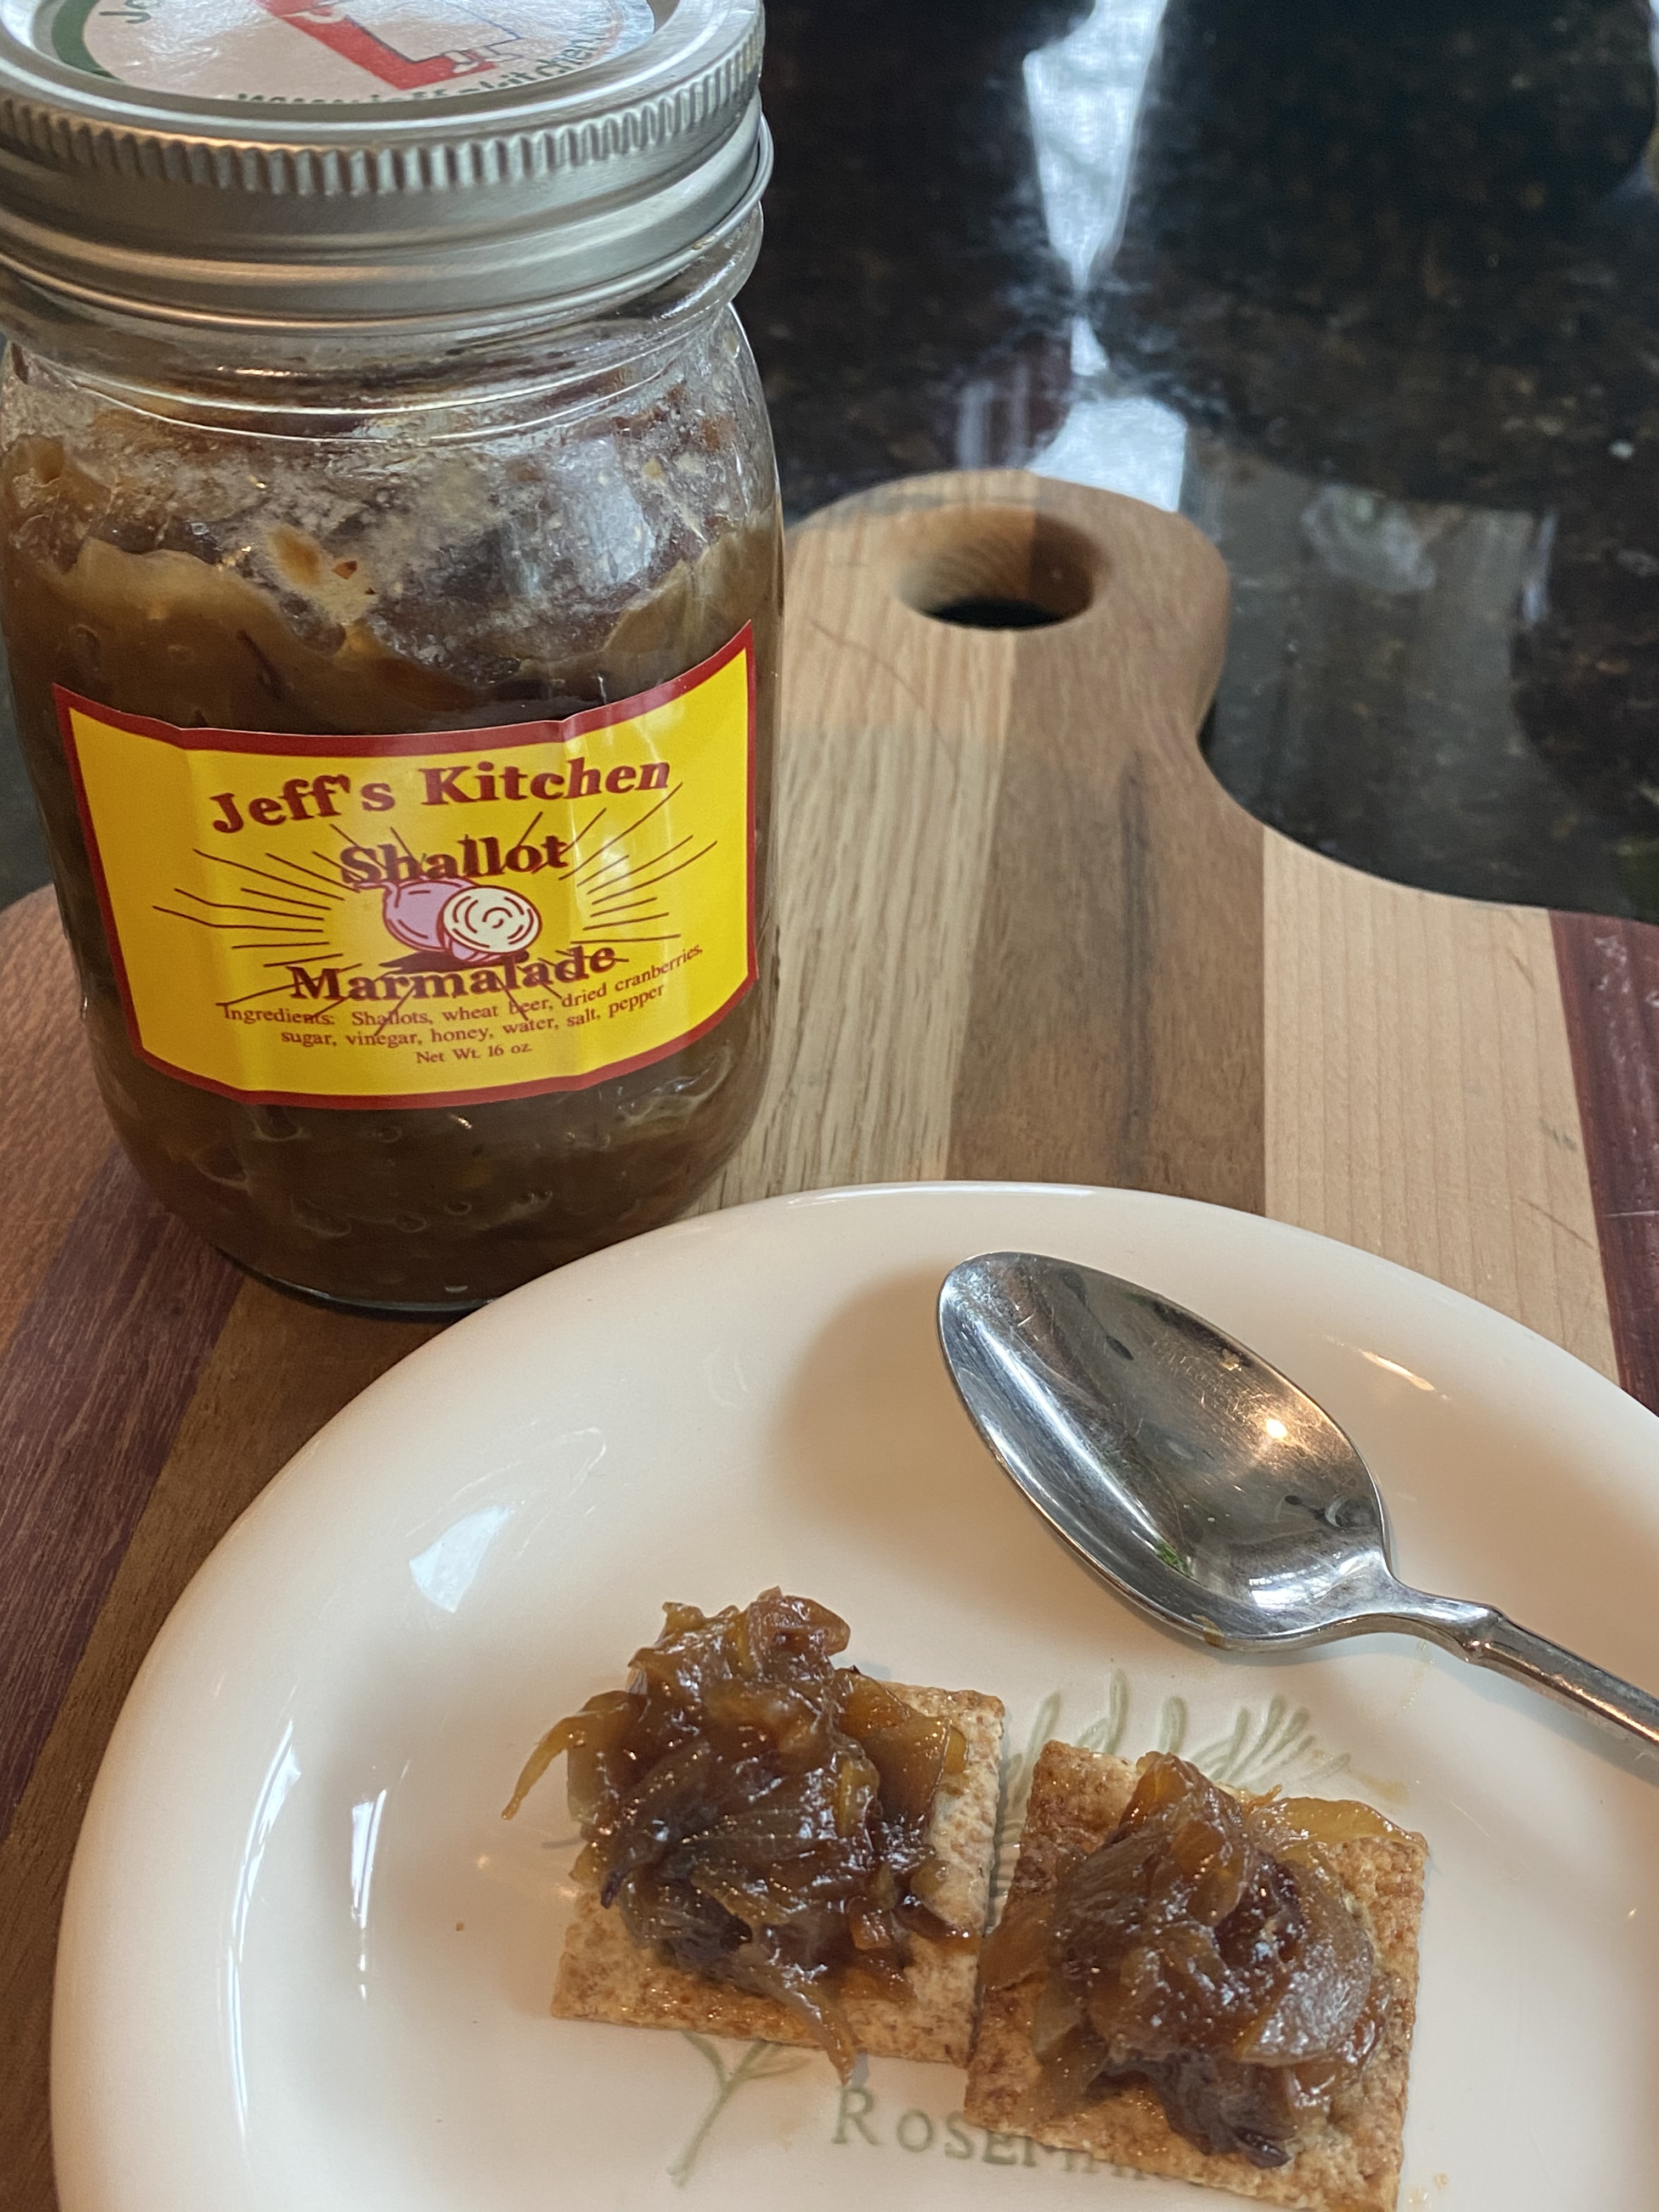 we’re cooking up an experiment…shallot marmalade. I’ve been working on different takes on marmalade for about three years now, starting when Ellen showed me a Pinterest post about Meyer Lemon marmalade; now I’m growing my own Meyer lemons. I’ve made marmalade from these lemons, Key limes, Valencia and navel oranges, blood oranges, clementines, red grapefruits, both red and Vidalia onions—have I missed anything?
I found this recipe in search of a better recipe for orange marmalade. My search took me to the web site of the Paris- and New York-based chef David Leibovitz. He has a whole section of his blog (www.davidliebovitz.com) dedicated to jams and jellies, and a lot of the recipes are just rockin’. If you’re in the hunt for good alternative takes on homemade condiments I recommend this site highly.
So…shallot marmalade: what is it good for? Try it as a condiment on burgers, grilled chicken or salmon, spread a dollop over a wedge of Brie or Camembert (wrap the whole cheese in foil and bake in a 325-degree oven for 15 minutes, unwrap and add the marmalade), or simply spooned onto a toasted baguette slice. The fact is, shallots have a wonderful flavor, and with quality ingredients, the result ought to be spectacular. We’ll see.
So what’s the roadmap for this new and interesting new product? Here it is, altered slightly (as I am wont to do) from David Liebovitz’s original recipe. The fragrance is amazing. The flavor is, too.
Almost David Liebovitz’s Shallot Marmalade
Ingredients:
1 lb. shallots, peeled and thinly sliced
2 tablespoon unflavored vegetable oil
big pinch of coarse salt
a few turns of freshly-cracked black pepper
1/2 cup Belgian White beer
1/4 cup sugar
2 tablespoons honey
3 tablespoons apple cider or balsamic vinegar
1/2 cup raisins, dried currants, or cranberries
Preparation:
1. In a medium-sized saucepan, warm the oil and saute the shallots over moderate heat with a pinch of salt and pepper, stirring frequently, until the shallots are soft and wilted, which should take about 10 minutes.
2. Add the beer, sugar, honey, vinegar, and dried cranberries (or raisins or currants), and continue cooking, stirring frequently, until the shallots begin to caramelize. While cooking, continue stirring them just enough to keep them from burning. If the mixture seems to be very dry, add a small splash of water toward the end of cooking, to encourage a little juiciness.
3. The jam is done when the shallots are nicely-caramelized to a deep, dark brown. Do not overcook; there should still be a bit of juices in the pot when it’s ready. Transfer to a jar.
Storaage: You can keep the marmalade in the refrigerator for about two months.
Around the World in Eight Courses (Continued)
TAPAS!
Here are more wonderful recipes from our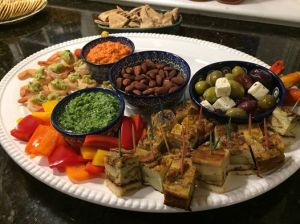 Around the World in Eight Courses dinner party ten nights ago. These are three more of the tapas presentations on the platter. Mini roasted peppers stuffed with herbs and goat cheese, a terrific parsley and anchovy (that’s right! anchovy) dip that was served with slices of bell pepper, toasted pita chips, and an onion and potato torte that was cut into bite-sized pieces. The surprise of the platter was the parsley dip, with the anchovies poached in a broth of milk and olive oil. Not salty, not offensive in any way, but rather very tasty and begging to be sampled twice.
Here, then are the recipes:
Peppers Stuffed with Goat Cheese
Ingredients:
8 ounces goat cheese
3 scallions, green parts only, roughly chopped
½ cup fresh mint, finely chopped
Red pepper flakes
Zest and juice of two lemons
12 mini red and yellow bell peppers
Preparation:
Prepare the filling an hour or two ahead. Place goat cheese, scallions, mint, and red-pepper flakes in a bowl. Zest and juice lemons into the bowl, straining seeds. Mix until well combined. Refrigerate until ready to fill the peppers.
Roast the peppers in a 350-degree oven, turning every five minutes, until they are blackened all over (alternately, roast them over a gas-stove flame, using tongs to keep them above the flames); then place them on a parchment-lined tray and cover with a dish towel until they are completely cool. Peel the skins gently, trying not to damage the roasted peppers.
Spoon the filling into a plastic bag, squeeze the filling into a bottom corner of the bag, remove as much air from the bag as possible, and twist the top of the bag. This forms a small piping bag. Cut a small piece of the bottom corner of the plastic bag, and fill each pepper with about 2 tablespoons of the goat cheese mixture. Place on a serving plate, and sprinkle with red-pepper flakes; garnish with spring onions if desired. Serve immediately, or cover and refrigerate until ready to serve, about 1 hour.
Parsley-Anchovy Dip
Ingredients:
2/3 cup extra-virgin olive oil
½ cup whole milk
1 head garlic, peeled and smashed
16 anchovies
2 bunches parsley heads
ground pepper
2-3 tsp. Lemon juice
Preparation:
In a small saucepan, bring olive oil, milk, garlic, and anchovy fillets to a simmer over medium; cook until garlic is tender, 8 minutes. Transfer to a food processor and add parsley. Pulse until smooth; season with pepper and lemon juice.
Onion and Potato Torte
Ingredients:
7 tbsp EVOO
1 medium onion, ½-inch rounds
3 Yukon golds, ¼-inch rounds
8 eggs
Kosher salt
Freshly ground pepper
1 clove garlic
Chicory or endive
2 tbsp sherry vinegar
Preparation:
Preheat oven to 325.
Saute onions till golden, place in bowl. Repeat with potatos. Whisk together eggs, salt, and pepper. Add to onions and potatoes.
Heat pan with extra-virgin olive oil, add mixture and cook until edges begin to brown. Place in oven and bake, covered, until set, about 10 minutes. Remove top and broil until lightly browned.
Brush bread with EVOO and garlic, toast until golden.. Toss lettuce with vinegar, salt and pepper. Scatter over bread, cover with torte, cool. Serve at room temp.
Avocado and Prawn Cocktail and Roasted Baby Potatoes with Romesco Sauce
From our “Around the World in Eight Courses” dinner comes the first two recipes from our tapas platter:
Avocado and Prawn Cocktail
Ingredients: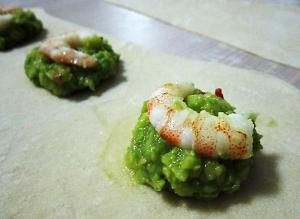
1 large avocados
5 oz. chopped prawns
1 tablespoon extra-virgin olive oil
1 scallion
1 clove garlic
Kosher salt
1.5 oz heavy cream
1.5 teaspoon extra-virgin olive oil
Preparation:
Peel the prawns and remove the heads. Season the bodies and fry in the oil. (The heads can be used to make the stock).
Peel the avocados, remove the pits and crush the flesh with the chopped spring onion, the peeled and finely chopped garlic, the olive oil and the cream to form a velvety smooth purée. Season to taste.
Drop a dollop of the avocado mix onto the platter and top with one shrimp (or the other way around.
Roasted Baby Potatoes with Romesco Sauce
Ingredients: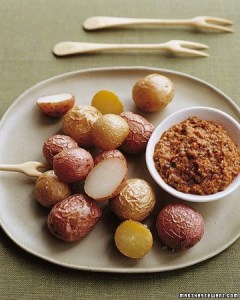
- 3 ounces whole blanched almonds
- 2 roasted red peppers
- 1 small garlic clove
- 1 teaspoon coarse salt
- 1/8 teaspoon smoked hot paprika
- 1 teaspoon sherry vinegar or red-wine vinegar
- 1 1/2 tablespoons extra-virgin olive oil
- 1 pound small red and yellow potatoes
Preparation:
- Preheat oven to 350 degrees. Spread almonds in a single layer on a rimmed baking sheet; toast in oven until lightly golden and fragrant, 7 to 8 minutes. Remove from oven, and let cool 15 minutes.
- Raise oven to 375 degrees. In a food processor, combine almonds, garlic, roasted red peppers, 3/4 teaspoon salt, paprika, mint, and vinegar. Process to a coarse paste, about 1 minute. With machine running, add 1 tablespoon oil in a slow, steady stream until sauce is smooth. Transfer sauce to a small bowl, and set aside.
- Place potatoes on a rimmed baking sheet, and toss with remaining 1/2 tablespoon oil and 1/4 teaspoon salt. Roast in oven until skins are slightly crisp and potatoes are tender, shaking pan once to turn potatoes, 20 to 30 minutes. Serve hot with sauce on the side.
What??? Living in Lancaster Ain’t Chopped Liver
I had a request.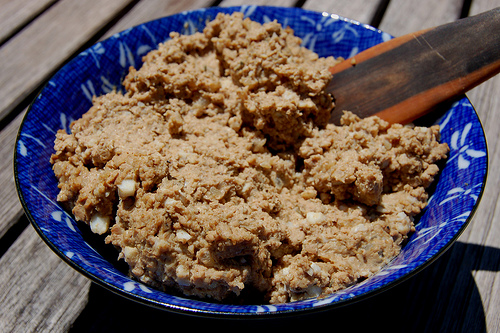
I’m honoring it, with one of my favorite recipes of all time. I made it at the Epicure in Miami Beach, usually 120 pounds a week. They sell a lot of chopped liver in Miami Beach–at least they did when I was there. Of course, Miami Beach wasn’t then what it is now; it was full of people who ate chopped liver and died young (young in Miami Beach back then was defined as 88). But we made chopped liver. Legend had it it was my grandmother’s recipe. I can’t say for sure; she never made it for me, and my father used to say that the rumors of her cooking skills were greatly exaggerated. She was, after all, a working woman from the time she arrived in the US at Providence, R.I. back at the turn of the twentieth century until she had her first heart attack at the age of sixty-something. Grandma Jenny was the greatest. Big, full of life, typical of the American Jewish grandmother but with none of the passive-aggressiveness. Nothing passive about Jenny. Her aggressiveness was right there in your face. Ask Uncle Sidney. But she was very kind.
But a cook? I think not so much. But she used to make me a mean saucer full of hot water with lemon.
Anyway here’s our chopped liver recipe, scaled down from the 120-pound recipe to a more manageable quantity. You might think this is a lot of chopped liver–who needs this much anyway??–but resist the temptation to halve the recipe. This will lose almost half its weight in water during the cooking process. Make at least this much, maybe even double it. This recipe will serve six nicely as an appetizer.
Jenny’s (?) Chopped Liver
Ingredients:
2 pounds fresh chicken livers
2 pounds sweet Vidalia (or large yellow) onions, halved, then thinly sliced
2 tablespoons sweet paprika
1/2 cup plus two tablespoons rendered chicken fat* (see note below)
8 hard-cooked eggs
2 teaspoons kosher salt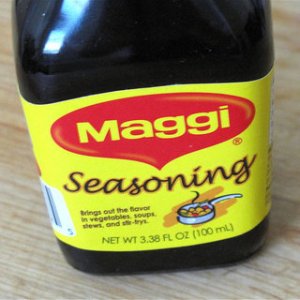
1/2 teaspoon fine-ground white pepper
2 tablespoons honey
2 tablespoons Maggi Seasoning (available at many good specialty grocery stores, and at my local Asian market)
Preparation:
Heat 1/4 cup chicken fat or vegetable shortening until shimmering in each of two large saute pans. Don’t go short here. Hey! This ain’t health food!
In one pan place the chicken livers and saute at medium heat until there is no more pink in the middle and they just begin to crisp up. A little crispiness in the liver is good. A lot is bad Be careful here.. Drain and cool to room temperature in a colander over the sink.
In the other pan saute the onions with paprika, salt, and pepper, over medium-low heat until they caramelize. Cook them slowly–don’t let them burn. Caramelizing onions is a skill a cook needs to learn, then use often. It takes patience. Patience is extremely important. Real caramelized onions are one of the world’s finest treats; they get so sweet you could die. Use them here. After they are caramelized, set them aside to cool completely. Don’t rush this process. The onions and livers need to be completely cooled to room temperature or the final product will be mushy. And nobody likes mushy chopped liver!
When cooled, mix the onions and livers in a bowl, tossing them with your hands to mix well. Use your hands. That’s the way real cooks cook. Then cut the eggs in half and toss them in with the rest of the mess and toss well to combine.
Then run the whole mess through a food grinder attachment to a stand mixer using the largest holes. Alternately, chop the mess up with a pastry cutter in a wooden bowl, but don’t cut the stuff up too fine. There really needs to be a bit of bite to the finished product. This isn’t pate.
Add the honey and Maggi seasoning and mix well. If the chopped liver is too dry, melt the remaining two tablespoons of fat and add it to the bowl a little at a time and mix until it reaches the consistency of tight peanut butter. Just don’t overmix here. You don’t want to chop the stuff up more in the mixing process.
Taste as you mix, adding a bit more salt and white pepper if necessary. Use just a bit more white pepper than you think you need. Chopped liver is soooo much better when it’s just slightly peppery (resist the temptation to use black pepper. It’s the wrong product. Fine-ground white pepper here, please. It should be a staple condiment in your kitchen.
Finally, coat a serving dish with a wee bit of the chicken fat or shortening and put the finished product in the bowl and chill in the fridge for at least six hours. It will be really tempting to eat it all freshly made, but don’t. Let it set up in fridge for a while. It gets better.
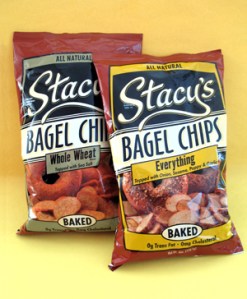
Serve the chopped liver with toasted bagel chips, available in bags at the deli counter at most grocery stores. It’s the best way. You’ll thank me later. Melba toast rounds or cocktail rye or pump slices are okay too, but not nearly as good. If you use rye or pump slices, toast them lightly before serving.
* To render chicken fat, place 1 cup raw chicken fat, 1/2 tsp kosher salt and (optionally) half a thinly sliced small onion in a heavy-bottom pot over medium heat, stirring occasionally, until the fat is liquified and the cracklings are golden brown. Strain over a Mason jar, toss the solids, cover and refrigerate until you need it.
Skinny Buffalo-Style Hot (or not so hot) Chicken Wings
Super Bowl day!
So I just know that you all have been waiting breathlessly to see what I might cook up for a Super Bowl party. Or not.
It’s tough coming up with wonderful finger-food dishes when you’ re in the process of losing a lot of weight (I’m at 33 and counting).
On the other hand, a Super Bowl just isn’t a Super Bowl without chicken wings, and so I just had to make my own.
First off, I skip the butter. I’m not quite sure why butter is necessary in chicken wings, but the place that originated the treat, the Anchor Bar in Buffalo, New York–Buffalo wings are called Buffalo wings because they were originated in Buffalo; you didn’t think they had anything do do with buffaloes, did you? Duh! Buffaloes don’t have wings!!)–used butter in the recipe, so butter has become the gospel. Not here.
Second, I skip the deep frying. Who needs the fat or the mess?
Third, when finished, I defy you to suggest that these wings aren’t every bit as good, and you can eat more of them, because they are skinnier.
A couple of notes: This recipe is for a fairly hot/spicy wing presentation. If you prefer your wings less spicy, delete some of the cayenne pepper from the dry rub, and replace the self-made sauce with your favorite hot-wing sauce from the grocery store. I have used Texas Pete’s Extra-Mild wing sauce, and all the flavor is there with a tiny little of the spice. It makes a terrific wing-sauce substitution that the kids can eat. Texas Pete’s comes in a variety of “hotnesses.” There are other pretty good wing sauces out there; two of my favorites are Tabasco brand and Budweiser Hot Wing sauce. Any sauce will do, but read the labels–watch out for fat content. Some are better than others. In my view, the lower, the better. Fat, in this case, doesn’t make the food taste better.
These are simple to make. Go for i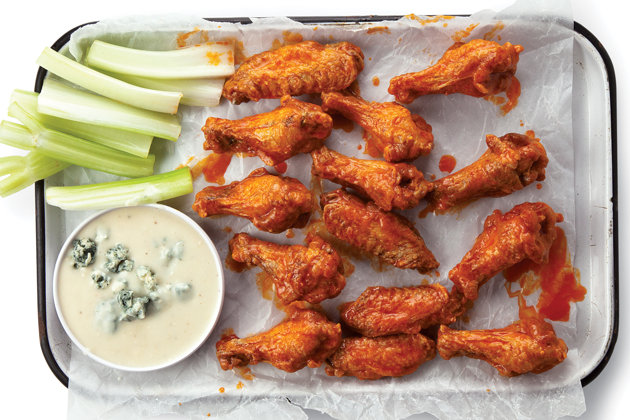 t. Treat your party.
Ingredients:
- canola oil spray
- 2 1/2 tablespoons paprika
- 2 tablespoons kosher salt
- 2 tablespoons garlic powder
- 1 tablespoon light brown granulated brown sugar
- 1 tablespoon fine-ground white pepper
- 1tablespoon onion powder
- 2 teaspoons cayenne pepper
- 1 tablespoon dried oregano
- 1 tablespoon dried thyme
- 1 teaspoon chipotle chili powder
- 1 teaspoon ground ginger
- 1/2 cup red hot pepper sauce; I still like Tabasco best, some swear by Frank’s RedHot Pepper Sauce. Use your favorite.
- 1 1/2 tablespoons white vingar
- 1 teaspoon Worcestershire sauce
- Lots of chicken wings, separated at the joint, tip portion discarded
Preparation:
1. Preheat the oven to 400 degrees F. Prepare sheet pans with a lining of aluminum foil and coat lightly with canola oil spray.
2. In a large bowl, add the first 11 ingredients (paprika through ground ginger). This is a dry rub I keep around premade in a container all the time; the recipe makes about 3/4 cup; for this recipe I use about 1/2 cup. If you’re making it up fresh, mix the ingredients well. Add the wings to the bowl and toss well to coat thoroughly. Use your hands or a big kitchen spoon. Make sure the wings are coated with the rub.
3. Spread the wings on the sheet pans and spray lightly again with canola oil. Bake in the preheated oven, turning once, until done and nicely browned, 20-30 minutes. If you have a convection oven, turn on the fan.
4. Wash the large bowl, add the pepper sauce, vinegar, and Worcestershire sauce and mix well.
5. Put the cooked wings back in the bowl and toss to coat with the sauce.
Serve hot with celery sticks and blue cheese dip. I make the blue cheese dip with 4 ounces crumbled blue cheese and 2 cups Ken’s Lite Blue Cheese salad dressing.
It’s Super Bowl Sunday. Make these wings and eat hearty, without the guilt. Eat as many as you can. Super Bowl Sunday only comes once a year.
Apple Fritters from America’s Test Kitchen
Anyone who’s followed my work for any length of time knows my allegiance to America’s Test Kitchen, the kitchen/laboratory attached to my favorite cooking periodical,  Cooks Illustrated. My experience is that any recipe they post, if followed to the letter, produces the best product in any food class. I feature stuff from America’s Test Kitchen a lot, because I have come to trust their effort and their results. I have several recipes here in Jeff’s Kitchen that are ATK-tested and recommended, and a couple of notes about stuff that is not.
Today, we’re featuring ATK’s apple fritters. I’ve scoured the Internet and looked at hundreds of apple fritter recipes, and I can say, without worrying about the recommendation, that these are the best ones I’ve come across. There are some pretty good fritter recipes out there, including one that includes fresh orange zest (I may feature that one down the road), but in terms of foolproof, great-tasting, great-looking, these are the ones to try. If I have one quibble with this recipe (and I usually have no quibble with ATK), it is that I like to mix up a sweet apple with a tart apple, so I make mine with a mixture of Granny Smith and HoneyCrisp apples (when the HoneyCrisps are in season), or Gala apples when they’re not.
Ingredients
FRITTERS
- 2 Granny Smith apples , peeled, cored, and cut into 1/4-inch pieces
- 2 cups all-purpose flour
- 1/3 cup granulated sugar
- 1 tablespoon baking powder
- 1 teaspoon Salt
- 1 teaspoon ground cinnamon
- 1/4 teaspoon ground nutmeg
- 3/4 cup apple cider
- 2 large eggs , lightly beaten
- 2 tablespoons unsalted butter , melted
- 3 cups peanut or vegetable oil
GLAZE
- 2 cups confectioners’ sugar
- 1/4 cup apple cider
- 1/2 teaspoon ground cinnamon
- 1/4 teaspoon ground nutmeg
Instructions
- 1. Spread prepared apples in single layer on paper towel–lined baking sheet and pat thoroughly dry with paper towels. Combine flour, granulated sugar, baking powder, salt, cinnamon, and nutmeg in large bowl. Whisk cider, eggs, and melted butter in medium bowl until combined. Stir apples into flour mixture. Stir in cider mixture until incorporated.
- 2. Heat oil in Dutch oven over medium-high heat to 350 degrees. Following step 1, use 1/3-cup measure to transfer 5 heaping portions of batter to oil. Press batter lightly with back of spoon to flatten. Fry, adjusting burner as necessary to maintain oil temperature between 325 and 350 degrees, until deep golden brown, 2 to 3 minutes per side. Transfer fritters to wire rack set inside rimmed baking sheet. Bring oil back to 350 degrees and repeat with remaining batter. Let fritters cool 5 minutes.
- 3. Meanwhile, whisk confectioners’ sugar, cider, cinnamon, and nutmeg in medium bowl until smooth. Top each fritter with 1 heaping tablespoon glaze. Let glaze set 10 minutes. Serve.
Jacques Pepin’s Apple Fritters
Here’s the simple approach to making killer apple fritters, the full monty, system-killer variety. You can try it difficult or you can try it simple. I prefer simple.
When I was the producer of the Larry King show in Washington, D.C., I had the pleasure of meeting Jacques Pepin, and then interviewing him several times. Each time he brought wonderful foods with him to share with us and to talk about. It being radio, it was pointless to demonstrate cooking techniques, so rather he simply brought with him those things about which he would talk, and let our enthusiasm for the food carry the narrative. Needless to say, he was one of our most requested guests. Radio carries with it such a strong component of conjuring up visions in each listener’s imagination that a wonderful man like Jacques and his sensory-overload recipes played incredibly well on the radio. Try to imagine Jacques Pepin discussing the making of apple fritters in his inimitable charming French accent and his over-the-top personality.
Serves 4 to 6 (makes about 12 fritters)
Apple fritters sprinkled with confectioners’ sugar and eaten piping hot are simplicity itself. The fruit can be cut into sticks or slices or fan shapes and dipped into the batter and fried, or it can be coarsely chopped or cut into julienne.
If you are making the fritters ahead, be sure to cook them until they are crisp and well browned. Then reheat and recrisp them in a toaster oven or under the broiler just before serving them heavily dusted with sugar.
1 cup all-purpose flour
1 large egg
1 cup ice-cold water
1 pound apples (any variety; about 3)
1 cup canola oil
½ cup confectioners’ sugar
Vigorously mix the flour, egg, and 1/3 cup of the water in a bowl with a whisk. The mixture will be fairly thick. When it is smooth, add the remaining
2/3 cup water and mix again until the water is incorporated and the batter is thin and smooth.
One at a time, stand the unpeeled apples upright on a cutting board and cut each one vertically into 1/2-inch-thick slices, stopping when you reach the core; pivot the apple and cut again, and repeat until only the core remains. Stack the apple slices and cut them into 1/2-inch-thick sticks. (You should have 4 cups.) Stir the apple sticks into the batter.
Heat the oil in a large heavy skillet. When it is hot, pour about 1/3 cup of the batter into the pan for each fritter, making 4 or 5 at a time. Using two forks, spread the batter out so the fritters are no more than 1/2 inch thick. Cook for about 4 minutes on one side, until brown and crisp, then turn and cook for about 3 minutes on the other side. Drain the fritters on a wire rack. Repeat with the rest of the batter. Sprinkle the fritters liberally with the sugar and serve.
Vietnamese Shrimp Spring Rolls
Morgan and her mom made these incredible spring rolls the other night for company, and they were a huge hit. I thought they were every bit as good as any I have had at a restaurant. Fact is, this is a restaurant recipe, from la Patisserie in Birmingham, Alabama, where a large Vietnamese population has resettled after the floods in New Orleans. There is a wonderful video that accompanies this recipe, for which I will post the link at the end of this recipe. Try these. You will need to find a good Asian market to get the rice wrappers, but if you haven’t found one already, you owe it to yourself to find one. Now. The one near us is wonderful, and always smells great. Very nice people, too.
Shrimp Spring Rolls
Ingredients:
1/4 cup rice wine vinegar
1/4 cup fish sauce
2 tablespoons white sugar
2 tablespoons lime juice
1 clove garlic, minced
1/4 teaspoon red pepper flakes
2 ounces rice vermicelli
24 baby shrimp, peeled and deveined
6 rice wrappers (8.5 inch diameter)
3 leaves lettuce, chopped
4 tablespoons finely chopped fresh mint leaves
4 tablespoons finely chopped cilantro
4 teaspoons finely chopped Thai basil
- Whisk vinegar, fish sauce, sugar, lime juice, garlic, and red pepper flakes together in a small bowl. Set the dipping sauce aside.
- Fill a large bowl with room temperature water. Add rice vermicelli and soak for 1 hour.
- Bring a large pot of water to a boil. Drop in shrimp and cook until curled and pink, about 1 minute. Remove the shrimp and drain. Or you can buy precooked baby shrimp with the tails on. Defrost and pinch off the tails. Transfer rice vermicelli noodles to the pot of boiling water and cook for 1 minute. Remove and drain in a colander. Immediately rinse the vermicelli with cold water, stirring to separate the noodles.
- To assemble the rolls, dip 1 rice wrapper in a large bowl of room temperature water for a few seconds to soften. Place wrapper on a work surface and top with 4 shrimp halves, 1/4 of the chopped lettuce, 1/2 ounce vermicelli, and 1/4 each of the mint, cilantro, and Thai basil. Fold right and left edges of the wrapper over the ends of the filling and roll up the spring roll. Repeat with remaining wrappers and ingredients. Cut each roll in half and serve with dipping sauce.
Makes 6 spring rolls
Servings: 1 roll, 2 tablespoons dipping sauce
PP3
