Category Archives: Appetizers
Tasty—And Healthy—Caesar Salad Dressing
It’s a summer classic!
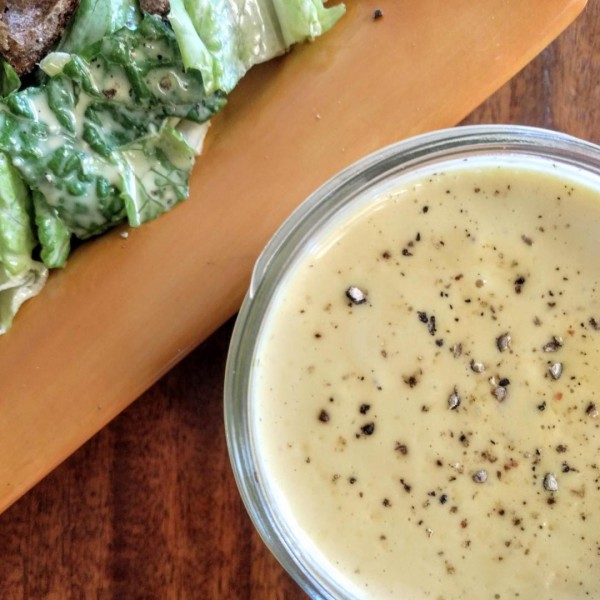
Who doesn’t love a good Caesar salad when the romaine is garden fresh, the croutons are toasty crisp, the Parmesan is salty and plentiful, and the dressing is tangy, lemony, and nicely briny? Just add some grilled chicken on a steamy summer evening, pour yourself a frosty beer or wine cooler, and dig in to this perfect hot summer treat.
Or, as we do here, pile up a batch of luscious grilled shrimp with some shredded romaine, some pickled onions, and your homemade Caesar dressing on warm tortillas and treat the family to the best fish tacos EVER!
That’s how we do it.
The Caesar palette is something with which we’re all familiar; fresh, crisp romaine, shaved Parmesan, garlicky croutons—you do make your own, right?—and that classic salty dressing. It just cries out for a cold beer in a frosty mug, doesn’t it?
But ah, you say, the dressing! Mayo, egg yolk, oil? Healthy?
Here’s a different take; it’s creamy and delicious, and I guarantee your guests will never know the difference.
We’ve eliminated the mayo and egg, reduced the amount of oil, and come up with a perfect Caesar dressing for the 21st century, when getting healthy is something that will serve all of us well.
But can’t that dressing be fussy? I say, NOPE! Just grab a food processor, dump, and Voilà! Tangy heaven. Here’s the scoop…
Ingredients:
1/3 cup freshly grated Parmesan cheese
Juice from 1 lemon
1 garlic clove, sliced thin (do not smash it)
½ tablespoon Dijon mustard (we use stone-ground Dijon)
2 anchovy filets (don’t skip the anchovies—anchovy paste from a tube works well here—about a 2-inch ribbon)
1 tablespoon GOOD extra-virgin olive oil
5 tablespoons 0% fat Greek yogurt
1/8 teaspoon kosher salt
Freshly ground black pepper (more than you think you need)
Preparation:
Simply dump all the ingredients into a food processor–it’s just the right amount for a mini-chopper–and whiz until it’s smooth. That’s it!
It works out really well to make the dressing in the morning and allow the flavors to marry, but it’s not necessary.
Shrimp Tacos

And if you want it, here’s the fast scoop on the tacos: Season the shrimp with salt and pepper; melt butter and oil in a large skillet, saute one pound of shrimp, two minutes on each side, in butter and olive oil; add some lemon juice, garlic, red pepper flakes, and freshly chopped parsley, and toss to combine. Turn off the heat. Then pile the shrimp, salad, and some pickled red onions on warm tortillas (flour tortillas are better for this recipe), and serve immediately.
Mmmmm Mmmmm Good!
Red Lentil Soup with Curry and Coconut Milk
Meatless Monday.
It’s become a thing in our house, like, I suppose, some of yours.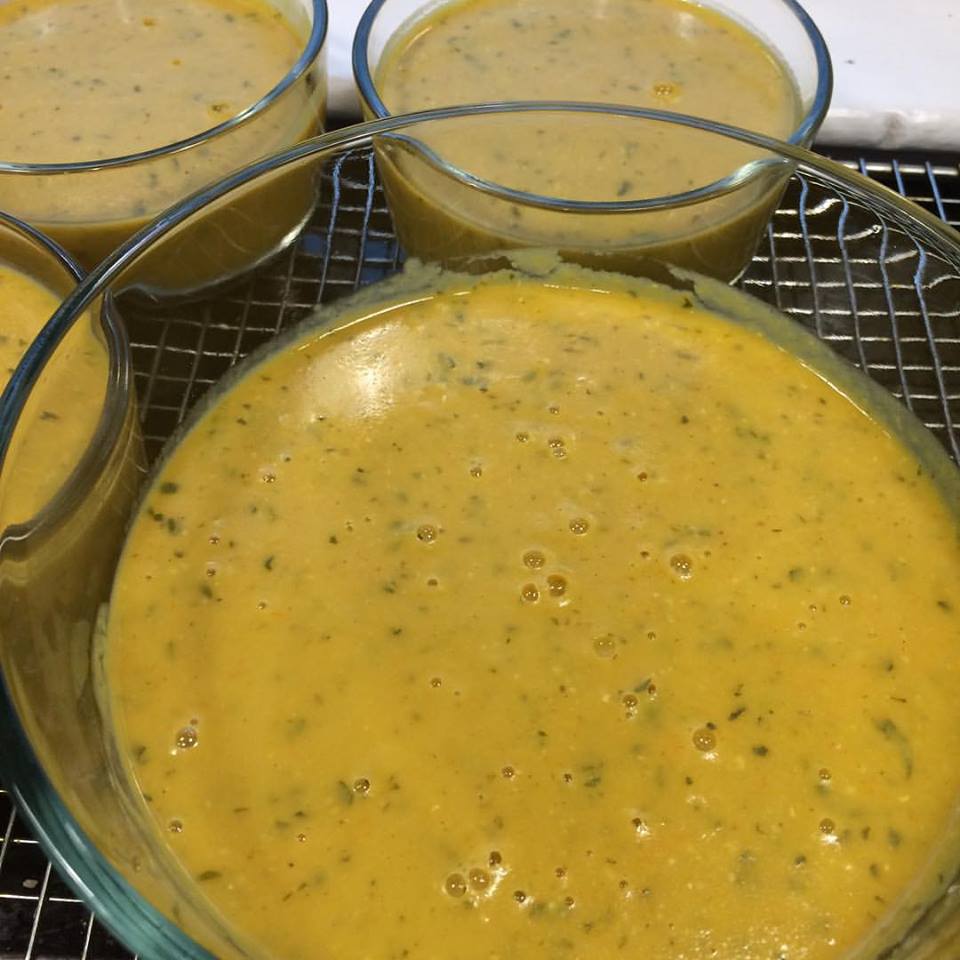
It’s something Ellen has instituted here, and it happens most of the time (except when it doesn’t). The kids often object, but not all that strenuously unless I produce something with bulgur or faro or some other grain that they perceive tastes like packing peanuts.
So we’re constantly challenged to come up with vegetarian offerings that are packed with nutritional value and interesting genealogy and, oh yes, flavor.
Such is the case with this tasty and fragrant Indian-influenced soup adapted from a recipe taken from the pages of Vegetarian Times. It’s loaded with flavor—it will perfume your whole house as it cooks—and protein and fiber, and will gain props all round as you serve it up with an interesting hunk of artisan bread or pita wedges or toasted naan, or a scoop of brown rice on the side.
Try this one. It’s simple to make and memorable, too.
By the way, if you’ve avoided getting an immersion blender, this is the perfect excuse to get one, or ask Santa to deliver one to you this holiday season.
Red Lentil Soup with Curry and Coconut Milk
Ingredients:
3 tablespoons vegetable oil
4 cups cold water.
2 cups sweet onions, chopped
1 cup red lentils
3 medium carrots, peeled and roughly chopped
1 14-ounce unsweetened (light if possible) coconut milk
1 teaspoon kosher salt
1/2 teaspoon finely round white pepper
1 bay leaf
3 cloves garlic, roughly minced
1-inch piece fresh ginger, peeled and roughly minced
1 tablespoon Indian (or try Jamaican) curry
½ cup chopped fresh cilantro
Preparation:
In a medium saucepan, heat 2 tablespoons oil over medium heat. Add onions and cook, stirring often, until they begin to brown, about 10 minutes. Add water, lentils, carrots, coconut milk, salt, pepper, and the bay leaf. Cover and bring to a boil. Reduce the heat to medium-low and simmer, partially covered, until the lentils are tender, 20-30 minutes.
Meanwhile, in a small non-stick skillet, heat the remaining oil over medium heat. Add the garlic, ginger, curry, and cilantro. Cook, stirring often, until fragrant, 2-3 minutes, then add to the soup. Remove the bay leaf.
Puree the soup, either in the food processor or blender in batches, or in the pot with an immersion blender, until velvety smooth. Taste and add a bit more salt and pepper if necessary.
Serve hot with fresh sautéed vegetables, brown rice, and/or a nice fresh bread.
Fabulous Summer Salads
So. Summer.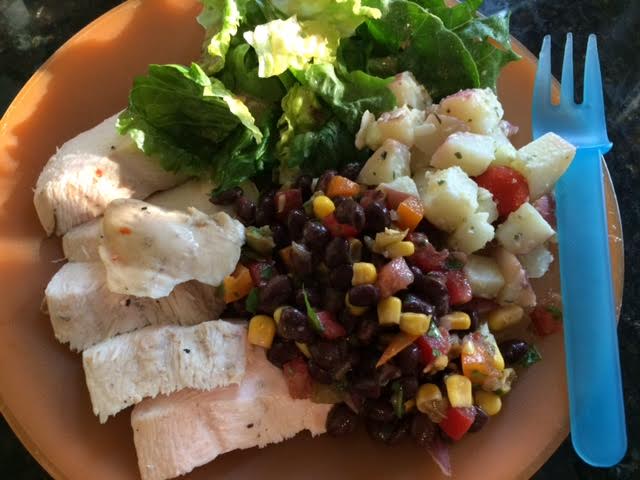
It’s hot out there; who wants to cook? Not me. So what I worked on this week are summer salads.
Ho hum, right? Potato salad, cole slaw, macaroni salad? Same old same old.
Not this guy.
I came up with two wonderful new recipes inspired by other, pre-existing recipes and worked them over into wonderful new dishes with my (and Ellen’s) personal twists to make a balmy summer evening absolutely sing with new flavors.
Standard ingredients, new applications. Here’s what we’ve got.
Among the things upon which Ellen and I agree is that we don’t much like creamy potato salads; you know the ones–potatoes, celery, mayonnaise, salt and pepper–not much about which to get excited.
Enter Eating Well magazine. Eating well is something I excel at, although “well” is a bit of a stretch. The magazine means healthy; to me, “eating well” generally means enjoying what we’ve made to the extreme. In this case, I’ll stick to (relatively) healthy–no mayo in this potato salad, just a beautious blend of herbs and spices that make a summer day feel like a celebration. This month’s issue of Eating Well features a choice of potato salads that are different from the norm almost as much as they are different from each other.
Our choice from this page was a luscious Greek potato salad with (or, in our case, without) beautiful Kalamata olives (Ellen doesn’t like olives, so we left them out, but I love them, so I say “put ’em in!” Here’s the plan:
The second recipe is a variation on a Mexican bean salad, with a tangy cumin/lime dressing that is similar to one that has long been one of our favorites. It’s like a bean salad I wrote about a couple of years ago, but with a twist in the dressing. The dressing started with the Food Network’s Ellie Krieger, but I’ve worked it over to my liking, and I sure do like it. Better, although the original is delicious.
I think you’ll like both recipes. We served them with grilled chicken and freshly torn romaine lettuce and the same dressing as in the beans. Fabulous!
Greek Potato Salad
Ingredients:
2½ pounds red or Yukon Gold potatoes
1 cup cherry tomatoes, halved
1/3 cup reduced-fat Feta cheese, crumbled
¼ cup Kalamata olives, quartered (optional! — NOT!)
1 medium cucumber, seeded and quartered and diced
2 tablespoons fresh oregano, chopped
¼ cup extra-virgin olive oil
3 tablespoons white balsamic vinegar
¼ cup finely chopped shallot
1 tablespoon Dijon mustard
Kosher salt and freshly ground black pepper to taste
Preparation:
Scrub and dice the potatoes to a ½-inch dice and place on a steamer basket above one inch of water in a large pot; steam until tender, 12-15 minutes. Place the potato dice on a baking sheet, sprinkle with ¼ teaspoon kosher salt and let cool for 15 minutes. Then gently place them in a large bowl.
In a separate bowl, whisk together olive oil, vinegar, shallot, mustard, and salt and pepper. Add the tomatoes, Feta, olives (or not ;), cucumber, and oregano to the potatoes, then drizzle the dressing into the bowl. Toss gently, so as not to break up the potatoes, and add salt and pepper to taste. Place the bowl in the fridge for at least two hours, then serve.
Mexican Black Bean and Tomato Salad
Ingredients:
2 cans black beans, rinsed well
4 fresh San Marzano (or Roma) plum tomatoes, ½-inch dice
1 orange (or yellow) bell pepper, seeded and pith removed, ½-inch dice
1 4-ounce can chopped green chiles, drained
½ red onion, diced
1 10-oz package of frozen corn, thawed, rinsed, and drained
¼ cup chopped cilantro
¼ cup extra-virgin olive oil
½ teaspoon freshly grated lime zest
1 ½ teaspoons freshly squeezed lime juice
1 ½ teaspoons freshly squeezed lemon juice
1 ½ teaspoons ground cumin
1/8 teaspoon ground chipotle pepper (more if you like your salads tangy!)
½ teaspoon salt
¼ teaspoon finely ground white pepper
Preparation:
Place the first seven ingredients (beans through cilantro) in a large bowl. In a separate, smaller bowl, add the zest, juice, cumin, chipotle pepper, salt, and white pepper, and stir to mix well. Slowly drizzle the olive oil into the dressing bowl whisking constantly to create a mixed dressing that thickens as you add the oil. Pour over the salad ingredients and toss to coat the salad well. Serve immediately to get all the flavor from the tomatoes and cilantro, or chill for later serving.
Both these recipes are tasty and reasonably healthy, and go well with anything grilled. Try ‘em both!
Locally Grown French Mushroom Soup
Continuing our trip around the world with friends,  we next stop in Marseille, on the southeast coast of France, to where we have traveled from Spain by train. There we encounter a small restaurant that has created a velvety-smooth mushroom soup that is dressed with a “salad” of ingredients also found in the soup. It is not your mother’s mushroom soup, or anything like that concentrated product from the soup giant. This soup has a sophisticated and complex flavor that is at the same time subtle and earthy, touched as it is by fresh raw mushrooms that bathe shortly in finished soup as you partake. Try this one yourself. It is simple and elegant.
The soup is a true French creation: it’s made with champignons de Paris, or what we know as plain white or button mushrooms, and it’s inspired by a soup from the Paris bistro, Les Papilles (whose name means taste buds). At the little restaurant, the soup comes to the table in a big tureen, and you’re encouraged to dip the ladle into it as often as you like.
At Les Papilles, shallow soup plates are brought to the table sans soup but with a small mushroom “salad”: thin slices of raw mushrooms seasoned with salt, pepper, chopped chives, and parsley and topped with a tiny bit of crème fraîche. When the hot soup is poured over the salad, the mushrooms cook just slightly. You’ll get to enjoy that nice contrast between the cooked soup and the raw vegetable.
The name champignons de Paris is more honorific than correct these days. While the mushrooms did get their start near Paris — Louis XIV had them in the gardens at Versailles — they were found growing in the catacombs beneath Paris when construction for the metro began, today the mushrooms are ubiquitous in America, but they are grown all over Chester county right next to us here in Lancaster, and they are likely fresher here than almost anywhere else. I believe we could just as easily call this Fresh and Local Mushroom Soup, as all the ingredients–right down to the butter and yogurt–can (and ought to be) locally sourced.
French Mushroom Soup
Ingredients:
For the soup
2 tablespoons unsalted butter
1½ large onions, coarsely chopped
3 large garlic cloves, split, germ removed, and coarsely chopped
Salt and freshly ground white pepper
1½ pounds white mushrooms, wiped clean, trimmed, and sliced
1/3 cup dry white wine
2 parsley sprigs
1 rosemary sprig
6 cups vegetable broth
2 tablespoons French cognac
For the “salad”
6 large white mushrooms, wiped clean and trimmed
2 scallions, white and light green parts only, thinly sliced
2 tablespoons minced fresh parsley
1 tablespoon minced fresh chives
Salt and freshly ground white pepper
Plain Greek yogurt, for serving
To make the soup: Melt 1 tablespoon of the butter in a large Dutch oven or soup pot over low heat. Toss in the onions and garlic, season with salt and white pepper, and cook, stirring often, for about 5 minutes, until the vegetables are soft. Add the mushrooms and the remaining tablespoon of butter, raise the heat to medium, and cook, continuing to stir, for another 3 minutes or so, until the mushrooms release their liquid. Increase the heat to high and cook until almost all of the liquid evaporates. Pour in the wine and let it boil until it, too, almost evaporates.
Toss the herbs into the pot, add the broth or water (and the bouillon cubes, if you’re using them), and bring to a boil. Lower the heat, cover the pot almost completely, and cook at a gentle simmer for 20 minutes. Pull out the rosemary sprig (it will have lost its leaves). Add the cognac.
Working in small batches in a blender or food processor, puree the soup until it is very smooth; or use an immersion blender. If you’re using a processor or an immersion blender, you probably won’t get a super-smooth soup. If you’d like, you can push the pureed soup through a strainer, but it’s really not necessary. Taste for salt and white pepper. Pour the soup back into the pot and heat it gently — it shouldn’t boil, but it should be very hot.
To make the salad and serve: Divide the mushrooms, scallions, parsley, and chives among six soup plates; season lightly with salt and white pepper. Ladle the soup into the bowls, and top each with a dollop of crème fraîche, if desired.
Serving
Arrange the salad in shallow bowls. Bring the dressed bowls to the table and ladle the soup from a tureen or soup pot into the bowls. Finish the soup with a spoonful of crème fraîche or plain Greek yogurt and sprinkle a bit of freshly chopped parsley over the top.
Storing
The soup can be covered and refrigerated for up to 3 days or packed airtight and frozen for up to 2 months.
Some of the text for this entry and the recipe, which I have altered just a bit, come from a fine cookbook titled Around My French Table, by Dorie Greenspan.
Around the World in Eight Courses (Continued)
TAPAS!
Here are more wonderful recipes from our Around the World in Eight Courses dinner party ten nights ago. These are three more of the tapas presentations on the platter. Mini roasted peppers stuffed with herbs and goat cheese, a terrific parsley and anchovy (that’s right! anchovy) dip that was served with slices of bell pepper, toasted pita chips, and an onion and potato torte that was cut into bite-sized pieces. The surprise of the platter was the parsley dip, with the anchovies poached in a broth of milk and olive oil. Not salty, not offensive in any way, but rather very tasty and begging to be sampled twice.
Here, then are the recipes:
Peppers Stuffed with Goat Cheese
Ingredients:
8 ounces goat cheese
3 scallions, green parts only, roughly chopped
½ cup fresh mint, finely chopped
Red pepper flakes
Zest and juice of two lemons
12 mini red and yellow bell peppers
Preparation:
Prepare the filling an hour or two ahead. Place goat cheese, scallions, mint, and red-pepper flakes in a bowl. Zest and juice lemons into the bowl, straining seeds. Mix until well combined. Refrigerate until ready to fill the peppers.
Roast the peppers in a 350-degree oven, turning every five minutes, until they are blackened all over (alternately, roast them over a gas-stove flame, using tongs to keep them above the flames); then place them on a parchment-lined tray and cover with a dish towel until they are completely cool. Peel the skins gently, trying not to damage the roasted peppers.
Spoon the filling into a plastic bag, squeeze the filling into a bottom corner of the bag, remove as much air from the bag as possible, and twist the top of the bag. This forms a small piping bag. Cut a small piece of the bottom corner of the plastic bag, and fill each pepper with about 2 tablespoons of the goat cheese mixture. Place on a serving plate, and sprinkle with red-pepper flakes; garnish with spring onions if desired. Serve immediately, or cover and refrigerate until ready to serve, about 1 hour.
Parsley-Anchovy Dip
Ingredients:
2/3 cup extra-virgin olive oil
½ cup whole milk
1 head garlic, peeled and smashed
16 anchovies
2 bunches parsley heads
ground pepper
2-3 tsp. Lemon juice
Preparation:
In a small saucepan, bring olive oil, milk, garlic, and anchovy fillets to a simmer over medium; cook until garlic is tender, 8 minutes. Transfer to a food processor and add parsley. Pulse until smooth; season with pepper and lemon juice.
Onion and Potato Torte
Ingredients:
7 tbsp EVOO
1 medium onion, ½-inch rounds
3 Yukon golds, ¼-inch rounds
8 eggs
Kosher salt
Freshly ground pepper
1 clove garlic
Chicory or endive
2 tbsp sherry vinegar
Preparation:
Preheat oven to 325.
Saute onions till golden, place in bowl. Repeat with potatos. Whisk together eggs, salt, and pepper. Add to onions and potatoes.
Heat pan with extra-virgin olive oil, add mixture and cook until edges begin to brown. Place in oven and bake, covered, until set, about 10 minutes. Remove top and broil until lightly browned.
Brush bread with EVOO and garlic, toast until golden.. Toss lettuce with vinegar, salt and pepper. Scatter over bread, cover with torte, cool. Serve at room temp.
Avocado and Prawn Cocktail and Roasted Baby Potatoes with Romesco Sauce
From our “Around the World in Eight Courses” dinner comes the first two recipes from our tapas platter:
Avocado and Prawn Cocktail
Ingredients: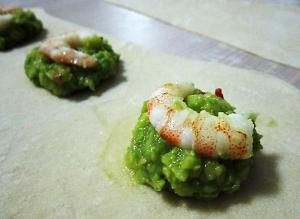
1 large avocados
5 oz. chopped prawns
1 tablespoon extra-virgin olive oil
1 scallion
1 clove garlic
Kosher salt
1.5 oz heavy cream
1.5 teaspoon extra-virgin olive oil
Preparation:
Peel the prawns and remove the heads. Season the bodies and fry in the oil. (The heads can be used to make the stock).
Peel the avocados, remove the pits and crush the flesh with the chopped spring onion, the peeled and finely chopped garlic, the olive oil and the cream to form a velvety smooth purée. Season to taste.
Drop a dollop of the avocado mix onto the platter and top with one shrimp (or the other way around.
Roasted Baby Potatoes with Romesco Sauce
Ingredients: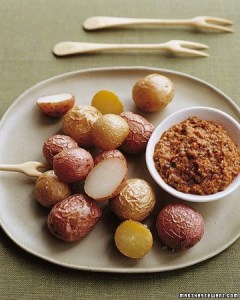
- 3 ounces whole blanched almonds
- 2 roasted red peppers
- 1 small garlic clove
- 1 teaspoon coarse salt
- 1/8 teaspoon smoked hot paprika
- 1 teaspoon sherry vinegar or red-wine vinegar
- 1 1/2 tablespoons extra-virgin olive oil
- 1 pound small red and yellow potatoes
Preparation:
- Preheat oven to 350 degrees. Spread almonds in a single layer on a rimmed baking sheet; toast in oven until lightly golden and fragrant, 7 to 8 minutes. Remove from oven, and let cool 15 minutes.
- Raise oven to 375 degrees. In a food processor, combine almonds, garlic, roasted red peppers, 3/4 teaspoon salt, paprika, mint, and vinegar. Process to a coarse paste, about 1 minute. With machine running, add 1 tablespoon oil in a slow, steady stream until sauce is smooth. Transfer sauce to a small bowl, and set aside.
- Place potatoes on a rimmed baking sheet, and toss with remaining 1/2 tablespoon oil and 1/4 teaspoon salt. Roast in oven until skins are slightly crisp and potatoes are tender, shaking pan once to turn potatoes, 20 to 30 minutes. Serve hot with sauce on the side.
Meyer Lemon Marmalade
E posted a photo on her Pinterest page suggesting that Meyer lemon marmalade 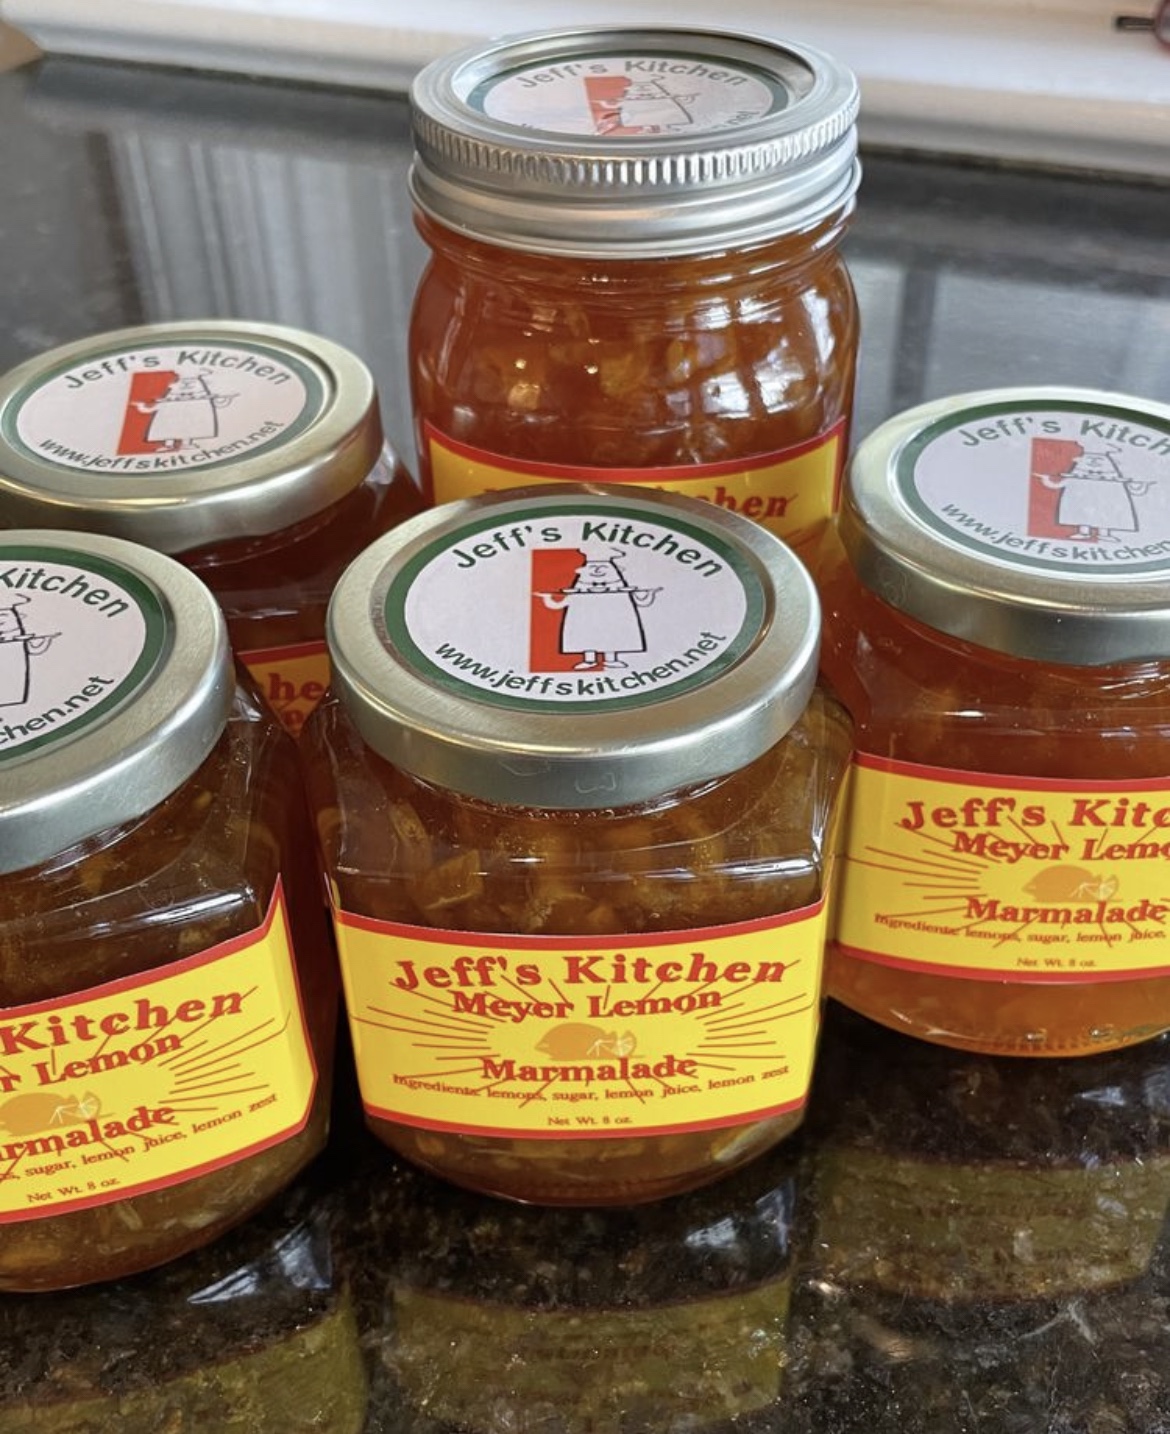 is one of her favorite things, even as she spread a wonderful Trader Joe’s rendition of orange marmalade on her rosemary-olive-oil bread from Thom’s. Given that whatever E thinks is a “favorite thing” ought to be made a reality, I decided to make a batch of the jelled gold for her. Not a marmalade fan myself, I needed to learn how marmalade is made, and I discovered how simple it is.
So off to market I go, ISO ripe Meyer lemons. The good news is that I knew just where to find them–at John and Ethel Stoner’s little stand in the middle of our local jewel, the Lancaster Central Market.
The Meyer lemon, in case you’re not familiar with it, is rounder than a true lemon. The skin is fragrant and thin, colored a deep yellow with a slight orange tint when ripe. Meyer lemons have a sweeter, less acidic flavor than the more common supermarket lemon varieties. The Meyer lemon is commonly grown in China in garden pots as an ornamental tree. It became popular as a food item in the United States after being rediscovered by chefs such as Alice Waters at Chez Panisse in San Francisco at the end of the 1990s, and even more so when Martha Stewart began featuring them in her recipes.
Citrus marmalades are basically reductions of the fruit, water, and sugar, cooked slowly until the sugars begin to caramelize. Orange marmalade has been a staple of British and American breakfasts for generations, certainly around here. So the idea of Meyer lemon marmalade seemed like such a natural for us, given E’s sudden “pinterest” in the stuff and my constant desire to please her with surprising cooking choices.
Ergo Meyer lemon marmalade. Sweet, tart, and tasty, it’s wonderful on English muffins and any good artisan bread you can imagine.
Here’s my take:
Meyer Lemon Marmalade
Ingredients:
6 Meyer lemons (about 1 1/2 pounds)
4 cups water
4 cups sugar
Preparation:
Quarter the lemons and separate the seeds (save the seeds!). Remove the ends and slice the lemons as thinly as possible, and reslice any larger bits of lemon rind to small pieces. Place all the lemon seeds in a cheesecloth bag and tie off the ends. Combine the lemon slices, the seed bag, and water in a large non-reactive pot, stir to mix well, cover and allow to stand at room temperature for 24 hours. (I used an enamel-coated cast-iron pot–Le Creuset–but you could also use a stainless-steel pot. I actually have a favorite stainless-steel pot I will use in the future, a $15.00 gem from Ikea. It holds five quarts, and has quart- and liter- markings etched ON THE INSIDE OF THE POT: BRILLIANT! This feature will work you your amazing advantage for this recipe, as you will see).
After the lemons have rested in the water for 24 hours, remove the seed bag and bring the mixture to a boil, reduce the heat and simmer slowly until the mixture is reduced to 4 cups (or 1 quart! See why the inside-the-pot etchings on the Ikea pot are so terrific for this recipe?). Add the sugar to the lemons, stir well to dissolve the sugar, and boil over moderate heat, stirring occasionally and skimming off any foam that develops, for 15-20 minutes, until a teaspoonful of the marmalade dropped on a cold plate gels (you can skip this test if you wish, it really works).
In the meantime, prepare six 1/2-pint jars for canning: wash and rinse the jars, lids, and rings, set them in a large pot of water and bring to a boil; allow the jars to simmer at a slow boil for 30 minutes, then turn the fire off under the pot.
When the marmalade is ready, ladle hot marmalade into the hot jars to within 1/4 inch of the rim, wipe the rim of the jar with a damp towel, and seal the jars with the hot lids and rings. Set the jars back into the hot water, bring to a boil, cover the pot and boil the jars for ten minutes, then turn off the heat, remove the cover, and allow to rest in the hot water five minutes more. Using jar tongs, transfer the jars to a wire rack and allow the marmalade to cool completely, then rest unmoved for twenty-four hours. Check to ensure that the lids have popped inward and the jars have sealed. If any jars haven’t popped, refrigerate them and use immediately. The sealed jars will keep in a cool, dark place for 1 year.
Next batch I’ll make will include 1 teaspoon of finely chopped fresh rosemary.
Just sayin’.
Hearty Mushroom-Barley Soup…Moosewood Style
The first thing I want to report in this entry is that I love—LOVE!!!—the Moosewood Restaurant in Ithaca, NY. For years I have used and featured recipes from the various Moosewood cookbooks; one of my all-time favorites is Moosewood Celebrates. It is chock full of holiday-specific recipes for just about as many holidays that you can imagine.
And this being the coldest part of the coldest winter in my memory, I thought I’d cook my go-to meal for a winter Sunday evening. 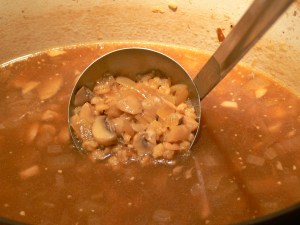
Soup.
You all know of my affinity for soups. I love making soups—creamy soups, hearty soups, beefy soups, chickeny soups, veggie soups—there isn’t a soup I won’t try.
But this week, I’m turning back to what I know and love best: Moosewood.
This recipe comes from the original book, The Moosewood Cookbook. Compiled and written by Molly Katzen and published in 1977, The Moosewood Cookbook is a beautiful-to-look-at-and-read cookbook, with lovely pen-and-ink drawings instead of photographs, a typeface reminiscent of hand-written recipes, and one of the best collections of down-home vegetarian recipes that don’t scream VEGETARIAN!!!, but rather present tasty entries that a whole family can enjoy without feeling like they are eating nuts and twigs. This is a soup I made a variation of at the gourmet store in Miami, and was one of our favorites. Herewith, I present to you the Moosewood Restaurant version of one of our all-time faves:
THE MOOSEWOOD RESTAURANT MUSHROOM-BARLEY SOUP
Ingredients:
½ cup raw pearled barley
1 ½ cups water
5 cups vegetable stock
1 teaspoon kosher salt
4 tablespoons tamari
4 tablespoons dry sherry
3 tablespoons unsalted butter
2 cloves garlic, minced fine
2 small-to-medium onions
1 pound fresh mushrooms, sliced white mushrooms
Preparation:
Cook the barley in 1 ½ cups water for 45 minutes at very low heat. Do it right in the soup pot. Add the stock, tamari and sherry and continue to simmer.
Saute the onions and garlic in the butter slowly, until they begin to brown lightly and start to caramelize. When they begin to soften, add the mushrooms and salt. When the mushrooms are tender, add to the simmering soup. Make sure to get all the liquid that is rendered by the onions and mushrooms.
Give the soup a generous grind of fresh black pepper and simmer 20 minutes over the lowest possible heat. Taste and add salt and pepper if necessary. Serve with fresh, warm, crusty bread.
I can’t begin to tell you just how wonderful this soup is; it’s reminiscent of the best French onion soup you’ve had, and so much more. It’s fragrant and hearty; it’s thick enough to stick to your ribs in winter, and at the same time tasty enough to serve to company. Try this one. It’s an oldie but goodie, and not much has come across my table that is much better.
What??? Living in Lancaster Ain’t Chopped Liver
I had a request.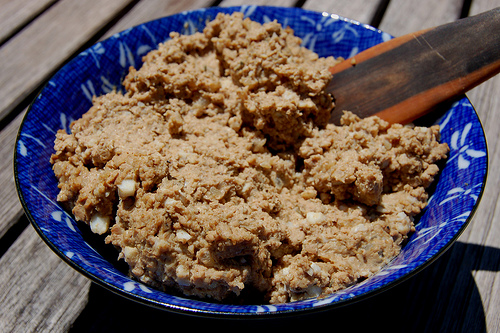
I’m honoring it, with one of my favorite recipes of all time. I made it at the Epicure in Miami Beach, usually 120 pounds a week. They sell a lot of chopped liver in Miami Beach–at least they did when I was there. Of course, Miami Beach wasn’t then what it is now; it was full of people who ate chopped liver and died young (young in Miami Beach back then was defined as 88). But we made chopped liver. Legend had it it was my grandmother’s recipe. I can’t say for sure; she never made it for me, and my father used to say that the rumors of her cooking skills were greatly exaggerated. She was, after all, a working woman from the time she arrived in the US at Providence, R.I. back at the turn of the twentieth century until she had her first heart attack at the age of sixty-something. Grandma Jenny was the greatest. Big, full of life, typical of the American Jewish grandmother but with none of the passive-aggressiveness. Nothing passive about Jenny. Her aggressiveness was right there in your face. Ask Uncle Sidney. But she was very kind.
But a cook? I think not so much. But she used to make me a mean saucer full of hot water with lemon.
Anyway here’s our chopped liver recipe, scaled down from the 120-pound recipe to a more manageable quantity. You might think this is a lot of chopped liver–who needs this much anyway??–but resist the temptation to halve the recipe. This will lose almost half its weight in water during the cooking process. Make at least this much, maybe even double it. This recipe will serve six nicely as an appetizer.
Jenny’s (?) Chopped Liver
Ingredients:
2 pounds fresh chicken livers
2 pounds sweet Vidalia (or large yellow) onions, halved, then thinly sliced
2 tablespoons sweet paprika
1/2 cup plus two tablespoons rendered chicken fat* (see note below)
8 hard-cooked eggs
2 teaspoons kosher salt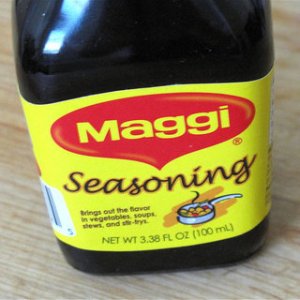
1/2 teaspoon fine-ground white pepper
2 tablespoons honey
2 tablespoons Maggi Seasoning (available at many good specialty grocery stores, and at my local Asian market)
Preparation:
Heat 1/4 cup chicken fat or vegetable shortening until shimmering in each of two large saute pans. Don’t go short here. Hey! This ain’t health food!
In one pan place the chicken livers and saute at medium heat until there is no more pink in the middle and they just begin to crisp up. A little crispiness in the liver is good. A lot is bad Be careful here.. Drain and cool to room temperature in a colander over the sink.
In the other pan saute the onions with paprika, salt, and pepper, over medium-low heat until they caramelize. Cook them slowly–don’t let them burn. Caramelizing onions is a skill a cook needs to learn, then use often. It takes patience. Patience is extremely important. Real caramelized onions are one of the world’s finest treats; they get so sweet you could die. Use them here. After they are caramelized, set them aside to cool completely. Don’t rush this process. The onions and livers need to be completely cooled to room temperature or the final product will be mushy. And nobody likes mushy chopped liver!
When cooled, mix the onions and livers in a bowl, tossing them with your hands to mix well. Use your hands. That’s the way real cooks cook. Then cut the eggs in half and toss them in with the rest of the mess and toss well to combine.
Then run the whole mess through a food grinder attachment to a stand mixer using the largest holes. Alternately, chop the mess up with a pastry cutter in a wooden bowl, but don’t cut the stuff up too fine. There really needs to be a bit of bite to the finished product. This isn’t pate.
Add the honey and Maggi seasoning and mix well. If the chopped liver is too dry, melt the remaining two tablespoons of fat and add it to the bowl a little at a time and mix until it reaches the consistency of tight peanut butter. Just don’t overmix here. You don’t want to chop the stuff up more in the mixing process.
Taste as you mix, adding a bit more salt and white pepper if necessary. Use just a bit more white pepper than you think you need. Chopped liver is soooo much better when it’s just slightly peppery (resist the temptation to use black pepper. It’s the wrong product. Fine-ground white pepper here, please. It should be a staple condiment in your kitchen.
Finally, coat a serving dish with a wee bit of the chicken fat or shortening and put the finished product in the bowl and chill in the fridge for at least six hours. It will be really tempting to eat it all freshly made, but don’t. Let it set up in fridge for a while. It gets better.

Serve the chopped liver with toasted bagel chips, available in bags at the deli counter at most grocery stores. It’s the best way. You’ll thank me later. Melba toast rounds or cocktail rye or pump slices are okay too, but not nearly as good. If you use rye or pump slices, toast them lightly before serving.
* To render chicken fat, place 1 cup raw chicken fat, 1/2 tsp kosher salt and (optionally) half a thinly sliced small onion in a heavy-bottom pot over medium heat, stirring occasionally, until the fat is liquified and the cracklings are golden brown. Strain over a Mason jar, toss the solids, cover and refrigerate until you need it.
Pho Bo (Beef Pho) and Pho Ga (Chicken Pho)
Please permit me to introduce you to Andrea Nguyen.
Andrea is the maven of an incredible website that is full of the culture and recipes of Viet Nam, www.vietworldkitchen.com. It is there that I found two recipes that are to become staples of my kitchen, Chicken Pho and beef Pho, the rich and tasty dinner soups that are central to the culture of Viet Nam, and have found their way into the lore of American cuisine by way of the many immigrants from South Viet Nam who have found their way to America. Local to us here in Lancaster is the incredible Rice & Noodles restaurant in Manheim Township, an addition to our culinary life that is among the most welcome I have seen in my years in Central Pennsylvania. Vy and her family moved here after the disastrous hurricane Katrina decimated their home and business in New Orleans, and they are a most pleasurable addition to our wonderfully diverse life here in Lancaster County. Vy’s Pho soups are a joy to behold, and while I love dropping in to grab a potful and bringing it home, I wanted to find a way to make it myself.
Enter Andrea Nguyen.
She has produced a fabulous collection of her own family recipes into an incredible cookbook, Into the Vietnamese Kitchen, which I have purchased as a NookBook and downloaded onto my Nook and my kitchen computer, my beautiful HP Touchsmart PC, which has become the most invaluable kitchen accessory I own (and which my better half–who was skeptical when I insisted that it had to be in our remodeled kitchen–now considers it vital to the welfare of our family).
But I digress…
Andrea Nguyen has enlightened me to the ways of Vietnamese Pho, and I am now a changed man. The stock used to make this legendary meal is the stuff of magical qualities, and I think that I will forever keep frozen containers of it, ready to use whenever the mood comes upon me–just add noodles and protein!
Here I will introduce you to the magic of two varieties of Pho, Ga (chicken) and Bo (beef), which hopefully transform your life as they have mine.
Pho Bo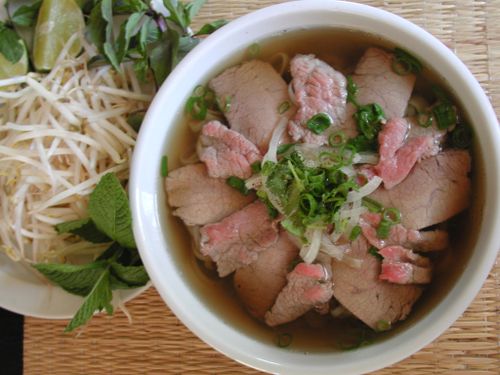
For the broth:
2 medium yellow onions (about 1 pound total)
4-inch piece ginger (about 4 ounces)
5-6 pounds beef soup bones, marrow and knuckle bones (get them at Central Market if you can’t find them at the grocery store)
5 star anise (40 star points total)
6 whole cloves
1 whole cinnamon stick
1 pound piece of beef chuck, rump, brisket or cross rib roast, cut into 2-by-4-inch pieces (weight after trimming)
1 1/2 tablespoons salt
4 tablespoons fish sauce
1 ounce (1-inch chunk) yellow rock sugar (duong phen; get this at the Asian market on Liberty Street or the one near McCaskey High School)
For the bowls:
1 1/2-2 pounds small (1/8-inch wide) dried or fresh banh pho noodles
1/2 pound raw eye of round, sirloin, London broil or tri-tip steak, thinly sliced across the grain (1/16 inch thick; freeze for 15 minutes to make it easier to slice)
1 medium yellow onion, sliced paper-thin, left to soak for 30 minutes in a bowl of cold water
3 or 4 scallions, green part only, cut into thin rings
1/3 cup chopped cilantro
Ground black pepper
Optional garnishes arranged on a plate and placed at the table:
Sprigs of spearmint and Asian/Thai basil
Leaves of thorny cilantro (ngo gai–also available at most good Asian markets)
Bean sprouts (about 1/2 pound)
Red hot chiles (such as Thai bird or dragon), thinly sliced
Lime wedges
Prepare the Pho broth:
 Char onion and ginger. Use an open flame on grill or gas stove. Place onions and ginger on cooking grate and let skin burn. (If using stove, turn on exhaust fan and open a window.) After about 15 minutes, they will soften and become sweetly fragrant. Use tongs to occasionally rotate them and to grab and discard any flyaway onion skin. You do not have to blacken entire surface, just enough to slightly cook onion and ginger.
 Let cool. Under warm water, remove charred onion skin; trim and discard blackened parts of root or stem ends. If ginger skin is puckered and blistered, smash ginger with flat side of knife to loosen flesh from skin. Otherwise, use sharp paring knife to remove skin, running ginger under warm water to wash off blackened bits. Set aside.
Parboil bones. Place bones in stockpot (minimum 12-quart capacity) and cover with cold water. Over high heat, bring to boil. Boil vigorously 2 to 3 minutes to allow impurities to be released. Dump bones and water into sink and rinse bones with warm water. Quickly scrub stockpot to remove any residue. Return bones to pot.
Simmer broth. Add 6 quarts water to pot, bring to boil over high heat, then lower flame to gently simmer. Use ladle to skim any scum that rises to surface. Add remaining broth ingredients and cook, uncovered, for 1 1/2 hours. Boneless meat should be slightly chewy but not tough. When it is cooked to your liking, remove it and place in bowl of cold water for 10 minutes; this prevents the meat from drying up and turning dark as it cools. Drain the meat; cool, then refrigerate. Allow broth to continue cooking; in total, the broth should simmer 3 hours.
Strain the broth through fine strainer. If desired, remove any bits of gelatinous tendon from bones to add to your pho bowl. Store tendon with cooked beef. Discard solids.
Skim as much fat from top of the broth as you like. (Cool it and refrigerate it overnight to make this task easier; reheat before continuing.) Taste and adjust flavor with additional salt, fish sauce and yellow rock sugar. The broth should taste slightly too strong because the noodles and other ingredients are not salted. (If you’ve gone too far, add water to dilute.) Makes about 4 quarts.
Assemble pho bowls:
The key is to be organized and have everything ready to go. Thinly slice cooked meat. For best results, make sure it’s cold.
Heat the broth and ready the noodles. Reheat the broth over medium flame as you’re assembling bowls. If you’re using dried noodles, cover with hot tap water and soak 15-20 minutes, until softened and opaque white. Drain in colander. For fresh rice noodles, just untangle and briefly rinse in a colander with cold water.
Blanch noodles. Fill 3- or 4-quart saucepan with water and bring to boil. For each bowl, use long-handle strainer to blanch a portion of noodles. As soon as noodles have collapsed and lost their stiffness (10-20 seconds), pull strainer from water, letting water drain back into saucepan. Empty noodles into bowls. Noodles should occupy 1/4 to 1/3 of bowl. I prefer fewer noodles, because I want more broth! Then blanch bean sprouts for 30 seconds in same saucepan. They should slightly wilt but retain some crunch. Drain and add to the garnish plate.
Add other ingredients. Place slices of cooked meat, raw meat and tendon (if using) atop noodles. (If your cooked meat is not at room temperature, blanch slices for few seconds in hot water from above.) Garnish with onion, scallion and chopped cilantro. Finish with black pepper.
Ladle in broth and serve. Bring broth to rolling boil. Check seasoning. Ladle broth into each bowl, distributing hot liquid evenly so as to cook raw beef and warm other ingredients. Serve your Pho with with the garnish plate.
Note: Yellow rock sugar (a.k.a. lump sugar) is sold in one-pound boxes at Chinese and Southeast Asian markets. Break up large chunks with hammer.
Variations: If you want to replicate the splendorous options available at Pho shops, head to the butcher counter at a Vietnamese or Chinese market. There you’ll find white cords of gan(beef tendon) and thin pieces of nam (outside flank, not flank steak). While tendon requires no preparation prior to cooking, nam should be rolled and tied with string for easy handling. Simmer it and the beef tendon in the cooking broth for two hours, or until chewy-tender.
You can also make Pho with beef meatballs (bo vien), which you can purchase in Asian markets in the refrigerator case; they are already precooked. Slice each one in half and drop into broth to heat through. When you’re ready to serve, ladle them out with the broth to top each bowl.
Pho Ga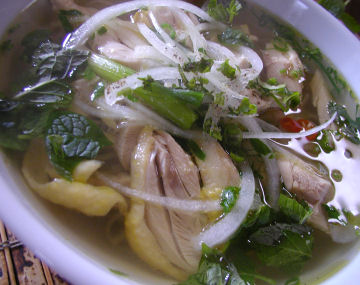
Broth
2 yellow onions, about 1 pound total, unpeeled
Chubby 4-inch section fresh ginger, unpeeled
1 chicken, 4 pounds, excess fat and tail removed
3 pounds chicken backs, necks, or other bony chicken parts
5 quarts water
1 1/2 tablespoons salt
3 tablespoons fish sauce
1-inch chunk yellow rock sugar (about 1 ounce)
2 tablespoons coriander seeds, toasted in a dry skillet for about 1 minute until fragrant
4 whole cloves
1 small or 1/2 large bunch cilantro (bound stems about 1 inch in diameter)
Bowls
1 1/2–2 pounds small flat rice noodles, dried or fresh
Cooked chicken, at room temperature
1 yellow onion, sliced paper-thin, soaked in cold water for 30 minutes and drained
3 or 4 scallions, green part only, thinly sliced
1/3 cup chopped fresh cilantro, leafy tops only
Black pepper
Optional garnishes
3 cups bean sprouts (about 1/2 pound)
10 to 12 sprigs mint, 10 to 12 sprigs Thai basil
12 to 15 fresh cilantro leaves
2 or 3 Thai chiles, thinly sliced
2 or 3 limes, cut into wedges
Make the pho broth
1. Place the onions and ginger directly on the cooking grate of a medium-hot charcoal or gas grill (as pictured, to the right) or a gas stove with a medium flame, or on a medium-hot burner of an electric stove. Let the skin burn (if you’re working indoors, turn on the exhaust fan and open a window), using tongs to rotate onion and ginger occasionally and to grab and discard any flyaway onion skin.
After 15 minutes, the onions and ginger will have softened slightly and become sweetly fragrant. There may even be some bubbling. You do not have to blacken the entire surface. When amply charred, remove from the heat and let cool.
2. Rinse the cooled onions under warm running water, rubbing off the charred skin. Trim off and discard the blackened root and stem ends. Use a vegetable peeler, paring knife, or the edge of a teaspoon to remove the ginger skin. Hold it under warm water to wash off any blackened bits. Halve the ginger lengthwise and bruise lightly with the broad side of a cleaver or chef’s knife. Set the onions and ginger aside.
3. Rinse the chicken under cool water. Detach each wing by bending it back and cutting it off at the shoulder joint. Add the wings and neck, and set the wingless chicken aside.
4. Remove and discard any loose pieces of fat from the chicken parts. With a large chef’s knife or heavy cleaver designed for chopping bones, chop the bones to break them partway or all the way through, making the cuts at 1- to 2-inch intervals, depending on the size of the part. This exposes the marrow, which enriches the broth.
5. To achieve a clear broth, you must first parboil and rinse the chicken parts. Put them in a stockpot (about 12-quart capacity) and add cold water just to cover. Bring to a boil over high heat and boil vigorously for 2 to 3 minutes to release the impurities. Dump the chicken parts and water into the sink (make sure it is clean), and then rinse the parts with water to wash off any clinging residue. Quickly scrub the stockpot clean and return the chicken parts to the pot. Put the chicken into the pot, breast side up.
6. Add water to cover the chicken. Bring to a boil over high heat and then lower the heat to a gentle simmer. Skim off any scum that rises to the top. Add the onions, ginger, salt, fish sauce, rock sugar, coriander seeds, cloves, and cilantro and cook, uncovered, for 25 minutes, adjusting the heat if needed to maintain a gentle simmer.
At this point, the chicken is cooked; its flesh should feel firm yet still yield a bit to the touch. With a pair of tongs, transfer the chicken to a large bowl. Flush with cold water and drain well, then it set aside for 15 to 20 minutes until it is cool enough to handle. Meanwhile, keep the broth at a steady simmer.
7. When chicken can be handled, use a knife to remove each breast half and the whole legs (thigh and drumstick). Don’t cut these pieces further, or they’ll lose their succulence. Set aside on a plate to cool completely, then cover with plastic wrap and refrigerate; bring to room temperature before assembling the bowls.
8. Return the leftover carcass to the stockpot and adjust the heat to simmer the broth gently for another 1 1/2 hours. Avoid a hard boil, or the broth will turn cloudy.
9. Strain the broth through a fine-mesh sieve (or a coarse-mesh sieve lined with cheesecloth) positioned over a pot. Discard the solids. Use a ladle to skim as much fat from the top of the broth as you like. (To make this task easier, you can cool the broth, refrigerate overnight, lift off the solidified fat, and then reheat before continuing.) Taste and adjust the flavor with additional salt, fish sauce, and rock sugar. There should be about 4 quarts of broth. At this point, you can freeze the broth.
Assemble the pho bowls
10. If using dried noodles, cover them with hot tap water and let soak for 15 to 20 minutes, or until they are pliable and opaque. Drain in a colander. If using fresh rice noodles, untangle them, place in a colander, and rinse briefly under cold running water.
11. Cut the cooked chicken into slices about 1/4 inch thick, cutting the meat off the bone as necessary. If you don’t want to eat the skin, discard it first. Set the chicken aside. Ready the yellow onion, scallions, cilantro, and pepper for adding to the bowls. Arrange the garnishes on a plate and put on the table.
12. To ensure good timing, bring the broth to a simmer over medium heat as you are assembling the bowls. (For an extra treat, drop in any unused white scallion sections and let them poach in the broth. Add the poached white scallion sections (called hành chần) to a few lucky bowls when ladling out the broth.) At the same time, fill a large pot with water and bring to a rolling boil.
For each bowl, place a portion of the noodles on a vertical-handle strainer (or mesh sieve) and dunk the noodles in the boiling water. As soon as they have collapsed and lost their stiffness (10 to 20 seconds), pull the strainer from the water, letting the water drain back into the pot. Empty the noodles into a bowl. If you like, once you have finished blanching the noodles, you can blanch the bean sprouts for 30 seconds. They should wilt slightly but retain some crunch. Drain and add to the garnishes.
13. Top each bowl of noodles with chicken, arranging the slices flat. Place a mound of yellow onion in the center and then sprinkle scallion and cilantro on top. Finish with a sprinkle of pepper.
14. Raise the heat and bring the broth to a rolling boil. Do a final tasting and make any last-minute flavor adjustments. Ladle about 2 cups broth into each bowl, distributing the hot liquid evenly to warm all the ingredients. Serve immediately with the garnishes.
