Blog Archives
Crusty Cranberry-Nut No-Knead Artisan Bread
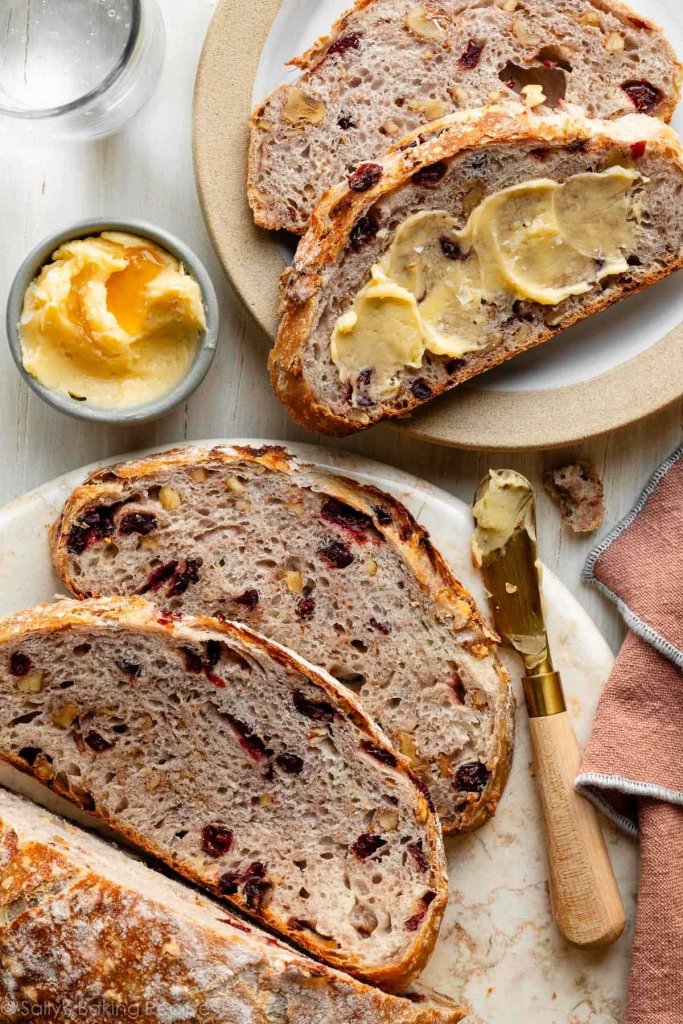
I’m making this bread for our Christmas Eve Swedish Smorgasbord feast. It is a variation on Jim Lahey’s famous no-knead crusty artisan bread, which has been featured, amended, and rebranded as the New York Times “Almost” no-knead bread loaf, which we’ve made on numerous occasions over the years. It is also the recipe on which most of my recent sourdough adventures have been based. It is a genuine holiday treat, and worthy of your time and attention. Try it sometime. You’ll like how easy it is and how wonderful it tastes. I also have a standard recipe for the bread without the fruit and nuts, which you can find by searching on “Jim Lahey bread” or “New York Times No-Knead bread.”
Crusty Cranberry-Nut No-Knead Artisan Bread
Ingredients:
3 cups + 2 Tablespoons (390 g) all-purpose flour, plus more for hands and bench
2 teaspoons coarse sea salt (10 g)
1/2 teaspoon instant yeast
3/4 cup (95 g) chopped nuts (walnuts or pecans)
3/4 cup (105 g) dried cranberries
1 Tablespoon honey
1 1/2 cups (360 g) warm water (95-100 degrees)
Preparation:
- Stir the first six ingredients (flour through honey) together in a large bowl. Stir in the water and mix well to incorporate and hydrate all the flour. Gather into a homogenous ball. Cover tightly and rest on the counter 12-18 hours.
- Turn the dough out onto a floured surface and shape into a ball. transfer to a 12×12 piece of lightly oiled parchment paper. Score the dough as desired with a lame or sharp knife 1/2″ deep. Cover lightly with plastic wrap and allow to rest for 30 minutes.
- While the dough is resting, place a covered Dutch oven in the oven and preheat to 475 degrees. After 30 minutes, remove the Dutch oven and carefully place the bread (on the parchment paper) into the pot. Cover and place in the oven and bake for 30 minutes covered. Remove the lid and continue to bake 8-10 minutes, until nicely browned. Remove from the oven, lift the bread from the pot and place on a cooling rack. Allow to cool at least 30 minutes before slicing/serving.
- The bread can be stored in a zip-close plastic bag for one week or frozen for up to 3 months.
Notes: The dough can be premade and frozen for up to 3 months, wrapped in plastic and placed in a freezer container after Step 2. To bake, allow the dough to thaw overnight in the fridge or 2-3 hours at room temperature, then resume at Step 3.
You can replace up to 1/2 the flour with whole-wheat flour for a chewier crumb and a slightly nutty taste.
Raisins can be substituted for cranberries, and
This recipe is published courtesy of Sally’s Baking Addiction, at www.sallysbakingaddiction.com
Pain-Free Cast-iron Skillet Foccacia
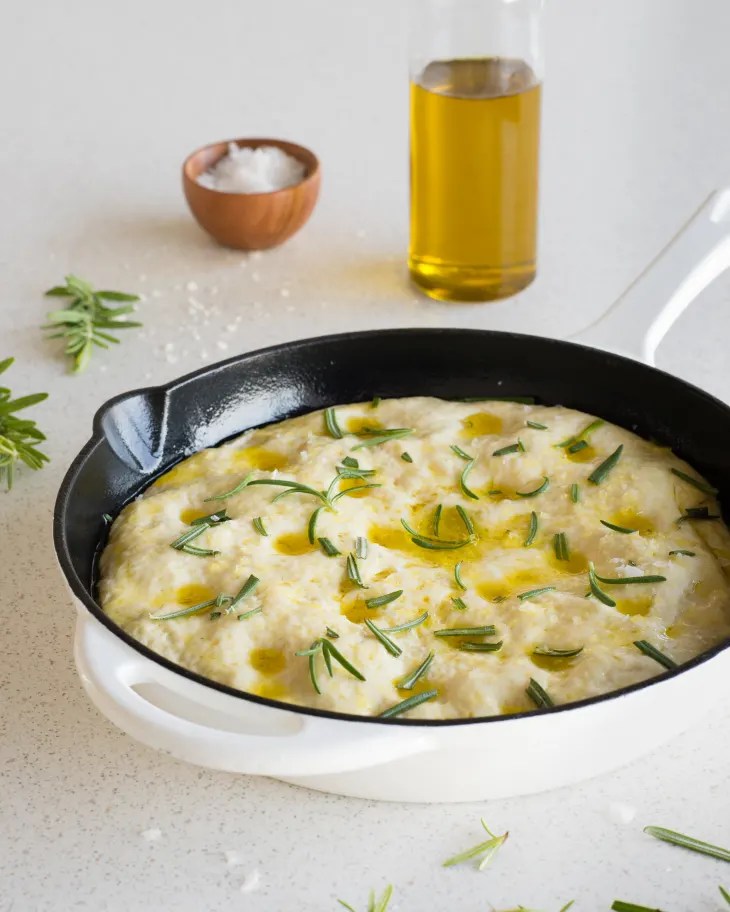
I am forever in search of the perfect recipe for an amazing foccacia, one that doesn’t take two days to make, and which makes just enough for the family. I think I’ve found it, and it happens quickly with ingredients that I always have on hand. And it happens in my favorite pan, my 10-inch cast-iron skillet. It doesn’t take a lot of work, and it comes out perfect every time.
The only caveat I give you is that you must use fresh and high-quality ingredients to get a high-quality product. Trust me on this. If I have one mantra in Jeff’s Kitchen, it is to use only the finest–and freshest–ingredients. It’s why I grow my own tomatoes and herbs. I’ve waxed poetic in the past about both of these–you can find my rants on tomatoes here, and on my herb garden here. You should trust me on these.
The best ingredients make the best-finished recipes. It only makes sense. Right?
So assemble your ingredients with care, and you’ll have a dish of which you can be proud. That’s a promise.
So here, forthwith, is the easiest, best-tasting foccacia you can make, and you surely CAN make it.
INGREDIENTS:
- 2 cups all-purpose flour — I use King Arthur AP.
- 1/2 teaspoon salt — Diamond Crystal kosher salt is what you ought to have
- 1 teaspoon dry instant yeast — For this recipe instant is best
- 3/4 cup lukewarm water — not too hot, please. You’ll kill the yeast. 100 – 110 is best
- 3 tablespoons plus 3 teaspoons extra-virgin olive oil, divided — Don’t skimp here!
- 2 teaspoons coarsely chopped fresh rosemary leaves — Fresh only! Grow it on a windowsill
- 1/4 teaspoon flaky sea salt — Should be a pantry staple in your kitchen.
PREPARATION:
- Place the flour, salt, and yeast in a food processor fitted with the blade attachment and pulse to combine. Add the water and 2 tablespoons of the olive oil. Pulse until a rough ball of dough forms, about 15 (2-second) pulses.
- Drizzle 2 teaspoons of the olive oil in a large bowl. Flour your hands, scoop the dough out of the food processor, and form into a smooth ball. Place the ball of dough in the oiled bowl and turn it so it’s coated on all sides. Cover with plastic wrap or a kitchen towel and let it sit at warm room temperature until doubled in size, 2 to 3 hours.
- Drizzle 1 teaspoon of the olive oil in a 10-inch cast iron or other ovenproof skillet and rub it over the bottom and sides. Punch down the dough and place the dough in the skillet. Using your fingertips, coax and stretch the dough to cover the bottom of the skillet and reach all the way to the edges. Cover with plastic wrap or a kitchen towel and let rest at warm room temperature until puffed and slightly risen, 30 to 40 minutes. Meanwhile, arrange a rack in the middle of the oven and heat to 450°F.
- Use you fingertips to gently dimple the surface of the dough. Drizzle the remaining 1 tablespoon of olive oil over the dough so that it pools in some of the indentations. Sprinkle with the rosemary and flaky salt.
- Place in the oven and immediately turn the heat down to 400°F. Bake until lightly golden-brown, 20 to 25 minutes.
- Remove from the oven and cool for at least 15 minutes before slicing and serving. Focaccia is best eaten when warm, but is also good at room temperature. If the crust gets too soft, reheat in a 350°F oven to crisp it up.
NOTES:
Make ahead: The dough can also be left in the covered bowl to rise overnight in the refrigerator — the slower rise actually provides extra flavor. In the morning, transfer the cold dough to the skillet and allow it to warm up a little, about 20 minutes, before stretching it and proceeding with the recipe.
Storage: The focaccia is best the day it is made but can be stored, well-wrapped, at room temperature for up to 1 day. The crust will soften, but it can be warmed and crisped in a 350°F oven for a few minutes. Leftover focaccia also freezes exceptionally well. Let it defrost at room temperature and then reheat in a 350°F oven for a few minutes.
Topping options: There is tons of experimentation to be had when it comes to focaccia toppings. Aside from rosemary, other herbs like thyme and oregano, thinly sliced lemons, pitted chopped olives, thick slices of fresh garlic or shallots, a sprinkling of Parmesan cheese, and even everything bagel seasoning are great topping options.
Recipe Credit: Sheela Prakash, on The Kitchn: https://www.thekitchn.com/skillet-focaccia-bread-recipe-261454
Sourdough!
Today I’ve turned the reins of Jeff’s Quarantine Kitchen over to the boss (I surely have come to understand which side of the bread is buttered), because she is the baker extraordinaire in this confederacy of equals. When it comes to baking I am truly only the woke little sous-y (see what I did there?).
For several years we’ve entertained the notion of doing a sourdough, but because none of us REALLY need all the bread we’d have to bake to keep a sourdough starter alive and productive, and the thought of discarding food is inherently foreign to my training and my sensibility, we’ve never really considered it seriously.
Until now.
In my constant quest for the next new and different cooking challenge—the latest, greatest take on mac and cheese holds absolutely no interest for me—I stumbled across a take on a small-batch sourdough starter that seems to be both workable from a task standpoint (we surely didn’t wish to become slaves to the idea of keeping yet another creature alive) and manageable in terms of quantity (and really, could this sentence be any more complex and befuddling? I’d like to see Miss Appleby try to diagram this baby).
But I digress (I hate when I do that). Sourdough!
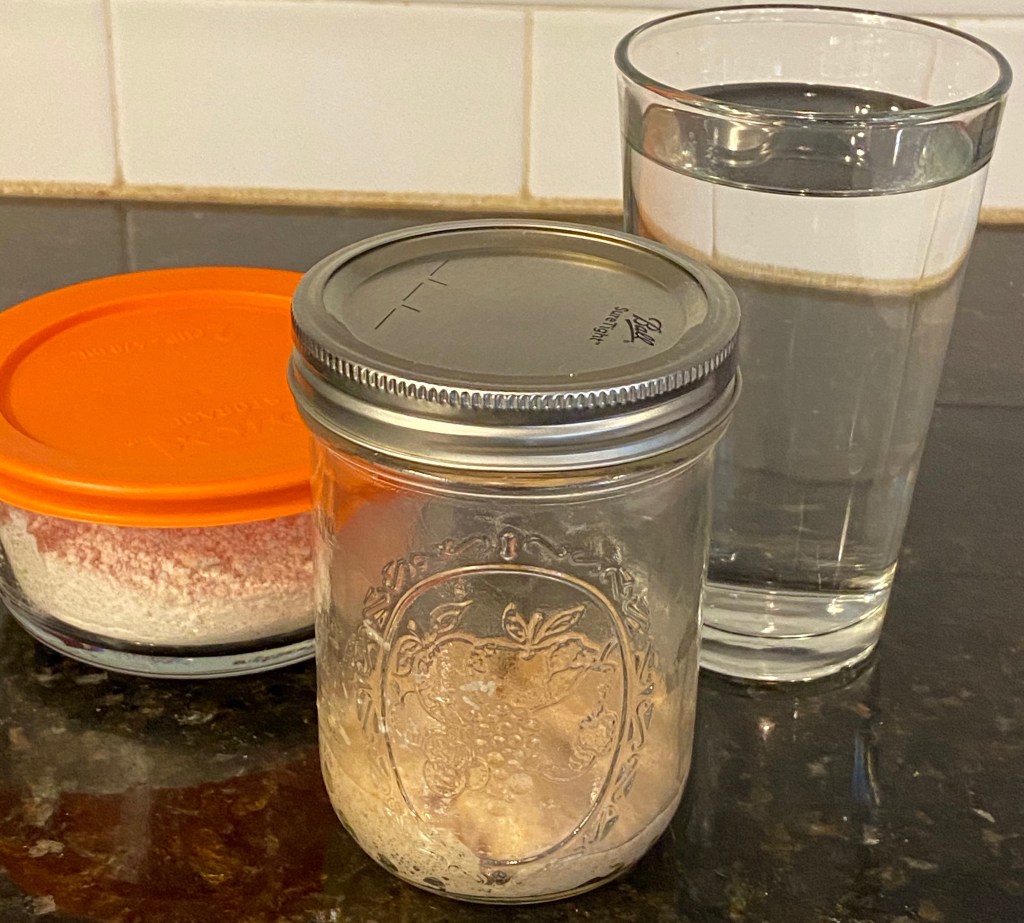
The guy calls himself “The Pressured Prepper,” and he has a whole YouTube channel chock full of ideas for when the SHTF (google it). I haven’t located a web site for the guy, but his videos are, to say the least, entertaining. He posits that a credible sourdough starter can be made and maintained with just a tiny bit of flour and water and no added yeast. I showed the video to E., and she was intrigued. So we’ve tried it. I did find that (and he did reference) a similar idea on the King Arthur Flour (heretofore referred to as KAF) web site, so it really must be a thing.
So here’s the scoop: The Pressured Prepper says to combine three tablespoons of flour—he suggests a mix of bread and whole wheat flours, and a bit of rye flour if you have it on hand— with two tablespoons of dechlorinated water, and mix well in a pint-size canning jar, cover and set it on the counter at room temperature (dechlorinated water is just really tap water that has sat overnight in an open container, so that the chlorine gas evaporates). The mix of flour—it doesn’t want any all-purpose flour—provides the starter additional capabilities for capturing wild yeasts that are in the air. The Prepper goes on to say that you can speed up the process by using pineapple juice instead of water, and adding just a pinch of active dry yeast.
This morning E opted for the quick-start method, and made her original starter (pictured above) using three tablespoons of a 50-50 blend of bread and whole-wheat flours, two tablespoons of pineapple juice, and that pinch of yeast (she said that it felt a bit like cheating, but wanted to give it every chance of succeeding). Now we’ll let it sit on the counter in the jar. The directions say to feed the starter three tablespoons of flour and two tablespoons of water once a day.
So that’s what we’ll do.
My plan is to try to blog something every day here in the JQK, so the likelihood is that you will get daily updates on the progress of this small-batch sourdough starter.
Here’s hoping, and we’ll see you soon. Stay well, be careful, and WASH YOUR HANDS!!!
Bacon-Maple Slow-Cooker Baked Beans
Got a hankering for baked beans.
Sure, it’s cute watching Jay Bush and his golden retriever Duke, who seems to be on a mission to sell the secret recipe, like any capitalist dog would be. Makes you want some beans. Or a golden retriever. Makes me want neither. Bush’s Beans are probably a perfectly fine product, but I’ve always been a B&M kind of guy, and I’m not particularly fond of dogs, although I’ve grown to love my wild and crazy German shorthaired pointers, Argos and Maggie (Argos, I should point out, has no interest in selling any of my recipes; he has a one-track agenda, which is to eat everything I cook. Maggie, on the other hand, would sell my recipes in a heartbeat if she thought she could turn a profit; she’s probably the most dedicated capitalist in the family).
But I digress (I hate when I do that).
I was reading someplace recently that some kid’s favorite food was baked-bean sandwiches–homemade baked beans on fresh homemade bread–and I got to thinking about that. Could that be nature’s perfect food? The writer was recounting how such sandwiches ignited his love of all things food and how they inspired him to become a chef. It started, he says, because he couldn’t find a pile of baked beans anywhere near as good as the scratch batches his grandmother made for him. I can relate. I was raised on the cooking of a wonderful woman who came from the Piedmont of Virginia, where home-grown pork and chickens and corn and cabbages and greens were on the table every day. She made her baked beans (and everything else) from scratch, and the tale of baked-bean sandwiches massaged a longing in me I hadn’t felt in quite a while.
Consequently, I got a hankering for baked beans.
Lily Jones was not available to make me beans, and I’ve never really worked up a recipe of my own. So I decided to do some research, find a recipe to start with, and then make it my own. Something hearty, flavorful, bold, and memorable.
I must have read 500 recipes. What I kept coming back to was a fabulous website chock full of recipes that use beer as the principal ingredient. Beer! That’s the ticket! But not just any beer. It needed to be thick, dark, malty, nutty–hair-raising. I found a recipe that resonated, and then kept reading, comparing each next one I found to the one that sang to me, and not one measured up.
And then, I made the beans. Incredible. Salved my hankering, my wife, the remarkable Ellen, followed up with a honey-Hefeweisen boule made with a locally brewed winter wheat beer, and voila! Baked-bean sandwiches for the Gods.
Next, I had to make the recipe my own. The recipe on the website is perfect as is. But it’s not mine, alas, and I thought I could improve it. Guess what: I couldn’t. It’s perfect as is. The only thing I did change was to use turkey bacon (we don’t eat much pork around here) cooked in two teaspoons of extra-virgin olive oil; and instead of a smoky porter I used Sierra Nevada Coffee Stout.
Try this if you want perfect beans. And if you want a perfect bean sandwich, make the bread, too. It’s almost as simple to make as the beans–no kneading, just rest and love.
Slow Cooker Maple Bacon Beer Baked Beans
Ingredients:
- ½ pound Great Northern beans
- ½ lbs Navy beans
- 4 strips thick cut bacon (I used turkey bacon)
- 1 large sweet onion, chopped
- 3 tablespoons full-flavor molasses
- ¼ cup real maple syrup
- 2 cups smoked porter beer (I used Sierra Nevada Coffee Stout)
- 2 cups water
- 1 teaspoon smoked paprika
- 1 tablespoon liquid smoke
- 1 teaspoon granulated garlic
- 3 tablespoon balsamic vinegar
- 2 teaspoon Worcestershire sauce
- 1 teaspoon kosher salt
- 1 teaspoon fine ground white pepper
- 1/2 teaspoon freshly ground black pepper
- 1 teaspoon dry mustard
Preparation:
- Place the beans in a large pot with 3 cups of water. Cover and bring the pot to a boil, and cook for 3 minutes. Remove from the heat and soak for 8-12 hours; overnight is good. Rinse with cold water and drain.
- Cook the bacon in a skillet over medium high heat, remove bacon from pan. Add the onions to the bacon grease, cook until soft, about 5 minutes. Chop the bacon.
- Add the bacon, onions, drained beans and remaining ingredients to a slow cooker. Cook for 8 hours on low, stirring once or twice during cooking. If beans are still firm after 8-10 hours, turn to high and cook for an additional 2 hours.
And now the bread:
Honey Hefeweizen Boule Loaf
Ingredients:
- 4 ¼ (19 wt oz) cups all-purpose flour
- 1 package (2 ¼ tsp) rapid rise yeast
- ¼ cup honey
- pinch salt
- 12 ounces wheat beer*
- egg wash (1 egg, 1 teaspoon water, beaten)
Preparation: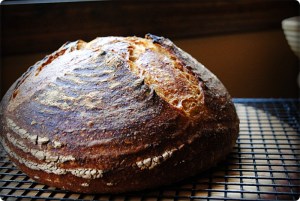
- In the bowl of a stand mixer fitted with a dough hook add the flour and yeast, mix to combine.
- Heat the beer to between 120 and 130F degrees.
- Add the beer and the honey to the flour, beat on high until dough gathers around the hook and is no longer sticky, about 6 minutes.
- Transfer the dough to a lightly oiled bowl, cover and allow to rise in a warm place until doubled in size, about 1 hour.
- Place a baking stone in the oven, preheat for 30 minutes prior to baking.
- Once the dough has risen, place a bread peel (or a sheet of parchment paper) on a flat surface, cover in cornmeal or semolina flour. Grab the dough in your heads, folding it into itself gently a few times, then form into a tight ball. Place on the peel (or parchment paper), allowing to rise for about 30 minutes.
- Brush the top with egg wash, slash an “X” on top of the loaf using a sharp knife.
- Transfer the dough to the pizza stone using either the peel or by simply placing the parchment paper on top of the heated stone (if you don’t own a bread stone, just place the parchment on top of a baking sheet and set that into the oven when you are ready to bake).
- Bake at 400 until top is a dark golden brown and makes a hollow “thump” sound when tapped, about 30 minutes.
- Allow to cool slightly before slicing.
Notes
*This recipe is for a very low IBU (low hop) beer. If all you have is a pale ale, IPA or hoppy wheat, use 3/4 cup beer and 3/4 cup hot water or the beer taste will be overpowering.
And to Jackie Dodd, “The Beeroness,” I offer a toast: Jackie (wwwthebeeroness.com), you’ve won my heart. Or more accurately, my appetite.
