Search Results for tomatoes
The Best Tomatoes NOT Grown in the Shadow of Mount Vesuvius
A Cheffzilla story…

Before the turn of the (21st) century–truth be told–just about the only people who know about San Marzano tomatoes lived in the region in Italy, or were European-trained chefs, were one of handful of American chefs who had been to the region, or worked in the kitchen at my beloved Epicure Market on South Beach. Let’s face it, the “legendary” San Marzano tomato was a virtual unknown here in the US. Then, about 15 years ago, its fame and story became one of the “newest” trends in American cooking. People discovered this amazing tomato variety. The major tomato growers in the US began importing seeds or the tomatoes themselves and harvesting the seeds, and started selling the product as authentic, even though anyone who actually knew of the tomatoes knew better. The growers in this tiny region of southern Italy filed all sorts of lawsuits and attempted to patent and copyright the name, only to be hoo-hahed by the agro-industrial complex.
Because of my experience in South Florida, I knew of this amazing fruit, because the owners of the gourmet store imported these beauties any way they could–fresh, frozen, or canned. Now because I have known about San Marzanos almost forever, I decided that I would try to grow them myself in my garden here in the fertile soil of Lancaster County. I’ve been growing them for seven or eight years now.
Now, anyone who knows the origin story of these amazing tomatoes know that their special magic–the thing that makes them the most delicious and sought-after tomatoes in the world–knows that what sets these tomatoes apart has to do with the volcanic-ashen soil in the shadow of Mount Vesuvius, near Naples, Italy. Those grown in the US may come from the same (or harvested) seeds, but they don’t have the same incredible flavor of the originals.
I won’t pretend that my San Marzanos are anywhere near as tasty as the Italian-grown variety, but I do know that they are a darn sight better tasting than any other tomatoes I’ve ever used.
And so I grow my own.

This year I tried something a little different, just as an experiment. In addition to the normal care and feeding of my tomato garden, into the soil where the San Marzano plant (only one) was to grow, I sowed a bucket full of wood ash from our back-patio fire pit.
Guess what…

In my admittedly unscientific experiment, my San Marzano plant gave me a surprise: nearly four times the number of tomatoes, and of such amazing size that some of them were as large as my fist. So far, as of October 1 I have harvested and roasted more than 30 pounds of these wonderful tomatoes–twice what any of my other plants produced. And that is cooked weight–I roast, peel, and freeze my tomatoes, so that I have them to use all winter–tomatoes from my garden in February is a special treat, especially when they are these amazing San Marzano-variety tomatoes. Just today I roasted up four pounds (cooked weight) and I’ve been doing this every weekend since they first started to ripen more than a month ago.
If only I could travel ot Sicily to get some seeds, so that I could say the tomatoes came from San Marzano.
If only…
Gael’s Saturday Focaccia
So I made another focaccia!

I got this one from the website of King Arthur’s baking products (www.kingarthurbaking.com), the recipe of Gael Clauson, who bakes regularly in the Baker’s store in White River Junction, Vermont. According to the website, Gael bakes fresh, hot focaccia for customers on Saturday mornings. I can’t think of anything better on a chilly New England Saturday morning than a slice of fresh hot and spicy bread slathered with cream cheese or marmalade with a steaming cup of coffee. Makes me long for my wonderful years in the Berkshires of western Massachusetts (which is not too far away).
So I played a bit with Gael’s recipe, which called for semolina flour. I substituted whole wheat flour because that’s what I had on hand. The recipe calls for olive oil, but on a whim, I substituted my homemade garlic-infused olive oil, a rich and flavorful condiment I’ve been making for several years now (I’ll tag that recipe at the bottom of this post, just in case you want to try it; it goes wonderfully with most green veggies in an air fryer). As a nod to King Arthur’s flour products–which I use exclusively–I listed them by brand in the ingredients [editor’s note: I get no support from King Arthur].
The recipe calls for round cake pans, but I love using my 8×8 square baking pans, so I used them instead. This was about the easiest bread I’ve made, three and a half hours start to finish with two rises.
Ingredients:
2 cups (454g) lukewarm water
1 tablespoon (14g) granulated sugar
1 tablespoon instant yeast
1 tablespoon (18g) table salt
2 tablespoons (25g) olive oil
1/2 cup (82g) King Arthur semolina or whole-wheat flour
4 1/2 to 5 cups (540g to 600g) King Arthur unbleached all-purpose flour
2 to 3 tablespoons Herbes de Provence
1/2 teaspoon black pepper
2 tablespoons (25g) olive oil for the pan
herbes de Provence
freshly snipped chives
coarse salt
coarsely ground black pepper, optional
extra-virgin olive oil
Preparation:
- Measure all the ingredients in grams–you’re baking here. Spend the twenty bucks on a digital scale. If you plan to do much baking, you’ve GOT to measure in grams for everything!
- Combine the water, sugar, yeast, salt, and olive oil, stirring to dissolve the sugar and yeast.
- Stir in the semolina or whole-wheat flour, then 4 1/2 cups of the all-purpose flour, the herbs, and the black pepper. Knead the dough — by hand, mixer, or in a bread machine set on the dough cycle — until it’s smooth. It’ll be quite soft. Gael says, “Your finished dough should be like a marshmallow, very easy to knead. It should clean the sides of the bowl, if you’re using a mixer. If the dough seems too slack, add more flour a tablespoon at a time until it comes together. It should feel moist and soft; tacky like a sticky note, but not sticky.” I started with 540 grams of AP flour, and measured 60 more in a separate bowl, and added a little more, two tablespoons at a time until the dough came together and cleaned the sides of the bowl. Trust the process. It WILL come together, but you’ll likely need most of the last 60 grams of flour–I did.
- Place the dough in a lightly oiled bowl and turn the dough on all sides to coat with oil. Cover it loosely with plastic wrap, and let it rise for 90 minutes in a warm place–like your oven with only the light turned on–or until doubled in size.
- Gently deflate/de-gas the dough by pressing lightly. Turn it out onto a lightly floured counter; it should feel like a big marshmallow, very pliable.
- Lightly grease two 8″ or 9″ cake pans, and drizzle 1 tablespoon garlic oil or olive oil into each pan, brushing it across the bottom. “The oil will ensure that the bottom of the focaccia will be crispy and tasty,” says Gael.
- Divide the dough in half and gently shape it into rounds to fit whichever pans you’ve chosen. Place the rounds into the prepared pans, cover the pans, and let the dough rise for 45 minutes in a warm place (not the oven this time, you’ll need it) until puffy.
- While the dough is rising, preheat your oven to 425°F.
- Use your fingers to gently but firmly dimple the dough, making focaccia’s signature little hills and valleys. Sprinkle the top with herbes de Provence and some freshly snipped chives, a bit of coarse sea salt for crunch and flavor, and coarsely ground black pepper. Drizzle with garlic oil or olive oil.
- Bake the focaccia in the middle of the oven for about 30 minutes, or until it’s lightly browned and baked through. It should be brown and crispy on the bottom.
- Remove the focaccia from the oven, and turn it out of the pans onto a rack to cool just slightly before serving. Serve with warmed marinara sauce as a dip, or just as is with soup or salad.
Tips from a professional baker:
- Substitute an overnight rest in the refrigerator for the dough’s first rise, if desired. Let the dough come to room temperature before proceeding with the rest of the recipe.
- For heartier bread, choose any of the following toppings (or whatever strikes your fancy): chopped fresh rosemary, grated Parmesan cheese, chopped Kalamata olives, halved grape tomatoes, shredded Asiago cheese, crumbled feta cheese, mozzarella cheese, anchovies, oil-packed sun-dried tomatoes, caramelized onions, sautéed mushrooms, diced red peppers.
Recipe from Gael Clauson, courtesy of kingarthurbaking.com
Pain-Free Cast-iron Skillet Foccacia

I am forever in search of the perfect recipe for an amazing foccacia, one that doesn’t take two days to make, and which makes just enough for the family. I think I’ve found it, and it happens quickly with ingredients that I always have on hand. And it happens in my favorite pan, my 10-inch cast-iron skillet. It doesn’t take a lot of work, and it comes out perfect every time.
The only caveat I give you is that you must use fresh and high-quality ingredients to get a high-quality product. Trust me on this. If I have one mantra in Jeff’s Kitchen, it is to use only the finest–and freshest–ingredients. It’s why I grow my own tomatoes and herbs. I’ve waxed poetic in the past about both of these–you can find my rants on tomatoes here, and on my herb garden here. You should trust me on these.
The best ingredients make the best-finished recipes. It only makes sense. Right?
So assemble your ingredients with care, and you’ll have a dish of which you can be proud. That’s a promise.
So here, forthwith, is the easiest, best-tasting foccacia you can make, and you surely CAN make it.
INGREDIENTS:
- 2 cups all-purpose flour — I use King Arthur AP.
- 1/2 teaspoon salt — Diamond Crystal kosher salt is what you ought to have
- 1 teaspoon dry instant yeast — For this recipe instant is best
- 3/4 cup lukewarm water — not too hot, please. You’ll kill the yeast. 100 – 110 is best
- 3 tablespoons plus 3 teaspoons extra-virgin olive oil, divided — Don’t skimp here!
- 2 teaspoons coarsely chopped fresh rosemary leaves — Fresh only! Grow it on a windowsill
- 1/4 teaspoon flaky sea salt — Should be a pantry staple in your kitchen.
PREPARATION:
- Place the flour, salt, and yeast in a food processor fitted with the blade attachment and pulse to combine. Add the water and 2 tablespoons of the olive oil. Pulse until a rough ball of dough forms, about 15 (2-second) pulses.
- Drizzle 2 teaspoons of the olive oil in a large bowl. Flour your hands, scoop the dough out of the food processor, and form into a smooth ball. Place the ball of dough in the oiled bowl and turn it so it’s coated on all sides. Cover with plastic wrap or a kitchen towel and let it sit at warm room temperature until doubled in size, 2 to 3 hours.
- Drizzle 1 teaspoon of the olive oil in a 10-inch cast iron or other ovenproof skillet and rub it over the bottom and sides. Punch down the dough and place the dough in the skillet. Using your fingertips, coax and stretch the dough to cover the bottom of the skillet and reach all the way to the edges. Cover with plastic wrap or a kitchen towel and let rest at warm room temperature until puffed and slightly risen, 30 to 40 minutes. Meanwhile, arrange a rack in the middle of the oven and heat to 450°F.
- Use you fingertips to gently dimple the surface of the dough. Drizzle the remaining 1 tablespoon of olive oil over the dough so that it pools in some of the indentations. Sprinkle with the rosemary and flaky salt.
- Place in the oven and immediately turn the heat down to 400°F. Bake until lightly golden-brown, 20 to 25 minutes.
- Remove from the oven and cool for at least 15 minutes before slicing and serving. Focaccia is best eaten when warm, but is also good at room temperature. If the crust gets too soft, reheat in a 350°F oven to crisp it up.
NOTES:
Make ahead: The dough can also be left in the covered bowl to rise overnight in the refrigerator — the slower rise actually provides extra flavor. In the morning, transfer the cold dough to the skillet and allow it to warm up a little, about 20 minutes, before stretching it and proceeding with the recipe.
Storage: The focaccia is best the day it is made but can be stored, well-wrapped, at room temperature for up to 1 day. The crust will soften, but it can be warmed and crisped in a 350°F oven for a few minutes. Leftover focaccia also freezes exceptionally well. Let it defrost at room temperature and then reheat in a 350°F oven for a few minutes.
Topping options: There is tons of experimentation to be had when it comes to focaccia toppings. Aside from rosemary, other herbs like thyme and oregano, thinly sliced lemons, pitted chopped olives, thick slices of fresh garlic or shallots, a sprinkling of Parmesan cheese, and even everything bagel seasoning are great topping options.
Recipe Credit: Sheela Prakash, on The Kitchn: https://www.thekitchn.com/skillet-focaccia-bread-recipe-261454
Garden-Fresh Ratatouille with Chicken
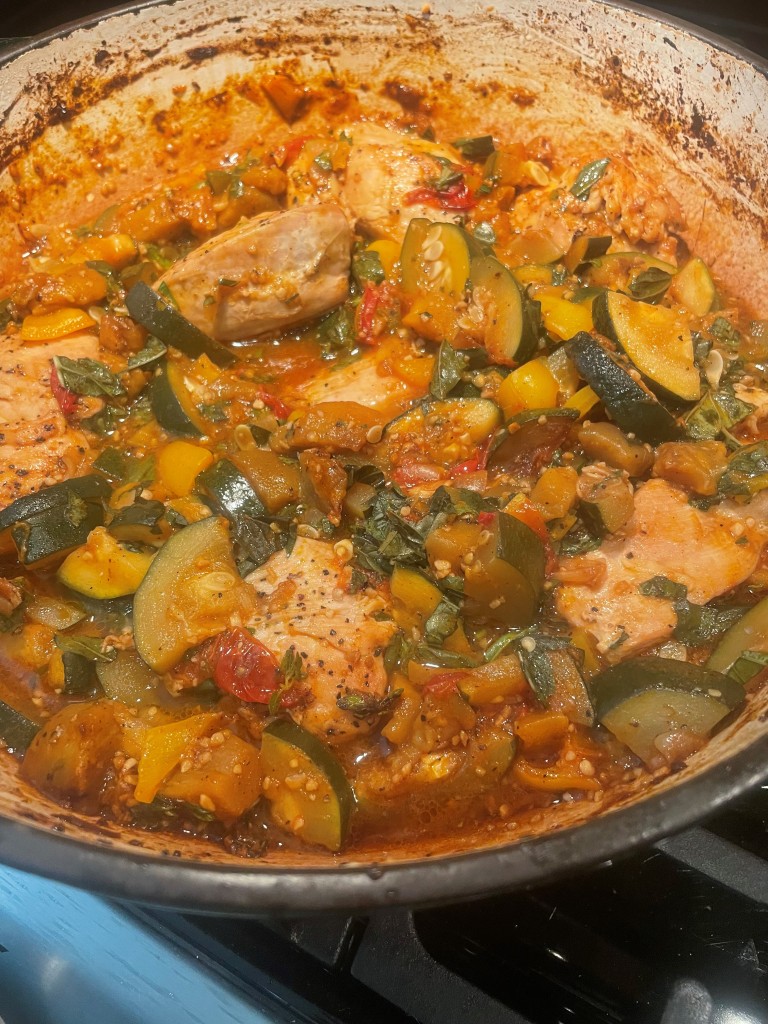
Got a bunch of fresh vegetables in your garden you’d like to turn into a magic dish? I sure do. Squash, eggplant, peppers, tomatoes, and lots of fresh herbs. To me, that spells ratatouille, a garden-fresh vegetable stew. Add some chicken, and you’ve got a wonderful, protein-rich, vegetable-rich dinner to dazzle your family. It’s one of my favorites; we make it all the time in the summer, to use the delicious fresh veggies we grow in the back yard.
I’ve been making the ratatouille for years, and last year we decided to add the chicken for a protein-jolt, and to make it a complete meal. We love it. You will too.
Here’s the recipe:
Chicken Ratatouille
Ingredients:
2 Tablespoons extra-virgin olive oil
8 bone in chicken thighs, skin removed
Kosher salt and freshly ground black pepper
1 medium onion, diced
5 garlic cloves, minced
1 medium eggplant, 1-inch dice
1 tablespoon tomato paste
1 tablespoon finely chopped fresh thyme
2 medium zucchini, 1/2-inch chop
1 yellow pepper, 1/2-inch dice
5 ripe cooking tomatoes, 1/2-inch dice
1 cup fresh basil leaves, chopped
Preparation:
- Preheat oven to 400 degrees F.
- Set a large Dutch oven over medium-high heat. Add ½ tablespoon EEVO, heat to shimmering
- Pat the chicken dry with paper towels, season well on both sides with salt and pepper. Place the chicken in the Dutch oven and brown, unmoved, for 5 minutes. Flip and brown the other side until the chicken releases from the pan, about 4 minutes more. Remove from pan and set aside.
- Reduce the heat to medium and add the remaining EVOO. Add the onion and garlic and a pinch of salt. Cook, stirring occasionally, until the onions begin to soften, about 5 minutes. Add the tomato paste and thyme, and continue to cook until the tomato paste begins to brown.
- Add the eggplant and another pinch of salt, and cook, stirring occasionally, until the eggplant just begins to soften, about 5 minutes.
- Add the zucchini, peppers, tomatoes, and another pinch of salt and cook, stirring occasionally, until the vegetables are tender, about 10 minutes.
- Remove the pan from the heat and partially submerge the chicken into the vegetables. Place the pan in the preheated oven, uncovered, until the thickest part of the chicken registers an internal temperature of 160 degrees F., about 20 minutes.
- Remove from the oven, cover, and allow to rest 10-15 minutes.
- Stir in the basil and serve.
Hearty Country Vegetable Soup with Ravioli
It’s a working vegetarian’s dream!
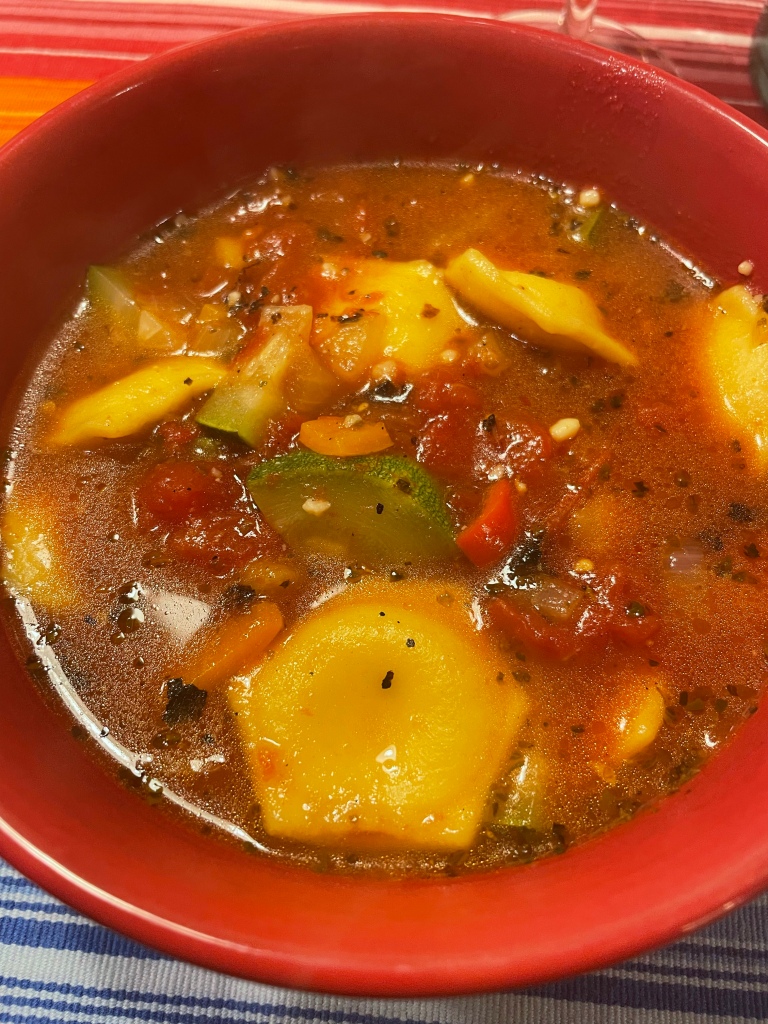
Oh, and it’s just about the easiest soup you could make; I made it the other night, start to finish, in just about 15 minutes, with minimal prep, little more than just stirring the pot, and a little seasoning.
This soup–I hesitate to call it a soup, because with just a few minor alterations it could be a wonderful vegetarian or seafood stew. It’s hearty, flavorful and, made with fresh vegetables, just about perfect.
If you’ve followed this space at all, you know that what I am all about is simple; both of us work, and often supper comes down to what is easiest. Well let me tell you, this is easier than defrosting something you made last Sunday while watching the football games.
The recipe I post here is for a vegetarian version, but let me suggest to you that a simple addition of about three quarters of a pound of shrimp or a nice white fish like cod or haddock–or both–would make this a dream come true.
Guaranteed!
A couple of preparation notes: this would work really well with a bag of chopped onions and peppers from the freezer aisle of the grocery store–in fact the original recipe called for just that–but don’t. Use a fresh onion and a bell pepper or two (I used mini peppers–red, orange, and yellow), and fresh garlic cloves. The recipe calls for two 15-oz. cans of diced tomatoes. I suggest Muir Glen Fire-Roasted tomatoes–find them at a store near you–we found them at Target–they’re worth the difference. It might be even better if you have tomatoes from your garden that you put up over the summer–I do, and I fire-roasted them, but these canned tomatoes are fabulous. Try them. You’ll be glad you did.
So here’s the roadmap:
Vegetable Soup with Ravioli
Ingredients:
1 TBSP extra-virgin olive oil
2 cups chopped onions and bell peppers–about half of each
2 cloves garlic, minced
1/4 tsp. red pepper flakes (don’t skip this!)
2 15-oz. cans diced tomatoes (fire-roasted is best)
3 cups vegetable stock
1 cup water
1 tsp. dried marjoram (or basil if you prefer)
9 oz. fresh or frozen cheese (or meat, if you must) ravioli
2 cups zucchini, small dice
Salt and freshly ground pepper, to taste
Preparation:
- Over medium heat add the oil in a heavy enamel or stainless-steel soup pot (not aluminum–tomatoes and aluminum don’t play well together). Add onions, peppers, garlic, and pepper flakes and saute. stirring constantly, for 2 minutes. Don’t overcook here–you want the veggies to feel like they’re still fresh.
- Add the tomatoes, stock, water, and dried herbs, plus 1/2 tsp. kosher salt and 1/4 tsp. freshly ground pepper; stir well and bring to a rolling boil.
- Add the ravioli, give it a stir, bring the soup back to a boil and cook, stirring, just until the ravioli begin to float, about 2 minutes. Add the zucchini, stir, and return to a boil. Continue cooking, stirring occasionally, until the zucchini are just getting tender–3 to 4 minutes. NO MORE!
- Adjust the flavor with salt and pepper to taste and serve with a pinch of grated Parmesan cheese, if desired.
NOTE: You can turn this into a bangin’ seafood soup by adding about 3/4 pound of 26-31 shrimp and/or white cod or haddock at the same time as the zucchini and cook just until the fish is turning from translucent to opaque. Want a stew: After cooking the onions and peppers for a minute, add 2 TBSP olive oil and 2 TBSP all-purpose flour, and stir well to combine, until there is no more white flour showing. Stir another minute, until the mixture begins to brown and the oil and butter are well incorporated. Then proceed to step 2, adding the tomatoes and the stock, but don’t add the extra cup of water. For an extra jolt of goodness, add a teaspoon or two of Cajun seasoning.
TIP: You can make this ahead and keep it in the fridge for 2-3 days–it gets better. but if you do and want the seafood variety, don’t add the fish until you’re ready to heat and serve.
Original Source: Nancy Baggett for EatingWell
Mulligatawny: a Soup Apart
This one’s too easy not to share. And too good to keep it all to myself.

Mulligatawny is one of the signature dishes in all of Indian cuisine. It’s a soup, in the same fashion that a Rolls Royce is a car, or a Rolex is a watch, or Linda Ronstadt is a voice.
Capise?
Friday night in the time of the pandemic has become, for many of us, just another night. Boring. Routine. Yawn. I suspect that many of you share this sad way of life. Not because you’re boring, or unimaginative or worn out. I for one have fallen into the pandemic-driven blahs. I think you know what I mean.
We’ve decided to change that. Friday nights are special—should be special—so we’re making it so. It’s the end of our work week (the days all have run together this year, what with working from home and all, so that all the days have started to look the same.
Not any more.
Now I suspect many of you have reached this point already, but we are, I guess, a little slow.
But special it is. And we started at the top-shelf Lancaster restaurant Himalayan Curry & Grill. Which brings me back around to mulligatawny. Himalayan makes it as good as I have ever tasted. Thick and rich, sweet and spicy, familiar and comforting.
But then, hey, I can do that! My teacher taught me that flavor trump’s heat in a spicy dish, and that’s what this dish wants most of all—spicy, but flavor forward. I cruised the recipes on line, and came up with my own version, using only what I have on hand.
You should try it. It’s actually one of the easiest soups I have made, and yet so flavorfully complex. You should try it.
Ingredients:
1/4 cup olive oil
1 yellow onion, chopped
1 carrot, peeled and diced
1 red jalapeno, seeded and finely minced
3 garlic cloves, minced
2 teaspoons peeled and minced ginger root
2 small firm apples, peeled, cored and diced
1 (14.5 oz) can diced tomatoes
1 tablespoon curry powder
1 teaspoon ground cumin
1/2 teaspoon paprika
1/2 teaspoon ground cinnamon
1/2 teaspoon ground turmeric
1/4 teaspoon ground cardamom
1/4 teaspoon freshly ground black pepper
1/2 teaspoon dried thyme
1/2 cup red lentils (uncooked)
3 cups vegetable broth
2/3 cup unsweetened coconut milk
Salt and black pepper to taste
Chopped cilantro and/or scallions for garnish
Preparation:
1. Heat the oil in a large pot or Dutch oven over medium-high heat.
2. Add the onion, carrot, and jalapeno, then saute for 4 to 5 minutes or until the onions have softened.
3. Add the garlic, ginger, apples, and diced tomatoes to the pot. Saute for another 3 minutes, then add in all of the spices and toss to coat. Add in the lentils and broth and bring to a boil. Turn the heat down to medium-low and simmer uncovered for 30 minutes.
4. Puree about 3/4 of the ingredients by transferring the soup to the bowl of a standard blender. You may need to do this in two batches. Leave some of the vegetables whole, as it adds texture and consistency to the soup. Return the soup to the pot, then stir in the coconut milk, and bring the soup back to a slow simmer. Adjust the flavor to your liking with salt and coarsely ground black pepper.
5. Serve topped with chopped cashews and cilantro or scallions along with naan bread for dipping.
Shrimp and White Bean Stew

I finally got to do some real cooking. I haven’t done much of that recently, what with us being empty nesters and all—both working, dogs and cats pretty much at war with each other, and my nicely blossoming indoor orchard of citrus trees. And then there’s the pending living-room remodel.
Sometimes there just isn’t much time left for real cooking. You know the kind I mean—where I actually get to start with making a stock, where I layer in the flavors thoughtfully one at a time, where I actually start with a found recipe and adjust and adapt it to my personal style and preference. Plus, since I’m now 50 pounds lighter than I was 11 months ago and plan to keep it that way, the choices I have from on-hand supplies is a bit different. Butter and flour as main ingredients aren’t much in the plan any more, so flavors and textures come from other, more creative places.
So there I was on a Friday evening, sipping quietly on a syrupy Zinfandel, and thinking through my dinner prep plan (yes, Virginia, we actual trained cooks think and make a plan).
Tonight’s menu was built around a tasty shrimp and white-bean stew with fresh basil and lemon zest, and a surprise. And it meant actually cooking!
Heaven in a kitchen.
E thought it was pretty good. I thought it was one of the best dishes I’ve eaten in a very long time. So good that I just had to write about it here, I haven’t been so inspired in a while, but tonight’s dish just struck that chord—definitely a major-seventh in D. I hope you’ll try this one. It’s a winner!
SHRIMP AND WHITE-BEAN STEW
Ingredients:
4 tablespoons extra-virgin olive oil, divided
1 medium onion, chopped fine
1 pound jumbo shell-on shrimp (21-26 count), peeled, deveined, and tails removed, shells reserved
1 teaspoon kosher salt
1/2 teaspoon freshly ground black pepper
2 tablespoons sugar
¼ cup fresh basil, coarsely chopped
2 (15-ounce) cans cannellini beans (1 can drained and rinsed, 1 can left undrained)
2 teaspoons Thai fish sauce
1 (14.5-ounce) can diced tomatoes, drained
4 garlic cloves, peeled, halved lengthwise, and sliced thin
1/2 teaspoon red pepper flakes
½ teaspoon grated lemon zest plus 1 tablespoon juice
Preparation:
1. Dissolve sugar and 1 tablespoon salt in 1 quart cold water in large container. Submerge shrimp in brine, cover, and refrigerate for 15 minutes. Remove shrimp from brine and pat dry with paper towels.
2. While the shrimp is brining, heat 1 tablespoon oil in 12-inch skillet over medium heat until shimmering. Add shrimp shells and cook, stirring frequently, until they begin to turn spotty brown and skillet starts to brown, 5 to 6 minutes. Remove skillet from heat and carefully add 1 cup water. When bubbling subsides, return skillet to medium heat and simmer gently, stirring occasionally, for 5 minutes. Strain mixture through colander set over large bowl. Discard shells and reserve liquid (you should have about 1/4 cup). Wipe skillet clean with paper towels.
3. Heat 2 tablespoons oil. Add the onion, garlic, anchovies, pepper flakes, 1/2 teaspoon salt, and 1/4 teaspoon pepper in now-empty skillet over medium-low heat. Cook, stirring occasionally, until onion is softened, about 5 minutes. Add 1 can drained beans, 1 can beans and their liquid, tomatoes, and shrimp stock and bring to simmer. Simmer, stirring occasionally, for 15 minutes.
4. Reduce heat to low, add shrimp, cover, and cook, stirring once during cooking, until shrimp are just opaque, 5 to 7 minutes. Remove skillet from heat and stir in basil and lemon zest and juice. Season with salt and pepper to taste. Transfer to serving dish, drizzle with remaining 1 tablespoon oil, and serve.
Mediterranean Roasted Tomato, Garlic, and Basil Soup
So let me tell you about making soup in August.

I mean, who makes—let alone eats—soup in August? Except that, in August the garden out back is simply bursting with wonderful stuff, more than we newly empty nesters can possibly consume in a year when home entertaining is pretty much taboo.
So, Soup.
Out back I have five varieties of tomatoes, both heirlooms from the Landis Valley Farm Museum Seed Project, and Camparis and San Marzanos I started from saved seeds. We simply can’t consume all these tomatoes ourselves as they ripen, so I have to be creative and productive, and be ready to squirrel away tomatoes for the winter months, when the tomatoes at the grocery store come from South America. Yech! Plus, there’s the herb garden—thyme, sage, oregano, parsley, chives, sweet and Thai basil…
But…Soup?
Okay, okay. So I made copious quarts of sauce last week (recipe here: https://jeffskitchen.net/2013/08/25/canning-a-fabulous-marinara-sauce-quickly-and-simply/). And a batch of chutney. And admittedly, I will harvest, roast, peel, and can the last of the San Marzanos and Amish Pastes when the chill arrives—if it ever arrives—so that I have them to cook with in late fall and winter. And there is panzanella (recipe here: https://jeffskitchen.net/2018/07/02/authentic-tuscan-panzanella/ ) to be enjoyed while the big slicers are around.
Ergo, Soup!
This here recipe is about as good as soup recipes can get, especially if you like tomato soup. It’s not that “just-add-water-and-serve-with-grilled-cheese” creamy stuff from concentrate (although I have to admit, that’s pretty good too). And it’s not cold summer Gazpacho (although that’s pretty good too if you like cucumbers (recipe here: https://jeffskitchen.net/2013/07/16/cheffzillas-gazpacho-with-a-kick/).
But it’s a warm and flavorful chunky Mediterranean-style garden soup that tastes great, is completely vegan, freezes beautifully, and is even good cold.
So, if your garden is overflowing with tomatoes, if a bunch show up in the break room at work, if you can’t resist the huge piles of giant fresh tomatoes at the farmer’s market, or if you just want something sweet and swell, try this soup. It’s even one of the easiest soups you’ll ever make.
Then, SOUP!
Ingredients:
• 3 lb Roma tomatoes, halved, or whatever assortment you have on hand
• 2 to 3 carrots, cut into small chunks
• 2 teaspoons extra-virgin olive oil (I used home made garlic-infused EVOO)
• 2 teaspoons salt and 1/2 teaspoon freshly ground black pepper
• 2 medium yellow onions, chopped
• 5-10 garlic cloves (to taste), smashed (I used a whole head of garlic)
• 1 14-oz can crushed tomatoes (Muir Fire-roasted, if you can find them)
• 1 cup packed, fresh basil leaves, coarsely chopped
• 3 to 4 sprigs fresh thyme, or 2 tsp dried thyme leaves
• 2-3 sprigs fresh oregano, or 1 tsp dried oregano
• 1 tsp sweet paprika (you could use smoked paprika if you like, but I think it’s one too many flavors)
• 1 tsp ground cumin
• 2 1/2 cups vegetable stock
• Juice of 1 fresh lime
• Preparation:
Heat oven to 400 degrees F.
• In a large mixing bowl, combine tomatoes, garlic, and carrot pieces. Add a generous drizzle of extra virgin olive oil. Toss to combine.
• Transfer to a large baking sheet and spread well in one layer. Roast in heated oven for about 45 minutes. When ready, remove from the heat and set aside for about 10 minutes to cool.
• Transfer the roasted tomatoes, garlic, and carrots, and all the juice to a food processor fitted with a blade, and blend till just barely chunky.
• In a large enamel or stainless (NOT ALUMINUM!!!) soup pot, heat 2 tbsp extra virgin olive oil over medium-high heat until shimmering but not smoking. Add onions and cook for about 3 minutes, then add salt and pepper and cook briefly until golden. Don’t let the onions burn.
• Pour the roasted tomato mixture into the cooking pot. Stir in canned tomatoes, vegetable stock, basil, thyme, and spices. Season with a little kosher salt and black pepper. Bring to a boil, then lower heat and cover part-way. Let simmer for about 30 minutes or so.
• Remove the thyme springs, squeeze in the lime juice, and transfer tomato basil soup to serving bowls. If you like, add a generous drizzle of olive oil. Serve with your favorite crusty bread or grilled pieces of French baguette. Enjoy!
New York-Style Kosher Dill Pickles
It’s almost summer.

My favorite time of the year. Yes Friends, I am a summer animal. There’s not much that I can think of that I enjoy more than a great summer day with my feet in the sand, the ocean pounding in my ears, and an outrageous mystery thriller or six to put my brain on pause (well, there IS one thing, but hey, this is a family website).
Summer means fresh produce growing in the garden—we’ve got sugar snap peas; three kinds tomatoes (who doesn’t); three kinds peppers (two hot and one sweet); eggplants; lots of romaine lettuce; scallions; and herbs, herbs, herbs. The rose bushes are in full bloom, the grass is growing way too fast (so are the weeds); and the air conditioners have been put in place for the ladies of the house.
Summer means the kids are off from school and home all the time…oh, wait…
And for me the summer means pickles. I mean to say I make pickles. By the bushel full. If you know me at all, you likely know that pickles means kosher-style, vinegary and garlic-laden, salty, spicy, dilly, genuine New York deli-style pickles. I have been getting my cucumbers, Kirbys and baby English cukes, from our favorite neighborhood farmer’s markets, Brook Lawn Farm Market in Neffsville and Harvest Lane Farm Market, on Oregon Road in Manheim Township. I make them all summer long, as long as the Kirbys are available, because they’re a great low-calorie snack, and because they replace some of the salt I lose when walking Stella the dog in the summer heat.
I’m following my mother’s recipe—about the only thing she made in the summertime, because it doesn’t require cooking—and the pickles are every bit as good as the ones we got at the Epicure or from Murray’s in Merion, and way better than the ones I get now at the grocery store. Because I can determine just how much garlic, just how much vinegar, just how much spices. I did riff a bit on Mom’s recipe, because she didn’t like them as spicy as I do. But when you read the recipe you can back off on the heat or the vinegar if you wish, but they will be…well…different.
But as I always do, I’ll share the recipe with you here as I make them—no cooking required, just patience. And I promise that if you like real New York-style kosher dills, you’ll get them.
Every time.
Here’s the road map:
New York Deli-style Straight Outta’-the-barrel Kosher Dills
Ingredients:
- 8-9 Kirby cucumbers
- 2 Tablespoons pickling or kosher salt (pickling salt is better)
- 24 ounces BOTTLED water (DON’T USE LOCAL SINK WATER—IMPORTANT!)
- 8 ounces white vinegar
- 4 (or more or less—you get to decide here) cloves fresh garlic, smashed, skins on
- 4 Tablespoons pickling spice
- 2 teaspoons dill seeds (you could use fresh dill, but trust me, the seeds are a better option—you will be fermenting, and fresh dill could be a problem)
- 2 dried Thai chili peppers (optional, makes the pickles spicier)—I grow my own and dry them; you can get them at the Asian market.
Preparation:
- Wash the cucumbers well and cut off both ends—just barely nip them—about ¼ inch, but this is important.
- Stir the water, vinegar, and salt together until the salt is completely dissolved.
- Place 2 cloves garlic, 2 Tbsp pickling spice, 1 tsp. dill seeds and 1dried pepper in each of 2 quart-size containers. I use plastic containers I’ve saved from buying dill pickles from the refrigerator case at Aldi (see photo)—they’re the best I’ve found—or restaurant take-out quart-size soup containers (also saved). Wide-mouth canning jars are okay too, but it’s harder to get the pickles out later
- Cut the cucumbers in half or quarters lengthwise and pack them the into the containers. Pack them as tight as you can, so they won’t float when you add the brine. You could do them whole, but you’ll get fewer pickles per batch. If you like your pickles whole, use a half-gallon or gallon wide-mouth container, and keep the ingredient ratios exactly the same; if you make a gallon at a time, double the ingredients. The important thing is the salt-to liquid ratio—it must be 2 tablespoons salt to each quart of liquid.
- Add the brine to each container, leaving 1/2-inch head space. Make sure the cucumbers are completely submerged in the brine. They will want to float to the surface. Try getting another quarter cucumber in to make them tighter, or weigh them down with a fermenting weight or a small zipper-close bag with water in it. It’s important that they stay submerged, or the exposed ends will mold, and ruin the whole batch.
- Place the lids LOOSELY on top of the container, so the jars can breathe and the pickles can ferment. You don’t want to close the lids, as this will prevent the fermenting process from happening.
- Store the pickles in a cool dark location for anywhere from 24 hours to 7 days, depending on how crunchy or soft you like your pickles—the longer they ferment, the softer they get, and also the more intense the flavor. I ferment mine for 48 hours; I like the crunch and the flavor of 2-day pickles. Remove the weight, close the lids tight, and place them in the fridge.
The pickles will keep in the fridge for about a month, but they’ll never last that long. They will continue to get more flavorful as they sit in the brine.
Cheesy White-Bean Pizza
Today in Jeff’s Quarantine Kitchen…
The New York Times Cooking section (@NYTCooking, recipe by Ali Slagle) calls this dish “Cheesy White-Bean Tomato Bake.” So I gotta’ tell ya’ folks, that title just doesn’t grab my attention.

Nope! Not even a little bit.
Let’s be honest here. If you saw that title on a recipe, would you be compelled to make it for your family? The same night you stumbled across it on someone’s Pinterest page? Not me.
What caught my attention was the photo, proving once again that a picture is worth…well, you know.
What it looked like in the photo was a bubbly, crispy, pebbly, yummy-looking pizza. And who can’t resist reading a recipe that is topped with a beauteous picture of a steaming-hot, bubbling mass of mozzarella? Certainly not me.
But reading further, what I discovered was that this dish looked like it might be the best-looking white-bean stew I have ever seen; it was, after all, white-bean stew that had me browsing all those Pinterest pages in the first place. But I just couldn’t find one that would suit the dreadfully picky tastes that are currently taking up residence and space in our empty nest.
But this dish looked so good in the photo that if it had been topped with pepperoni or caramelized onions and peppers, I might have been tempted to break out an actual Corona or two (see what I did there?). In fact, it looked so good that I decided right then and there that it was going to be dinner tonight; I already had the white beans soaking on the stove top and I had been, so far, uninspired.
So, cheesy white-bean pizza.
It’s not really a pizza; there isn’t a beautifully thin and crispy crust—actually, it’s more like a protein-laden, gluten-free, deep-dish thing, a pizza in name only. Rather it’s a casserole masquerading as a pizza-flavored white-bean stew. Plus, if you make it right the bottom just might get a crispy crust anyway.
And it’s delicious. You can make it simple—just the base ingredients, or add whatever toppings and fillings that suit your whimsy; I’m thinking next time I might go Tex-Mex-style, adding a can of chopped green chilies to the tomatoes or replacing the tomatoes with salsa, adding a jolt of cilantro and using Jack cheese instead of mozzarella. Just imagine the possibilities.
And try this one at home. Here’s the plan…
Ingredients:
- ¼ cup extra-virgin olive oil
- 3 fat garlic cloves, thinly sliced
- 3 tablespoons tomato paste
- 2 (15-ounce) cans white beans, drained and rinsed
- ½ cup boiling water
- Kosher salt and black pepper
- 2 cups washed baby spinach
- 1 8-ounce can crushed tomatoes
- A few fresh basil leaves
- ⅓ pound mozzarella, coarsely grated (about 1 1/3 cups)
- Very thin slices of red onion, or Caramelized onion jam for topping (see recipe from 3/17)
Preparation:
- Heat the oven to 475 degrees. In a 10-inch ovenproof (I used cast iron) skillet, heat the olive oil over medium-high heat. Fry the garlic until it’s lightly golden, about 1 minute. Stir in the tomato paste (be careful of splattering) and fry for 30 seconds, reducing the heat as needed to prevent the garlic from burning.
- Add the beans, water, tomatoes, spinach, and generous pinches of salt and pepper and stir to combine. Sprinkle the cheese evenly over the top, spread the onion jam (or thinly sliced red onions) over the cheese, then bake until the cheese has melted and browned in spots, 5 to 10 minutes. If the top is not as toasted as you’d like, run the skillet under the broiler for a minute or 2. Serve at once.
PS: and by the way, we fed the sourdough starter again this morning, with three tablespoons of flour and two tablespoons of water (dechlorinated, remember?). It’s growing. In fact, it looks like any day now it might take over the kitchen.
#FeedMe!!!
