Monthly Archives: January 2015
Meyer Lemon Marmalade
E posted a photo on her Pinterest page suggesting that Meyer lemon marmalade 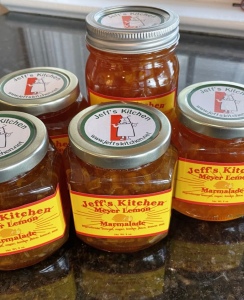 is one of her favorite things, even as she spread a wonderful Trader Joe’s rendition of orange marmalade on her rosemary-olive-oil bread from Thom’s. Given that whatever E thinks is a “favorite thing” ought to be made a reality, I decided to make a batch of the jelled gold for her. Not a marmalade fan myself, I needed to learn how marmalade is made, and I discovered how simple it is.
So off to market I go, ISO ripe Meyer lemons. The good news is that I knew just where to find them–at John and Ethel Stoner’s little stand in the middle of our local jewel, the Lancaster Central Market.
The Meyer lemon, in case you’re not familiar with it, is rounder than a true lemon. The skin is fragrant and thin, colored a deep yellow with a slight orange tint when ripe. Meyer lemons have a sweeter, less acidic flavor than the more common supermarket lemon varieties. The Meyer lemon is commonly grown in China in garden pots as an ornamental tree. It became popular as a food item in the United States after being rediscovered by chefs such as Alice Waters at Chez Panisse in San Francisco at the end of the 1990s, and even more so when Martha Stewart began featuring them in her recipes.
Citrus marmalades are basically reductions of the fruit, water, and sugar, cooked slowly until the sugars begin to caramelize. Orange marmalade has been a staple of British and American breakfasts for generations, certainly around here. So the idea of Meyer lemon marmalade seemed like such a natural for us, given E’s sudden “pinterest” in the stuff and my constant desire to please her with surprising cooking choices.
Ergo Meyer lemon marmalade. Sweet, tart, and tasty, it’s wonderful on English muffins and any good artisan bread you can imagine.
Here’s my take:
Meyer Lemon Marmalade
Ingredients:
6 Meyer lemons (about 1 1/2 pounds)
4 cups water
4 cups sugar
Preparation:
Quarter the lemons and separate the seeds (save the seeds!). Remove the ends and slice the lemons as thinly as possible, and reslice any larger bits of lemon rind to small pieces. Place all the lemon seeds in a cheesecloth bag and tie off the ends. Combine the lemon slices, the seed bag, and water in a large non-reactive pot, stir to mix well, cover and allow to stand at room temperature for 24 hours. (I used an enamel-coated cast-iron pot–Le Creuset–but you could also use a stainless-steel pot. I actually have a favorite stainless-steel pot I will use in the future, a $15.00 gem from Ikea. It holds five quarts, and has quart- and liter- markings etched ON THE INSIDE OF THE POT: BRILLIANT! This feature will work you your amazing advantage for this recipe, as you will see).
After the lemons have rested in the water for 24 hours, remove the seed bag and bring the mixture to a boil, reduce the heat and simmer slowly until the mixture is reduced to 4 cups (or 1 quart! See why the inside-the-pot etchings on the Ikea pot are so terrific for this recipe?). Add the sugar to the lemons, stir well to dissolve the sugar, and boil over moderate heat, stirring occasionally and skimming off any foam that develops, for 15-20 minutes, until a teaspoonful of the marmalade dropped on a cold plate gels (you can skip this test if you wish, it really works).
In the meantime, prepare six 1/2-pint jars for canning: wash and rinse the jars, lids, and rings, set them in a large pot of water and bring to a boil; allow the jars to simmer at a slow boil for 30 minutes, then turn the fire off under the pot.
When the marmalade is ready, ladle hot marmalade into the hot jars to within 1/4 inch of the rim, wipe the rim of the jar with a damp towel, and seal the jars with the hot lids and rings. Set the jars back into the hot water, bring to a boil, cover the pot and boil the jars for five minutes. Using jar tongs, transfer the jars to a wire rack and allow the marmalade to cool completely. Check to ensure that the lids have popped and the jars have sealed. If any jars haven’t popped, refrigerate them and use immediately. The sealed jars will keep in a cool, dark place for 1 year.
Next batch I’ll make will include 1 teaspoon of finely chopped fresh rosemary.
Just sayin’.
“As Good As Risotto” Israeli Couscous and Peas and Parmesan
Life on the run.
You get it; I know you do.
If you’re like me, however, you still refuse to succumb to the lure of mac & cheese from a box for dinner. I simply refuse.
The kids are annoyed at me all the time, because I cook. I want dinner, with the whole family sitting around the dinner table, to be something that they remember when they grow up and have kids of their own. I want them to be healthy. I want them to be interested in trying new things. I want them to appreciate the effort that E and I put into giving them the best daily experience they can have, whether they appreciate it now, or later, or maybe never, but I truly don’t think that last will come to pass.
Sure, occasionally, dinner can be baked beans from a can and browned hot dogs on white bread, on a day when L has mid-terms and chorus rehearsal and a voice lesson; and M has after-school enrichment and swim practice and an evening hockey game; and E has a meeting at eight am in Elizabethtown and a lunch meeting with a donor downtown and a planning session for the golf tournament at five pm in New Holland; and I’m driving up and down 501 four times in an afternoon and I’m on call for jury duty in Philadelphia; and … and … and …
I know you all can relate.
Still, the kids deserve a home-cooked meal, even if they don’t think they deserve it and only want mac & cheese and chocolate milk for dinner.
And I do love to cook.
So in that spirit, and with lots to do, I still wanted to conjure up something that looked like–and felt like–effort.
What resulted was a dinner of baked (turkey) ham pinned with whole cloves and slathered with brown sugar and Dijon mustard, cooked over a water bath of ginger beer and liquid smoke (took five minutes to prepare, then 75 minutes in a 325-degree oven); fresh green beans (trimmed and sauteed in olive oil and sliced almonds–took more time than the turkey ham by about three minutes); and something inspired by a recipe I found on the Internet–Israeli couscous with peas. This one sounds like a production, but actually it was amazingly simple and garnered applause and demands for seconds. Will wonders never cease?
The Israeli couscous product was–in my mind, anyway–as good as risotto, and so simple that you need to try it. Took me all of six minutes of effort and 15 minutes start to finish, with the most amazing result.
Want to make risotto without the muss and the fuss?
Israeli Couscous With Peas and Parmesan
Ingredients:
2 tablespoons olive oil or unsalted butter
2 cups pearl couscous
1 1/2 cups frozen peas (or freshly shelled in season–even better)
3 cups chicken or vegetable broth
1/2 cup shredded Parmesan cheese (the stuff in the bag in the dairy aisle–excellent product for cooking)
1 teaspoon kosher salt
1/2 teaspoon freshly ground black pepper
Preparation:
1. Heat the oil or butter in a medium-sized heavy pot over medium-high heat. Add the couscous and cook, stirring constantly, until it starts to brown; 3-5 minutes.
2. Add the peas and broth and bring to a boil. Reduce the heat to a simmer, cover, and cook until the broth is absorbed and the couscous is tender; 10-12 minutes.
3. Add the salt and pepper, stir well, then add the Parmesan cheese and stir constantly until the cheese is melted and fully incorporated.
Garnish with a little chopped parsley and serve immediately.
Bacon-Maple Slow-Cooker Baked Beans
Got a hankering for baked beans.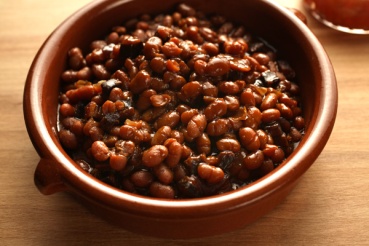
Sure, it’s cute watching Jay Bush and his golden retriever Duke, who seems to be on a mission to sell the secret recipe, like any capitalist dog would be. Makes you want some beans. Or a golden retriever. Makes me want neither. Bush’s Beans are probably a perfectly fine product, but I’ve always been a B&M kind of guy, and I’m not particularly fond of dogs, although I’ve grown to love my wild and crazy German shorthaired pointers, Argos and Maggie (Argos, I should point out, has no interest in selling any of my recipes; he has a one-track agenda, which is to eat everything I cook. Maggie, on the other hand, would sell my recipes in a heartbeat if she thought she could turn a profit; she’s probably the most dedicated capitalist in the family).
But I digress (I hate when I do that).
I was reading someplace recently that some kid’s favorite food was baked-bean sandwiches–homemade baked beans on fresh homemade bread–and I got to thinking about that. Could that be nature’s perfect food? The writer was recounting how such sandwiches ignited his love of all things food and how they inspired him to become a chef. It started, he says, because he couldn’t find a pile of baked beans anywhere near as good as the scratch batches his grandmother made for him. I can relate. I was raised on the cooking of a wonderful woman who came from the Piedmont of Virginia, where home-grown pork and chickens and corn and cabbages and greens were on the table every day. She made her baked beans (and everything else) from scratch, and the tale of baked-bean sandwiches massaged a longing in me I hadn’t felt in quite a while.
Consequently, I got a hankering for baked beans.
Lily Jones was not available to make me beans, and I’ve never really worked up a recipe of my own. So I decided to do some research, find a recipe to start with, and then make it my own. Something hearty, flavorful, bold, and memorable.
I must have read 500 recipes. What I kept coming back to was a fabulous website chock full of recipes that use beer as the principal ingredient. Beer! That’s the ticket! But not just any beer. It needed to be thick, dark, malty, nutty–hair-raising. I found a recipe that resonated, and then kept reading, comparing each next one I found to the one that sang to me, and not one measured up.
And then, I made the beans. Incredible. Salved my hankering, my wife, the remarkable Ellen, followed up with a honey-Hefeweisen boule made with a locally brewed winter wheat beer, and voila! Baked-bean sandwiches for the Gods.
Next, I had to make the recipe my own. The recipe on the website is perfect as is. But it’s not mine, alas, and I thought I could improve it. Guess what: I couldn’t. It’s perfect as is. The only thing I did change was to use turkey bacon (we don’t eat much pork around here) cooked in two teaspoons of extra-virgin olive oil; and instead of a smoky porter I used Sierra Nevada Coffee Stout.
Try this if you want perfect beans. And if you want a perfect bean sandwich, make the bread, too. It’s almost as simple to make as the beans–no kneading, just rest and love.
Slow Cooker Maple Bacon Beer Baked Beans
Ingredients:
- ½ pound Great Northern beans
- ½ lbs Navy beans
- 4 strips thick cut bacon (I used turkey bacon)
- 1 large sweet onion, chopped
- 3 tablespoons full-flavor molasses
- ¼ cup real maple syrup
- 2 cups smoked porter beer (I used Sierra Nevada Coffee Stout)
- 2 cups water
- 1 teaspoon smoked paprika
- 1 tablespoon liquid smoke
- 1 teaspoon granulated garlic
- 3 tablespoon balsamic vinegar
- 2 teaspoon Worcestershire sauce
- 1 teaspoon kosher salt
- 1 teaspoon fine ground white pepper
- 1/2 teaspoon freshly ground black pepper
- 1 teaspoon dry mustard
Preparation:
- Place the beans in a large pot with 3 cups of water. Cover and bring the pot to a boil, and cook for 3 minutes. Remove from the heat and soak for 8-12 hours; overnight is good. Rinse with cold water and drain.
- Cook the bacon in a skillet over medium high heat, remove bacon from pan. Add the onions to the bacon grease, cook until soft, about 5 minutes. Chop the bacon.
- Add the bacon, onions, drained beans and remaining ingredients to a slow cooker. Cook for 8 hours on low, stirring once or twice during cooking. If beans are still firm after 8-10 hours, turn to high and cook for an additional 2 hours.
And now the bread:
Honey Hefeweizen Boule Loaf
Ingredients:
- 4 ¼ (19 wt oz) cups all-purpose flour
- 1 package (2 ¼ tsp) rapid rise yeast
- ¼ cup honey
- pinch salt
- 12 ounces wheat beer*
- egg wash (1 egg, 1 teaspoon water, beaten)
Preparation: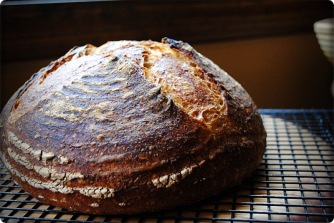
- In the bowl of a stand mixer fitted with a dough hook add the flour and yeast, mix to combine.
- Heat the beer to between 120 and 130F degrees.
- Add the beer and the honey to the flour, beat on high until dough gathers around the hook and is no longer sticky, about 6 minutes.
- Transfer the dough to a lightly oiled bowl, cover and allow to rise in a warm place until doubled in size, about 1 hour.
- Place a baking stone in the oven, preheat for 30 minutes prior to baking.
- Once the dough has risen, place a bread peel (or a sheet of parchment paper) on a flat surface, cover in cornmeal or semolina flour. Grab the dough in your heads, folding it into itself gently a few times, then form into a tight ball. Place on the peel (or parchment paper), allowing to rise for about 30 minutes.
- Brush the top with egg wash, slash an “X” on top of the loaf using a sharp knife.
- Transfer the dough to the pizza stone using either the peel or by simply placing the parchment paper on top of the heated stone (if you don’t own a bread stone, just place the parchment on top of a baking sheet and set that into the oven when you are ready to bake).
- Bake at 400 until top is a dark golden brown and makes a hollow “thump” sound when tapped, about 30 minutes.
- Allow to cool slightly before slicing.
Notes
*This recipe is for a very low IBU (low hop) beer. If all you have is a pale ale, IPA or hoppy wheat, use 3/4 cup beer and 3/4 cup hot water or the beer taste will be overpowering.
And to Jackie Dodd, “The Beeroness,” I offer a toast: Jackie (wwwthebeeroness.com), you’ve won my heart. Or more accurately, my appetite.
