Dessert for Breakfast–but Healthy!
Slow-Cooker Apple-Cinnamon Steel-cut Oatmeal
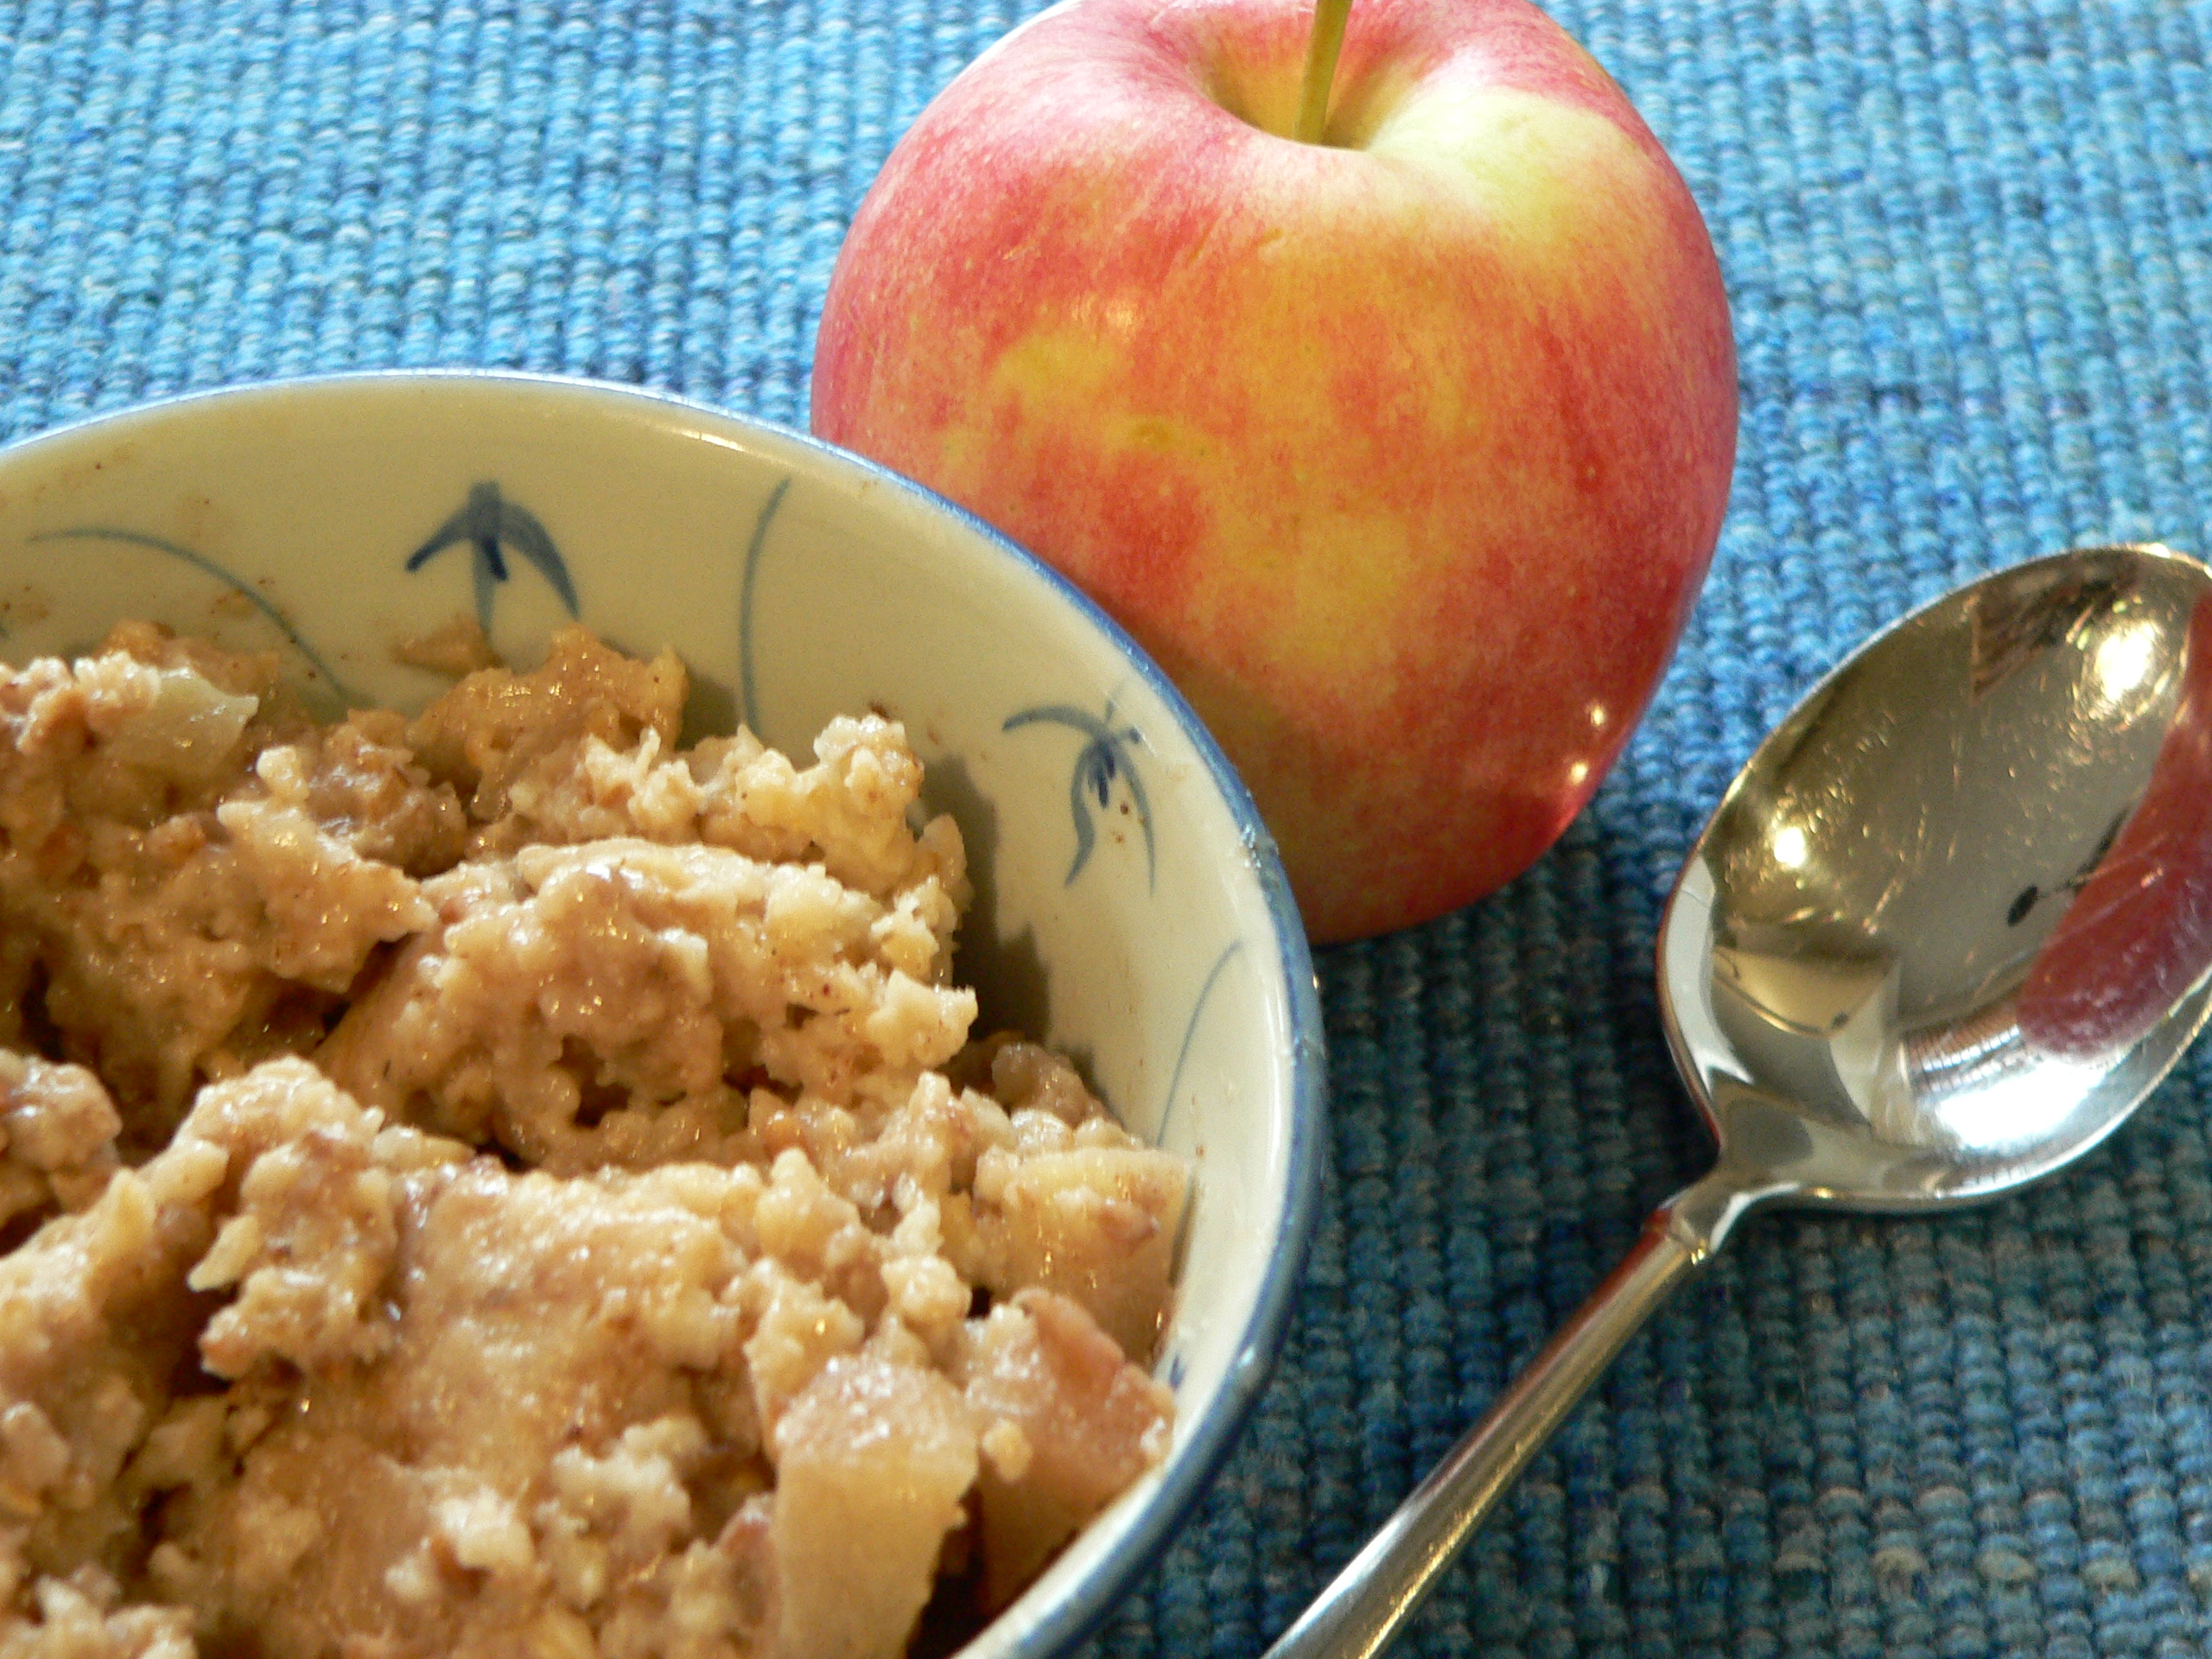
What a surprise I had this morning! The house was infused with the deep, rich aroma of baking apples and cinnamon–you’d think we were baking an apple crisp.
Apple crisp? First thing on a Sunday morning? Scandalous. Outrageous. Unheard of.
But yummy, and way healthy, too!
My partner and muse conjured up a breakfast that I think I could eat every single day. Sweet and fruity, tasty and stick-to-the-ribs. But so healthy that your body would think it was getting something that didn’t taste good.
Ah, to fool Mother Nature!
The Holy Grail of cooking is to make food that is so tasty that you want more and more, but at the same time is good for you. Not too many things fit that bill. This one does. You really need to do this one. The really interesting part is just how simple it is. Ten minutes before bed, and in the morning, voila! Hot and sweet and tasty and healthy, all in the same cup.
Do it for yourself. Do it for your family. Do it because, even if you can’t cook a lick, you can do this one.
Make it. Today.
Ingredients:
2 apples, peeled and cored, cut into 1/2-inch pieces
1 1/2 cups fat-free milk (or substitute non-dairy alternative–like almond milk)
1 1/2 cups water
1 cup uncooked steel-cut oats
2 tablespoons brown sugar or maple syrup
1 1/2 tablespoons butter, cut into small pieces
1/2 teaspoon ground cinnamon
1 tablespoons ground flax seed
1/4 teaspoon kosher salt
Optional toppings: chopped nuts, raisins, maple syrup, additional milk, butter, dried fruit–whatever suits you
Preparation:
Coat the inside of a 4-quart slow-cooker with cooking spray. Add all ingredients (except optional garnishes). Stir, cover, and cook on low for approximately 7 hours. Serve in 3/4-cup servings with optional toppings, if desired. Store leftovers in the fridge, and it freezes beautifully.
To reheat single serving, portion into microwaveable bowls, add 1/3 cup skim milk or almond milk, and microwave 1 minute, stir well, cook another minute, or until hot.
Oh yes, and it’s only 4 Weight-Watchers Points Plus points per 3/4-cup serving.
This recipe comes to you courtesy of Monica Matheny, from her terrific blog, The Yummy Life (www.theyummylife.com). Check it out! Lots of good, healthy recipes.
Caramelized Leek Risotto Recipe
Caramelized Leek Risotto Recipe
by katerina on November 13, 2009

The flavour of caramelized leeks is sweet, nutty and subtle. After trying caramelized leeks a few weeks ago them I knew there was a risotto with caramelized leeks in my future.
There aren’t that many leek recipes out there, but I can’t believe I have waited this long to make a leek risotto. When I tasted I was actually excited by how good it was, I think it is officially my new favorite.

If you are looking for a subtler leek flavour, but love bacon, then try this leek risotto with pancetta. It is not vegetarian friendly, but boy is it good.
Caramelized Leek Risotto
(2-4 servings)

Trim off the dark green part of leek, you can reserve it for a future use. Cut remaining leek in half lengthwise then into 1/3″ half moons. Clean thoroughly. In a heavy bottomed pot melt butter over medium heat, add leeks and stir to coat. Cook leeks stirring every five minutes or so until they start to brown. Let the leeks lightly brown evenly, you can turn it down a bit if you like as you don’t want them to burn. It should take about 25 minutes. Sprinkle with salt and pepper and then add rice. Stir to coat and cook, stirring regularly for 2 minutes. Add wine and continue stirring until two thirds of the wine has evaporated. Start adding chicken stock in large ladelfuls, stirring often. You want the temperature of the mixture to be at a very light simmer. Continue adding stock until rice is tender and just a little bit al dente. Turn off heat and stir in cheese and chives. Taste and correct for seasoning.
Calories(approximate per serving): 275
A Few Local CSA Farms in Lancaster County
Here is a link to a few other CSAs in Lancaster County besides my favorite, Blue Rock Farm. This is by no means a complete list, but there are resources where you can get more information. This one is Farmers’ Friend. Another is the website of PA Buy Fresh Buy Local, and if you “Google” Lancaster County CSA you will find others. Here is a quick link to a few. I haven’t tried any of them out, Blue Rock is my first venture into CSA. I’ll keep you posted.
http://www.farmerspal.com/organic-farms/csa-farms/region/lancaster-county-pennsylvania/page/1/
East Side Community Kitchen
I was recently asked about a kitchen that anyone in the community could use. Here is the information:
It is called the East Side Community Kitchen, located at 347 North Plum Street in Lancaster. Those who wish to use the kitchen are required to join the community as a member. The fee is $40.00 per month, which includes two hours of kitchen use, which can be banked up to 12 hours. In other words, you will be billed $40.00 each month, but on a month in which you do not use the hours, they can be rolled over into the next month, until a maximum of 12 hours are saved. Additional hours are billed at a rate of $20.00 per hour. The kitchen has virtually all the equipment one might need; members are asked to bring their own ingredients, any special equipment they might need, and extra paper towels and trash and garbage bags occasionally, as an in-kind contribution to help reduce costs. Members are also required to clean up after themselves in a manner congruent with the requirements of a commercial kitchen.
More information about the East Side Community Kitchen can be found at: http://www.eastsidecommunitykitchen.com/Home
Caitlin’s Chocolate Beet Cake from the Blue Rock Farm
In my last post I waxed poetic about the Blue Rock Farm in Willow Street. Now, Caitlin Brady sends me this recipe for a sweet and tasty chocolate cake made with chocolate and beets. It’s incredibly rich, and you may never go back to “normal” chocolate cake again.
Caitlin’s Chocolate Beet Cake with Beet Cream Cheese Frosting
Makes one 8 or 9-inch 2 layer cake
Ingredients:
For the Cake:
2 medium beets, unpeeled and trimmed of their greens
1 teaspoon vegetable oil
6 ounces (3/4 cup) unsalted butter, softened, plus more for the pans
1 cup packed brown sugar
3/4 cup granulated sugar
2 large eggs
1 teaspoon pure vanilla extract
2 cups all-purpose flour, plus more for dusting the pans
2/3 cup unsweetened cocoa powder
1 teaspoon baking soda
1/2 teaspoon baking powder
1 teaspoon salt
1 1/4 cups buttermilk
For the Frosting:
1 cup (2 sticks) unsalted butter, softened
8 ounces (1 brick) cream cheese, softened
4 to 5 cups powdered sugar, sifted
2 tablespoons finely grated beets, mashed with a fork
1 teaspoon pure vanilla extract
1-2 teaspoons milk, depending on desired consistency
1/2 teaspoon fresh lemon juice
pinch of salt
Preparation:
Place a rack in the center of the oven. Preheat oven to 350 degrees F. Wash beets under running water, and trim their leaves. Place clean beets in a piece of foil and drizzle with just a bit of vegetable oil. Seal foil and place on a baking sheet in the oven. Roast until beets are tender when pierced with a knife, about 1 hour. Remove the beets from the oven and allow to cool completely.
Using a box grater, grate the peeled beets on the finest grating plane. Measure 3/4 cup of grated beets for the cake and 2 tablespoons for the frosting. Set aside. Use butter to grease two 8 or 9-inch round baking pans. Add a dusting of flour to coat the pan. Set pans aside while you prepare the cake.
In the bowl of an electric stand mixer, cream together butter and sugars. Beat on medium speed until pale and fluffy, about 3 to 5 minutes. Beat in eggs, one at a time, for one minute after each addition. Stop the mixer and scrape down the sides of the bowl as necessary. Once eggs are incorporated, beat in beets and vanilla extract until thoroughly combined. In a medium bowl, whisk together flour, cocoa powder, baking soda, baking powder, and salt.
Add half of the dry ingredients to the butter and egg mixture. Beating on low speed , slowly add the buttermilk. Once just incorporated, add the other half of the dry ingredients. Beat on medium speed until milk and dry ingredients are just incorporated. Try not to overmix the batter. Bowl can be removed from the mixer. and mixture folded with a spatula to finish incorporating ingredients. Cake batter will be on the thick side… not pourable.
Divide the batter between the two prepared cake pans. Bake for 23 to 25 minutes (for a 9-inch pan) or 30-32 minutes (for an 8-inch pan). Cake is done when a skewer inserted in the center comes out clean. Remove cakes from the oven and allow to rest for 10 minutes. Invert cakes onto a cooling rack to cool completely before frosting and assembling the cake.
To make the frosting:
In the bowl of an electric stand mixer, beat cream cheese for 30 seconds, until smooth. Add the butter and beat for another 30 seconds, until well combined. Beat in the beets. Add the powdered sugar, vanilla extract, milk, lemon juice, and salt. Beat on medium speed until smooth. Refrigerate the frosting for 30 minutes before frosting the cooled cakes.
To assemble the cake, place one layer of cake on a cake stand or cake plate. Top with a generous amount of pink frosting. Spread evenly. Place the other cake on top of the frosting. Top with frosting. Work frosting onto the sides of the cake. Refrigerate for an hour before serving.
A Visit to My Produce
This week I met my farmers, and I walked the ground where my spring, summer, and autumn vegetables will grow. We joined a CSA this week, so we will be receiving regular bags full of produce—from mustard greens to watermelons to butternut squash and virtually everything in between—from a tiny but growing farm in Willow Street called Blue Rock Farm. And the farmers, Caitlin Brady and EmmaKate Martin are not what you’d expect.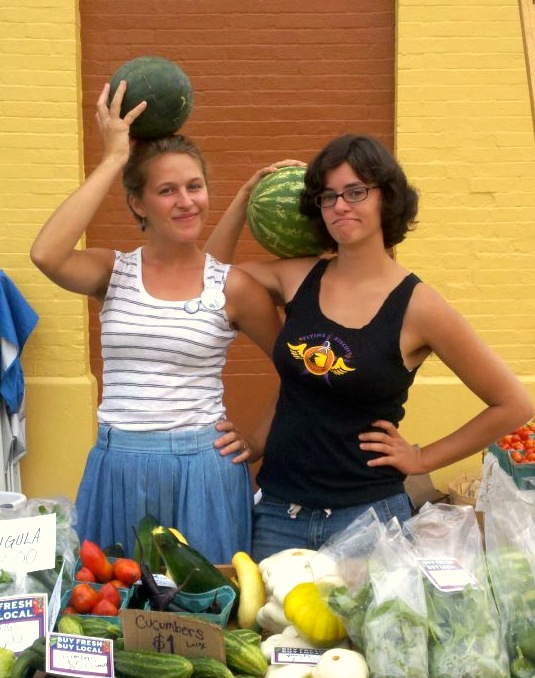
Caitlin Brady, 22, is the creative force behind the Blue Rock Farm. She was raised in Missouri on a 2000-acre farm that grew corn, soybeans, sorghum, and tobacco, using large machinery and production-farm techniques that are common to business farms all over the country (not that there is anything wrong with that). She’s been to five different colleges (currently Millersville University as a foreign-language major—Spanish, French, and Italian), she’s lived in several countries; and in big cities (Chicago) and small farming communities like Lancaster.
Caitlin started Blue Rock a couple of years ago and sold her products at several of the local farm markets—this year she will have a stand at the Eastern Market on East King Street on Saturdays.
EmmaKate grew up on the land she and Caitlin are currently farming. In fact, the land has been in her family for 6 generations. She graduated from Penn Manor High School and is now working the same land her father and her grandfather did, and further and further back. EmmaKate is also passionate about the land we all live on, and works with a volunteer organization that holds concerns for the environment as acts of faith.
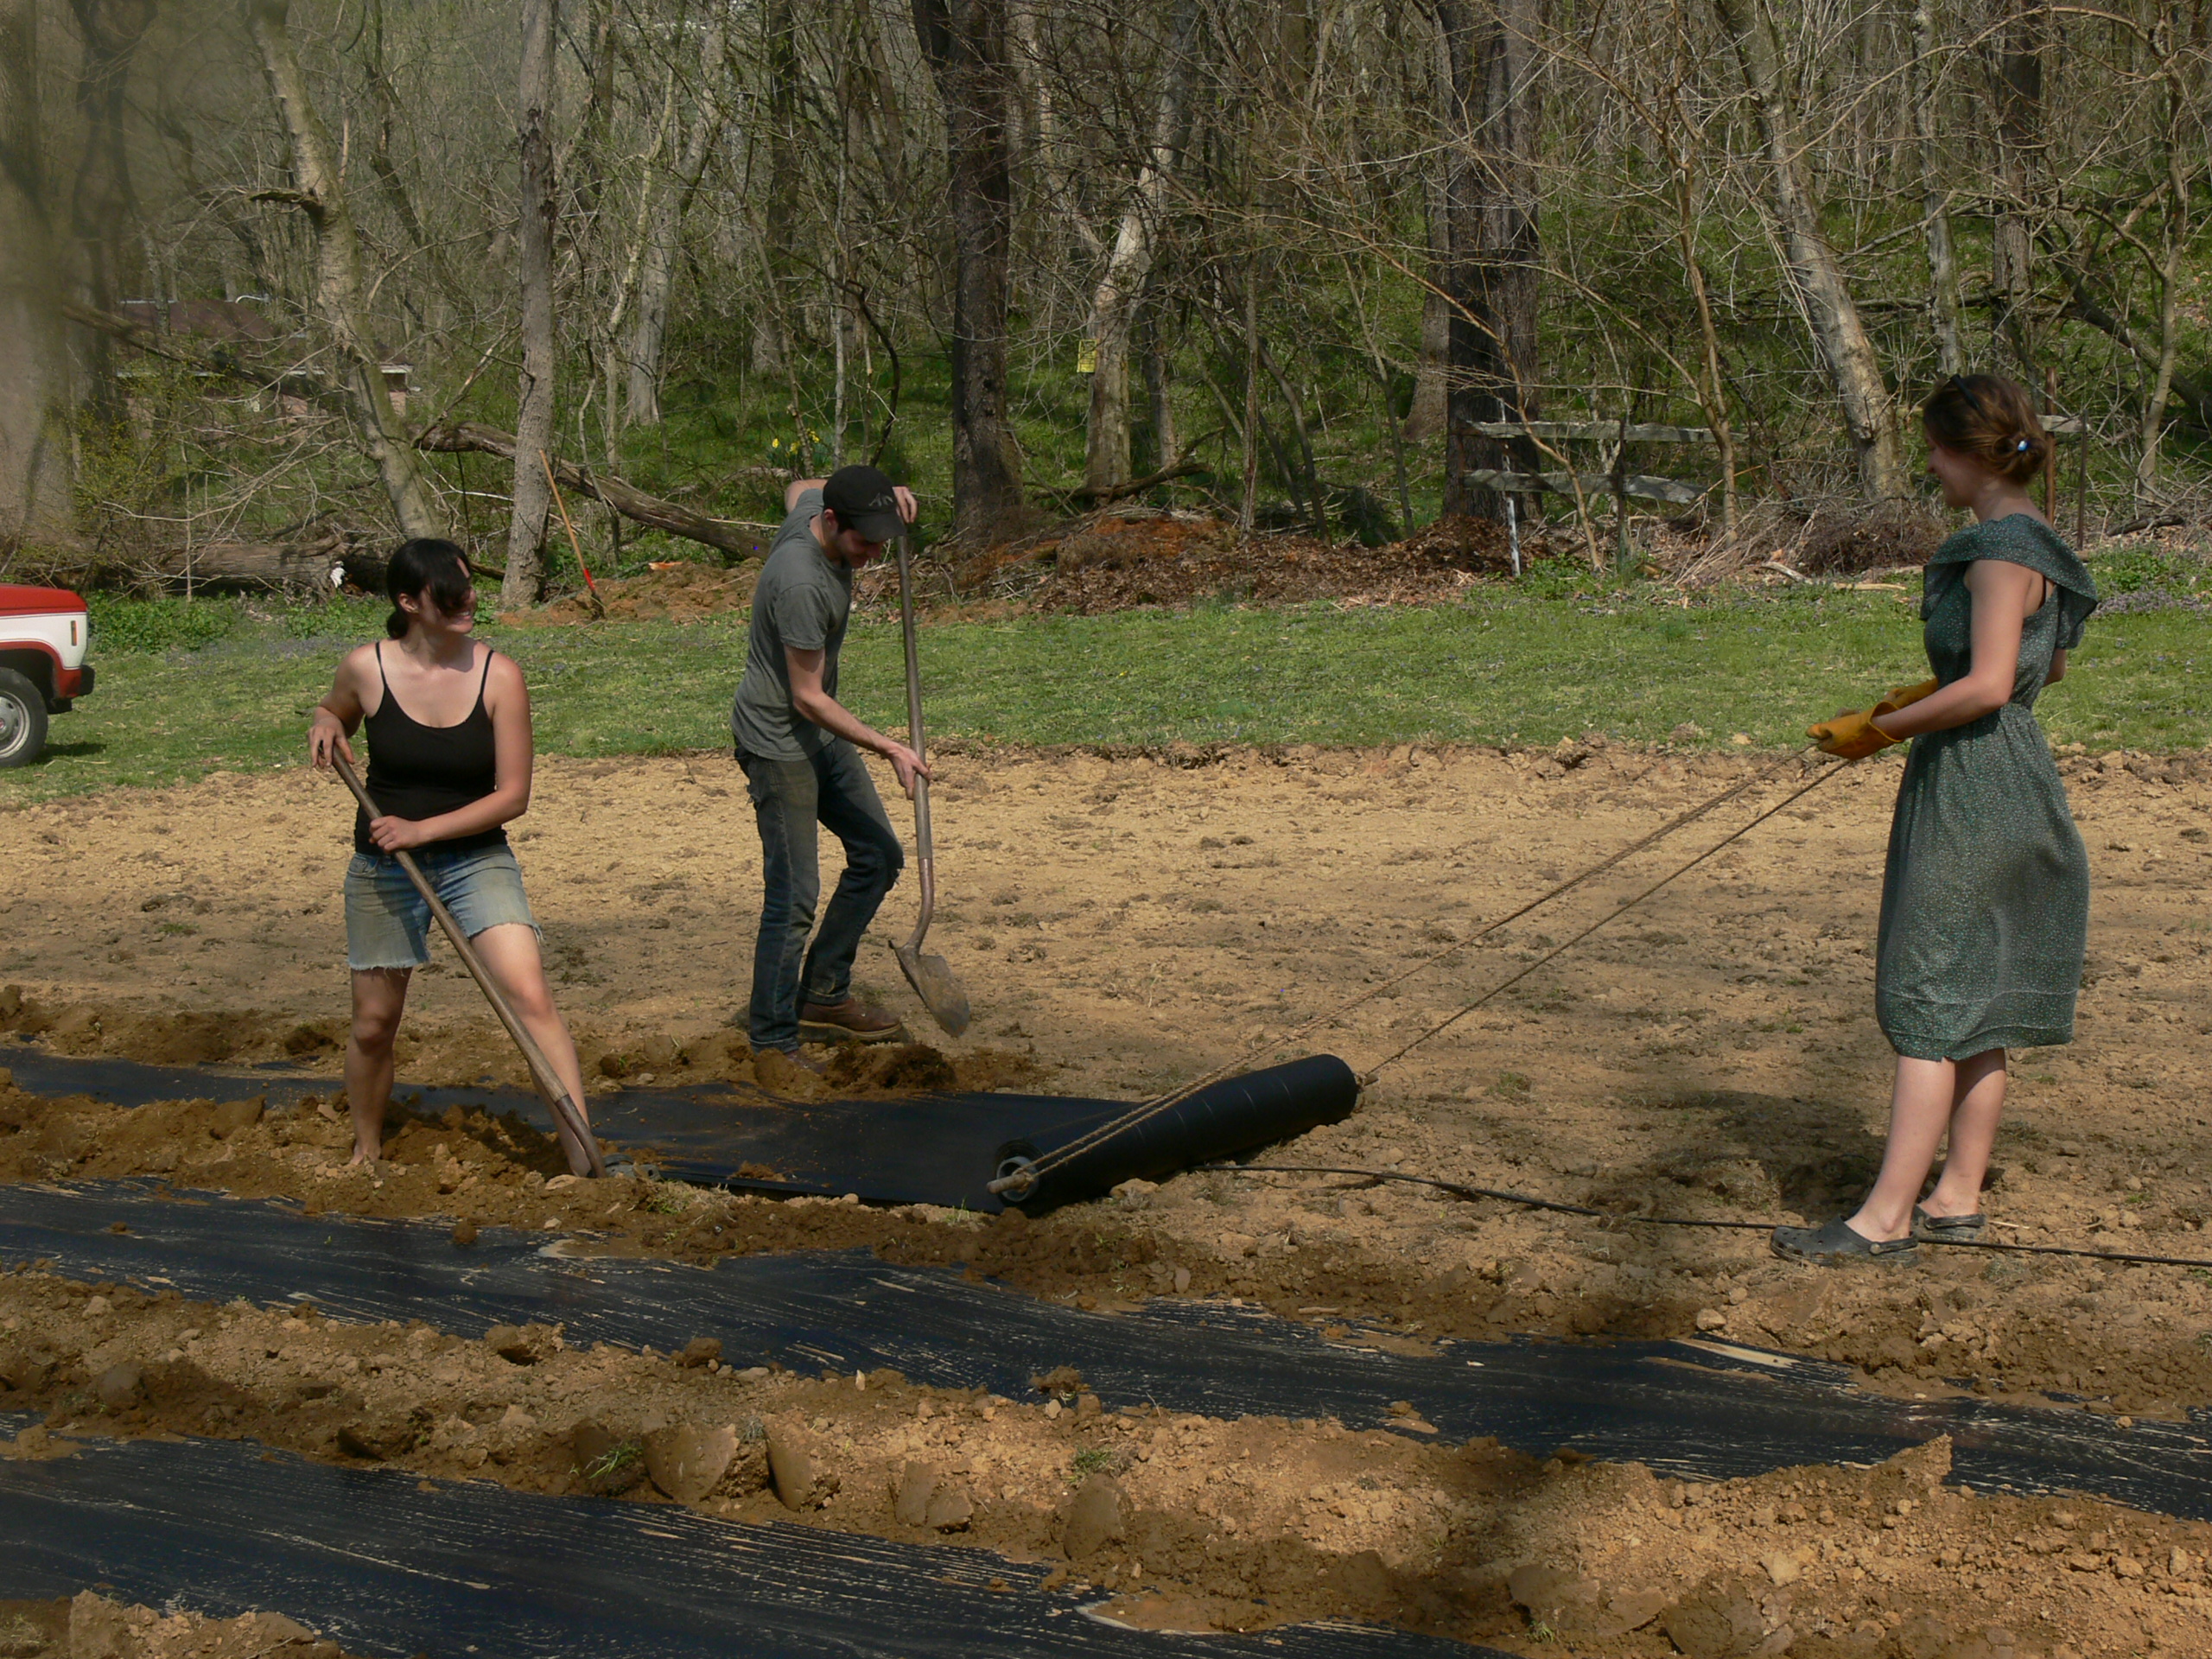 In a conversation with her spry 94-year-old grandfather, Park Mellinger, the other day, he told me how pleased he was that she and Caitlin were doing this kind of work. He told me that the plot they were currently working in was plowed under for planting for the first time since 1899—it’s been backyard to the farm house for generations.
Blue Rock farm is totally organic; the fertilizer is compost and the water is rain water collected in large containers all over the property and fed into the gardens through drip hoses. Caitlin and EmmaKate are making a serious go of this small family farm, currently having 15 half- and 6 whole shares in their CSA, which will deliver food weekly to three Lancaster County locations. A limited number of shares are still available.
The New York City chef Dan Barber, a loud and passionate advocate for small, local, organic farms—he runs one himself in upstate New York that produces for his restaurant—encourages consumers to “get to know your farmer and your fishmonger,” so that you will know exactly where your food comes from and on what it’s been raised.
I concur.
I have gotten to know my farmers and I, for one, couldn’t be happier. I know that my family will be eating some of the best, healthiest food available in Lancaster County, a place where there is more healthy food (and some pretty unhealthy stuff, too) than almost anywhere else in the nation.
Blue Rock Farm. Check it out!
Vegetable Lo Mein
I was in the Asian market today picking up fresh sprouts for a batch of pad Thai I plan to make for supper tonight, and another customer in the store asked the clerk if anyone in the market had a recipe for lo mein. When no one in the market could give her an idea of how to go about it, I offered to help her out. Not my favorite dish, although I do love a good plate of vegetarian lo Mein, here is a simple recipe for the noodle dish for beginners. There are certainly other, more complex recipes, and had I time (today is “Free Rita’s Day” here in Lancaster), I’d produce a recipe with much more complex flavor, but most neighborhood restaurants don’t go for complex, they go for fast and tasty. Here is one I got from a neighborhood restaurant in Alexandria, VA, when I lived in the Rosemont neighborhood. If you don’t know Rosemont, you haven’t lived. This is a wonderful, simple dish made with vegetables. It can be augmented with chicken, Chinese roast pork, shrimp, or tofu, and will taste even better.
This recipe comes from Grace Young’s The Wisdom of the Chinese Kitchen: Classic Family Recipes for Celebration and Healing. In the book, Grace says: “Vegetable Lo Mein is one the easiest dishes for a beginner to make. The mastery comes in correctly slicing the vegetables and not overcooking the noodles. You will find a variety of fresh egg noodles in the refrigerator section of most Chinese food markets. The best noodles for lo mein are about 1/4 inch thick, and come either uncooked or precooked. Either noodle can be used and will require one to three minutes of boiling, follow package directions.”
Vegetable Lo Mein
Ingredients:
1-pound package Chinese narrow, flat egg noodles (resembling linguine)
6 dried Shitake mushrooms
1 small can Chinese straw mushrooms
1 medium onion, halved and sliced in half-moon rings 1/4-inch thick
2 stalks celery, one-inch slices, sliced diagonally
1 broccoli crown, florets separated
6 Napa cabbage leaves
1 tablespoon sesame oil
2 tablespoons soy sauce
3 tablespoons peanut oil
1 tablespoon finely minced ginger
1 cup julienne carrots
2 scallions, finely shredded
2 tablespoons oyster sauce
Optional: 1 chicken breast, trimmed of fat, cut in half lengthwise then sliced crossways into small strips; or 24 31- to 36-count (medium) shrimp, peeled and deveined; or 1/2 pound extra-firm tofu, pressed dry, marinated 1/2 hour in 2 tablespoons soy sauce, 1 tablespoon rice-wine vinegar, and 1 teaspoon sesame-seed oil; or 1/2 pound Asian-roasted BBQ pork, cut into 1/2-inch cubes
Preparation:
In a medium bowl, soak the Shitake mushrooms in 1/4 cup cold water for 30 minutes, or until softened. Drain and squeeze dry, reserving soaking liquid. Cut off and discard stems and thinly slice the caps.
Wash the cabbage leaves in several changes of cold water and allow to thoroughly drain in a colander until dry to touch. Trim 1/4 inch from the stem end of the cabbage leaves and discard. Stack 2 to 3 cabbage leaves at a time and crosswise into 1/4-inch-wide shreds.
In a 4-quart saucepan, bring about 2 quarts of water to a boil over high heat. Add noodles , return to a rolling boil, and boil 2 to 3 minutes. Rinse under cold water and drain the noodles thoroughly. Transfer to a medium bowl, add sesame oil and 1 tablespoon soy sauce, and mix well. Set aside.
Heat a 14-inch flat-bottomed wok or 12-inch flat skillet over high heat until hot but not smoking. Add 1 tablespoon peanut oil and ginger, and stir-fry 20 seconds. Add the onions, celery, carrots, scallions, and mushrooms, and stir-fry 1 minute, or until vegetables are just limp. Transfer vegetables to a plate.
Add 1/4 cup water and broccoli; cover and steam 3 minutes, then drain and place on the plate with the other vegetables.
[Add protein ingredients here if you choose–see note*]
Add the remaining 2 tablespoons vegetable oil and cabbage, and stir-fry 1 minute, or until cabbage begins to wilt. And the cooked carrot mixture, noodles, and reserved mushroom soaking liquid, and stir-fry 2 to 3 minutes, or until noodles are heated through. Swirl in the remaining 1 tablespoon soy sauce and oyster sauce and toss to combine. Serve immediately.
* Note: If you choose to add protein ingredients such as chicken, shrimp, tofu, or pork, stir-fry them until just barely done after stir-frying the vegetables but before the cabbage. Set aside on a warm plate. Then resume the recipe with with the cabbage and continue until hot and well mixed. If you add protein ingredients, double the oyster sauce and increase the soy sauce by 1 tablespoon.
Roasted Salmon with Wasabi Cream
We made this recipe for a catered supper that we offered up at the Manheim Township Public Library silent auction. The winner got a dinner for ten catered by us here at Jeff’s Kitchen. The invaluable cheffing was provided by Ellen, Jen, and Morgan, along with Cheffzilla, who watched over the event while the real MVPs did all the work. Here is the main course, presented with pride:
Ingredients: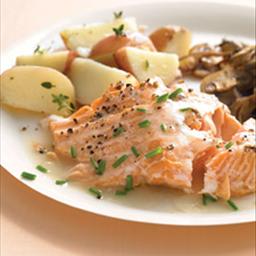
2 pounds wild salmon fillets
2 teaspoons kosher salt
6 teaspoons wasabi powder
1 up sour cream
Preparation:
Preheat the oven to 30 degrees. Sprinkle a large roasting pan with olive oil. Lay the salmon fillets in the pan with the skin side down. Spray the top side of the salmon with olive oil and season with salt. Roast until just cooked through, 20-30 minutes, depending on the thickness of the salmon.
Dissolve the wasabi powder in 8 teaspoons water. Whisk into the sour cream and season to taste with salt. Add more wasabi if desired for flavor.
Serve the salmon topped with wasabi sauce and garnished with chopped chives.
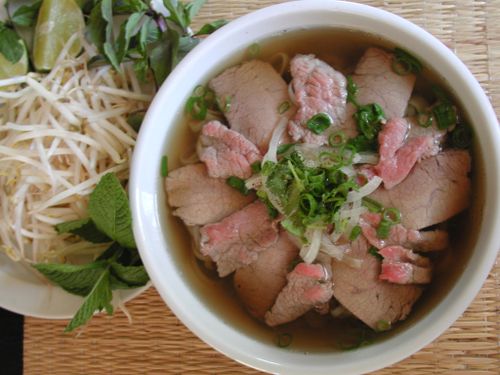
Pho Bo (Beef Pho) and Pho Ga (Chicken Pho)
Please permit me to introduce you to Andrea Nguyen.
Andrea is the maven of an incredible website that is full of the culture and recipes of Viet Nam, www.vietworldkitchen.com. It is there that I found two recipes that are to become staples of my kitchen, Chicken Pho and beef Pho, the rich and tasty dinner soups that are central to the culture of Viet Nam, and have found their way into the lore of American cuisine by way of the many immigrants from South Viet Nam who have found their way to America. Local to us here in Lancaster is the incredible Rice & Noodles restaurant in Manheim Township, an addition to our culinary life that is among the most welcome I have seen in my years in Central Pennsylvania. Vy and her family moved here after the disastrous hurricane Katrina decimated their home and business in New Orleans, and they are a most pleasurable addition to our wonderfully diverse life here in Lancaster County. Vy’s Pho soups are a joy to behold, and while I love dropping in to grab a potful and bringing it home, I wanted to find a way to make it myself.
Enter Andrea Nguyen.
She has produced a fabulous collection of her own family recipes into an incredible cookbook, Into the Vietnamese Kitchen, which I have purchased as a NookBook and downloaded onto my Nook and my kitchen computer, my beautiful HP Touchsmart PC, which has become the most invaluable kitchen accessory I own (and which my better half–who was skeptical when I insisted that it had to be in our remodeled kitchen–now considers it vital to the welfare of our family).
But I digress…
Andrea Nguyen has enlightened me to the ways of Vietnamese Pho, and I am now a changed man. The stock used to make this legendary meal is the stuff of magical qualities, and I think that I will forever keep frozen containers of it, ready to use whenever the mood comes upon me–just add noodles and protein!
Here I will introduce you to the magic of two varieties of Pho, Ga (chicken) and Bo (beef), which hopefully transform your life as they have mine.
Pho Bo
For the broth:
2 medium yellow onions (about 1 pound total)
4-inch piece ginger (about 4 ounces)
5-6 pounds beef soup bones, marrow and knuckle bones (get them at Central Market if you can’t find them at the grocery store)
5 star anise (40 star points total)
6 whole cloves
1 whole cinnamon stick
1 pound piece of beef chuck, rump, brisket or cross rib roast, cut into 2-by-4-inch pieces (weight after trimming)
1 1/2 tablespoons salt
4 tablespoons fish sauce
1 ounce (1-inch chunk) yellow rock sugar (duong phen; get this at the Asian market on Liberty Street or the one near McCaskey High School)
For the bowls:
1 1/2-2 pounds small (1/8-inch wide) dried or fresh banh pho noodles
1/2 pound raw eye of round, sirloin, London broil or tri-tip steak, thinly sliced across the grain (1/16 inch thick; freeze for 15 minutes to make it easier to slice)
1 medium yellow onion, sliced paper-thin, left to soak for 30 minutes in a bowl of cold water
3 or 4 scallions, green part only, cut into thin rings
1/3 cup chopped cilantro
Ground black pepper
Optional garnishes arranged on a plate and placed at the table:
Sprigs of spearmint and Asian/Thai basil
Leaves of thorny cilantro (ngo gai–also available at most good Asian markets)
Bean sprouts (about 1/2 pound)
Red hot chiles (such as Thai bird or dragon), thinly sliced
Lime wedges
Prepare the Pho broth:
 Char onion and ginger. Use an open flame on grill or gas stove. Place onions and ginger on cooking grate and let skin burn. (If using stove, turn on exhaust fan and open a window.) After about 15 minutes, they will soften and become sweetly fragrant. Use tongs to occasionally rotate them and to grab and discard any flyaway onion skin. You do not have to blacken entire surface, just enough to slightly cook onion and ginger.
 Let cool. Under warm water, remove charred onion skin; trim and discard blackened parts of root or stem ends. If ginger skin is puckered and blistered, smash ginger with flat side of knife to loosen flesh from skin. Otherwise, use sharp paring knife to remove skin, running ginger under warm water to wash off blackened bits. Set aside.
Parboil bones. Place bones in stockpot (minimum 12-quart capacity) and cover with cold water. Over high heat, bring to boil. Boil vigorously 2 to 3 minutes to allow impurities to be released. Dump bones and water into sink and rinse bones with warm water. Quickly scrub stockpot to remove any residue. Return bones to pot.
Simmer broth. Add 6 quarts water to pot, bring to boil over high heat, then lower flame to gently simmer. Use ladle to skim any scum that rises to surface. Add remaining broth ingredients and cook, uncovered, for 1 1/2 hours. Boneless meat should be slightly chewy but not tough. When it is cooked to your liking, remove it and place in bowl of cold water for 10 minutes; this prevents the meat from drying up and turning dark as it cools. Drain the meat; cool, then refrigerate. Allow broth to continue cooking; in total, the broth should simmer 3 hours.
Strain the broth through fine strainer. If desired, remove any bits of gelatinous tendon from bones to add to your pho bowl. Store tendon with cooked beef. Discard solids.
Skim as much fat from top of the broth as you like. (Cool it and refrigerate it overnight to make this task easier; reheat before continuing.) Taste and adjust flavor with additional salt, fish sauce and yellow rock sugar. The broth should taste slightly too strong because the noodles and other ingredients are not salted. (If you’ve gone too far, add water to dilute.) Makes about 4 quarts.
Assemble pho bowls:
The key is to be organized and have everything ready to go. Thinly slice cooked meat. For best results, make sure it’s cold.
Heat the broth and ready the noodles. Reheat the broth over medium flame as you’re assembling bowls. If you’re using dried noodles, cover with hot tap water and soak 15-20 minutes, until softened and opaque white. Drain in colander. For fresh rice noodles, just untangle and briefly rinse in a colander with cold water.
Blanch noodles. Fill 3- or 4-quart saucepan with water and bring to boil. For each bowl, use long-handle strainer to blanch a portion of noodles. As soon as noodles have collapsed and lost their stiffness (10-20 seconds), pull strainer from water, letting water drain back into saucepan. Empty noodles into bowls. Noodles should occupy 1/4 to 1/3 of bowl. I prefer fewer noodles, because I want more broth! Then blanch bean sprouts for 30 seconds in same saucepan. They should slightly wilt but retain some crunch. Drain and add to the garnish plate.
Add other ingredients. Place slices of cooked meat, raw meat and tendon (if using) atop noodles. (If your cooked meat is not at room temperature, blanch slices for few seconds in hot water from above.) Garnish with onion, scallion and chopped cilantro. Finish with black pepper.
Ladle in broth and serve. Bring broth to rolling boil. Check seasoning. Ladle broth into each bowl, distributing hot liquid evenly so as to cook raw beef and warm other ingredients. Serve your Pho with with the garnish plate.
Note: Yellow rock sugar (a.k.a. lump sugar) is sold in one-pound boxes at Chinese and Southeast Asian markets. Break up large chunks with hammer.
Variations: If you want to replicate the splendorous options available at Pho shops, head to the butcher counter at a Vietnamese or Chinese market. There you’ll find white cords of gan(beef tendon) and thin pieces of nam (outside flank, not flank steak). While tendon requires no preparation prior to cooking, nam should be rolled and tied with string for easy handling. Simmer it and the beef tendon in the cooking broth for two hours, or until chewy-tender.
You can also make Pho with beef meatballs (bo vien), which you can purchase in Asian markets in the refrigerator case; they are already precooked. Slice each one in half and drop into broth to heat through. When you’re ready to serve, ladle them out with the broth to top each bowl.
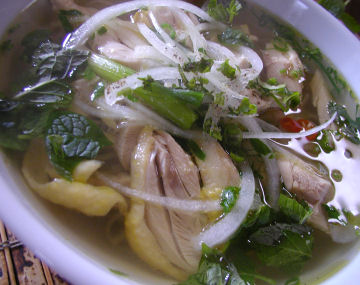
Pho Ga
Broth
2 yellow onions, about 1 pound total, unpeeled
Chubby 4-inch section fresh ginger, unpeeled
1 chicken, 4 pounds, excess fat and tail removed
3 pounds chicken backs, necks, or other bony chicken parts
5 quarts water
1 1/2 tablespoons salt
3 tablespoons fish sauce
1-inch chunk yellow rock sugar (about 1 ounce)
2 tablespoons coriander seeds, toasted in a dry skillet for about 1 minute until fragrant
4 whole cloves
1 small or 1/2 large bunch cilantro (bound stems about 1 inch in diameter)
Bowls
1 1/2–2 pounds small flat rice noodles, dried or fresh
Cooked chicken, at room temperature
1 yellow onion, sliced paper-thin, soaked in cold water for 30 minutes and drained
3 or 4 scallions, green part only, thinly sliced
1/3 cup chopped fresh cilantro, leafy tops only
Black pepper
Optional garnishes
3 cups bean sprouts (about 1/2 pound)
10 to 12 sprigs mint, 10 to 12 sprigs Thai basil
12 to 15 fresh cilantro leaves
2 or 3 Thai chiles, thinly sliced
2 or 3 limes, cut into wedges
Make the pho broth
1. Place the onions and ginger directly on the cooking grate of a medium-hot charcoal or gas grill (as pictured, to the right) or a gas stove with a medium flame, or on a medium-hot burner of an electric stove. Let the skin burn (if you’re working indoors, turn on the exhaust fan and open a window), using tongs to rotate onion and ginger occasionally and to grab and discard any flyaway onion skin.
After 15 minutes, the onions and ginger will have softened slightly and become sweetly fragrant. There may even be some bubbling. You do not have to blacken the entire surface. When amply charred, remove from the heat and let cool.
2. Rinse the cooled onions under warm running water, rubbing off the charred skin. Trim off and discard the blackened root and stem ends. Use a vegetable peeler, paring knife, or the edge of a teaspoon to remove the ginger skin. Hold it under warm water to wash off any blackened bits. Halve the ginger lengthwise and bruise lightly with the broad side of a cleaver or chef’s knife. Set the onions and ginger aside.
3. Rinse the chicken under cool water. Detach each wing by bending it back and cutting it off at the shoulder joint. Add the wings and neck, and set the wingless chicken aside.
4. Remove and discard any loose pieces of fat from the chicken parts. With a large chef’s knife or heavy cleaver designed for chopping bones, chop the bones to break them partway or all the way through, making the cuts at 1- to 2-inch intervals, depending on the size of the part. This exposes the marrow, which enriches the broth.
5. To achieve a clear broth, you must first parboil and rinse the chicken parts. Put them in a stockpot (about 12-quart capacity) and add cold water just to cover. Bring to a boil over high heat and boil vigorously for 2 to 3 minutes to release the impurities. Dump the chicken parts and water into the sink (make sure it is clean), and then rinse the parts with water to wash off any clinging residue. Quickly scrub the stockpot clean and return the chicken parts to the pot. Put the chicken into the pot, breast side up.
6. Add water to cover the chicken. Bring to a boil over high heat and then lower the heat to a gentle simmer. Skim off any scum that rises to the top. Add the onions, ginger, salt, fish sauce, rock sugar, coriander seeds, cloves, and cilantro and cook, uncovered, for 25 minutes, adjusting the heat if needed to maintain a gentle simmer.
At this point, the chicken is cooked; its flesh should feel firm yet still yield a bit to the touch. With a pair of tongs, transfer the chicken to a large bowl. Flush with cold water and drain well, then it set aside for 15 to 20 minutes until it is cool enough to handle. Meanwhile, keep the broth at a steady simmer.
7. When chicken can be handled, use a knife to remove each breast half and the whole legs (thigh and drumstick). Don’t cut these pieces further, or they’ll lose their succulence. Set aside on a plate to cool completely, then cover with plastic wrap and refrigerate; bring to room temperature before assembling the bowls.
8. Return the leftover carcass to the stockpot and adjust the heat to simmer the broth gently for another 1 1/2 hours. Avoid a hard boil, or the broth will turn cloudy.
9. Strain the broth through a fine-mesh sieve (or a coarse-mesh sieve lined with cheesecloth) positioned over a pot. Discard the solids. Use a ladle to skim as much fat from the top of the broth as you like. (To make this task easier, you can cool the broth, refrigerate overnight, lift off the solidified fat, and then reheat before continuing.) Taste and adjust the flavor with additional salt, fish sauce, and rock sugar. There should be about 4 quarts of broth. At this point, you can freeze the broth.
Assemble the pho bowls
10. If using dried noodles, cover them with hot tap water and let soak for 15 to 20 minutes, or until they are pliable and opaque. Drain in a colander. If using fresh rice noodles, untangle them, place in a colander, and rinse briefly under cold running water.
11. Cut the cooked chicken into slices about 1/4 inch thick, cutting the meat off the bone as necessary. If you don’t want to eat the skin, discard it first. Set the chicken aside. Ready the yellow onion, scallions, cilantro, and pepper for adding to the bowls. Arrange the garnishes on a plate and put on the table.
12. To ensure good timing, bring the broth to a simmer over medium heat as you are assembling the bowls. (For an extra treat, drop in any unused white scallion sections and let them poach in the broth. Add the poached white scallion sections (called hành chần) to a few lucky bowls when ladling out the broth.) At the same time, fill a large pot with water and bring to a rolling boil.
For each bowl, place a portion of the noodles on a vertical-handle strainer (or mesh sieve) and dunk the noodles in the boiling water. As soon as they have collapsed and lost their stiffness (10 to 20 seconds), pull the strainer from the water, letting the water drain back into the pot. Empty the noodles into a bowl. If you like, once you have finished blanching the noodles, you can blanch the bean sprouts for 30 seconds. They should wilt slightly but retain some crunch. Drain and add to the garnishes.
13. Top each bowl of noodles with chicken, arranging the slices flat. Place a mound of yellow onion in the center and then sprinkle scallion and cilantro on top. Finish with a sprinkle of pepper.
14. Raise the heat and bring the broth to a rolling boil. Do a final tasting and make any last-minute flavor adjustments. Ladle about 2 cups broth into each bowl, distributing the hot liquid evenly to warm all the ingredients. Serve immediately with the garnishes.
Thai Basil Chicken
I can’t say enough about how simple and delicious this recipe is. And fun, too. 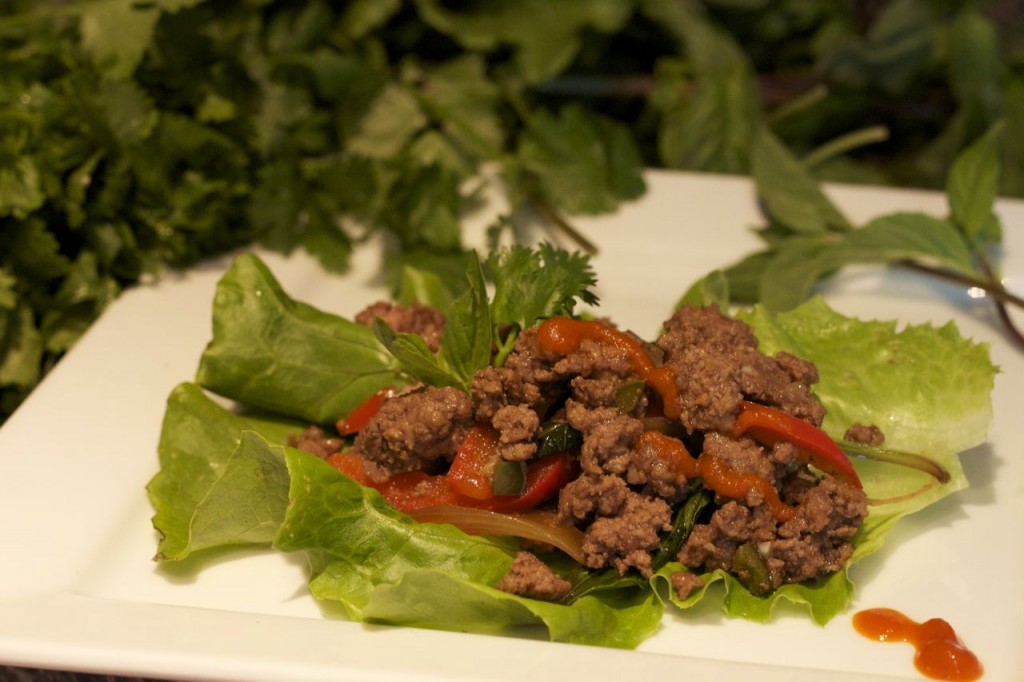 Made this last week and put it in the freezer, to be taken out on a night when all hell has broken loose and we needed something quick. Suffice it to say, it was a hit, not only for the rich flavor, but for the fun of eating the supper on one plate, like a wrap. The recipe calls for ground chicken, but you could use ground turkey or pieces of chicken thigh or breast, or almost any poultry you find on sale–we always find good inexpensive ground turkey at our local Giant market, and this dish can be made up in minutes. You need to try it out, and serve the result wrapped in green-leaf lettuce leaves like a wrap. It’s a hoot.
Ingredients:
- 4 tablespoons fish sauce
- 1 tablespoon minced garlic
- 1 lb ground chicken
- 1 red bell pepper, veins removed, cut in thin julienne strips
- 1/2 cup Thai basil leaves, packed
- 4-7 minced Thai chili peppers
- 2 tablespoons peanut oil
- 1 teaspoon toasted dark sesame seed oil
- green-leaf lettuce leaves, washed, dried, split in half down the center stem and stem removed
Mince garlic and chili pepper together. Clean and pick the basil leaves from their stems. It may appear like a lot of leaves, but the leaves will shrink when cooked and this dish’s flavor comes from the leaves.
Fry the garlic and chili peppers in oil over high heat. When garlic starts to turn brown, add the ground chicken. Stir constantly. The juice will start to come out. Keep stirring until all the juice is gone, 2-3 minutes. Add the bell pepper strips and stir fry two minutes. Add the fish sauce, then the basil leaves. Quickly turn it over a few times to mix the basil leaves with the meat and wilt them slightly. Remove from the heat, add the sesame oil and toss to mix. Serve with cleaned green leaf lettuce leaves to wrap, or with hot steamed rice.
