Category Archives: Recommendations
Baked Rice Two Ways
I heard a request at a meeting last night for baked rice. If you have been stuck in a rut with rice, try this alternative method of cooking rice. It is seriously good. and it releases the flavors in a whole new way. You might never look at rice the same way again.
Simple Baked Rice
Ingredients:
Olive Oil spray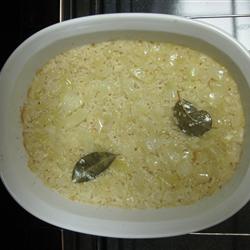
1 cup long-grain rice
1 tablespoon olive oil
¼ cup carrot, celery, onion
2 cloves garlic
2 cups chicken stock
2 bay leaves
½ teaspoon kosher salt
Preparation:
- Preheat oven to 350 degrees F. Coat baking dish lightly with olive oil spray
- Spread long-grain rice into prepared casserole dish.
- Heat olive oil in a saucepan over medium heat. Add carrot, celery, and onion and saute until onion is soft and translucent, about 5 minutes. Add garlic and stir 1 minute more.
- Increase heat to high, add chicken stock and bay leaf to saucepan and bring to a boil. Pour the mixture over the rice in the casserole dish. Cover the dish tightly with foil.
- Bake 20 minutes. Remove the foil an bake until most of the liquid is evaporated and absorbed, about 20 minutes more. Remove and discard the bay leaf. Season with freshly ground black pepper, fluff with a fork, and serve.
Note: If you like drier rice, return to the oven an additional 5 to 10 minutes, to your taste.
Baked Brown Rice
Ingredients:
2 cups brown rice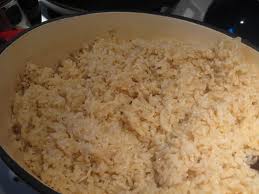
1 teaspoon butter
3 cups chicken stock
1 tablespoon olive oil
1 teaspoon salt
1 teaspoon freshly ground black pepper
1 teaspoon dried minced onion
1 pinch cayenne pepper (optional)
Preparation:
- Preheat oven to 375 degrees F.
- Toast rice and butter in a saucepan over medium heat, stirring frequently until rice gives off a nutty fragrance, about 5 minutes. Transfer rice to a Dutch oven or heavy casserole pan with a lid
- Bring chicken broth, olive oil, salt, powder, onion, and cayenne pepper to a boil in the same saucepan; pour over the rice and stir to combine.
- Cover and bake for 1 hour and 15 minutes.
- Fluff with a fork before serving.
Authentic San Francisco-style Sourdough Bread
I had a request that I just couldn’t refuse. I lived in San Francisco–actually, Mill Valley in Marin County–across the Golden Gate Bridge to work every day…WOW!–and more than virtually anything else, I fell in love with sourdough bread. On Sundays we would ride our bikes from Mill Valley through Marin City to Sausalito, then ride the ferry to Fisherman’s Wharf and eat crab legs and sourdough bread. I think that was one of the seminal 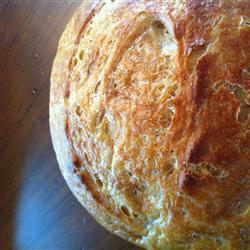 times in my life in terms of cementing my love for food. The really cool thing about that experience was that walking up and down the docks, one could sample the bread from different bakers the way we walk up and down the aisles at Roots and take little tastes here and there from vendors who truly love what they do and the product they represent, which really represents them. We all have favorite vendors at Roots and Central Market and Eastern Market and Millersville Farm Market, and all the others (not forgetting you, Alison Bryan!). The one thing they all have in common is that they try to stay true to their product, because their success and their reputation depends on quality product courteously presented. I’ve found that the vendors at these markets are fine representatives of our wonderful Lancaster way of life. And I appreciate it all the more because of my time in San Francisco, where the bread is the memory I carry with me every time I think about that time in my life.
Here, then is my favorite take on San Francisco sourdough bread. The thing that makes it what it is is that first, you make a starter. This starter is a piece of sour dough that gets added to the bread dough during the process, and then a piece of the new bread dough is separated and stored, to be used in the next loaf. In San Francisco, starters are generations old, always added to the new bread, then kept again for next time, thus keeping the original starter alive. Over time, it gets better and better, and divorces have been known to have the cup of starter be the single bone of custodial contention.
Make a starter. Make a bread. Keep your starter. Make some more bread. Share the secret. Share the love. And don’t forget the butter!
Sourdough Starter
Ingredients:
2 cups all-purpose flour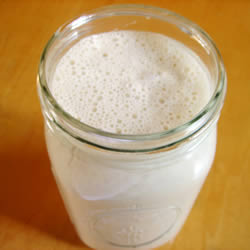
2 cups warm water
1 (.25-oz) package active dry yeast
Preparation:
- In large non-metallic bowl, mix together dry yeast, 2 cups warm water, and 2 cups all purpose flour and cover loosely.
- Leave in a warm place to ferment, 4 to 8 days. Depending on temperature and humidity of kitchen, times may vary. Place on cookie sheet in case of overflow. Check on occasionally.
- When mixture is bubbly and has a pleasant sour smell, it is ready to use. If mixture has a pink, orange, or any other strange color tinge to it, THROW IT OUT! and start over. Keep it in the refrigerator, covered until ready to bake.
- When you use starter to bake, always replace with equal amounts of a flour and water mixture with a pinch of sugar. So, if you remove 1 cup starter, replace with 1 cup water and 1 cup flour. Mix well and leave out on the counter until bubbly again, then refrigerate. If a clear to light brown liquid has accumulated on top, don’t worry, this is an alcohol base liquid that occurs with fermentation. Just stir this back into the starter, the alcohol bakes off and that wonderful sourdough flavor remains! Sourdough starters improve with age, they used to be passed down generation to generation!
Authentic Sourdough Bread
Ingredients: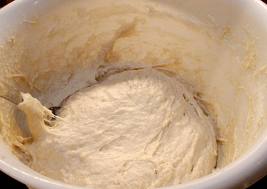
4 3/4 cups all-purpose flour
3 tablespoons white sugar
2 1/2 teaspoons kosher salt
1 (.25-oz) package active dry yeast
1 cup warm milk
2 tablespoons butter, softened
1 1/2 cups sourdough starter
1 large egg
1 tablespoon water
1/4 cup finely chopped onion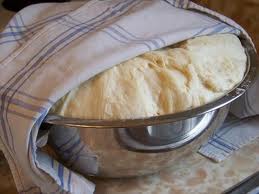
Preparation:
- In a large bowl, combine 1 cup flour, sugar, salt, and dry yeast. Add milk and softened butter or margarine. Stir in starter. Mix in up to 3 3/4 cups flour gradually, you may need more depending on your climate.
- Turn dough out onto a floured surface, and knead for 8 to 10 minutes. Place in a greased bowl, turn once to oil surface, and cover. Allow to rise for 1 hour, or until doubled in volume.
- Punch down, and let rest 15 minutes. Shape into loaves. Place on a greased baking pan. Allow to rise for 1 hour, or until doubled.
- Brush egg wash over tops of loaves, and sprinkle with chopped onion.
- Bake at 375 degrees F (190 degrees C) for 30 minutes, or till done.
Then refresh your starter by following direction number 4 above, using 1.5 cups water and all-purpose flour and a pinch of sugar.
Yet Another Pad Thai
|
12 ounces dried rice noodles
 1/2 cup white sugar
1/2 cup distilled white vinegar
1/4 cup fish sauce
2 tablespoons tamarind paste
1 tablespoon vegetable oil
2 boneless, skinless chicken breast
halves, sliced into thin strips
1 tablespoon vegetable oil
|
1 1/2 teaspoons garlic, minced
4 eggs, beaten
1 1/2 tablespoons white sugar
1 1/2 teaspoons salt
1 cup coarsely ground peanuts
2 cups bean sprouts
1/2 cup chopped fresh chives
1 tablespoon paprika, or to taste
1 lime, cut into wedges
|
| 1. | Place rice noodles in a large bowl and cover with several inches of room temperature water; let soak for 30 to 60 minutes. Drain. |
| 2. | Whisk sugar, vinegar, fish sauce, and tamarind paste in a saucepan over medium heat. Bring to a simmer, remove from heat. |
| 3. | Heat 1 tablespoon vegetable oil in a skillet over medium-high heat. Add chicken; cook and stir until chicken is cooked through, 5 to 7 minutes. Remove from heat. |
| 4. | Heat 1 tablespoon oil and minced garlic in a large skillet or wok over medium-high heat. Stir in eggs; scramble until eggs are nearly cooked through, about 2 minutes. Add cooked chicken breast slices and rice noodles; stir to combine. |
| 5. | Stir in tamarind mixture, 1 1/2 tablespoons sugar, and salt; cook until noodles are tender, 3 to 5 minutes. Stir in peanuts; cook until heated through, 1 to 2 minutes. Garnish with bean sprouts, chives, paprika, and lime wedges. |
Thanksgiving With a Lighter Touch
For anyone watching their weight, Thanksgiving has become a day filled with potential pitfalls and dietary disappointments. The original Pilgrim celebration of gratitude for having enough food to survive the coming winter has evolved into an all-day, all-you-can-eat extravaganza. Many families spend the day parked on their couches, watching parades followed by football, snacking whether they are hungry or not, before sitting down to an enormous meal.
Contrary to popular opinion, it is possible to prepare and serve a light, healthy Thanksgiving dinner without depriving your guests of their traditional favorites or letting them go hungry. By making a few simple changes to your menu, it is easy to make a meal you and your guests will enjoy and remember, without the morning-after regret that too often accompanies this special day
Suggestion One: Cut the fat.
The centerpiece of Thanksgiving dinner is almost certainly the turkey, which is an easy place to cut fat without cutting flavor. Unless you are entertaining a dozen or more people, a turkey breast may be a better choice than a whole turkey. White meat is far leaner than dark meat, and turkey cooked on a grill (breast or whole bird) will release much of its internal fat during the cooking process. Brining a turkey can compensate for any moisture lost through decreasing the fat. This recipe is for a 12-15 pound turkey. If you have a larger turkey, double the brine recipe.

Grilled turkey
Ingredients:
Brine:
1 gallons water
1 ½ cups apple cider
¾ cup kosher salt
1 cups brown sugar
2-3 bay leaves
2 branches fresh rosemary, stripped from the branch
5-10 whole pepper corns
2-3 cloves fresh garlic
Peel of 1 navel orange, coarsely chopped
Preparation:
The day before cooking, bring one-half gallon of water and all other ingredients to a brisk boil; immediately turn off the heat, cover and allow the brine to cool to room temperature. Half way through the cooling process, add the remaining half-gallon of cold water.
When the brine is completely cooled, place the turkey, breast side down, in a brining bag, a food-grade bucket or large soup pot. Pour the brine over the turkey and refrigerate covered for 8-16 hours, turning the turkey over two-thirds of the way through. Leaving the turkey in the brine for more than 16 hours may leave the turkey mushy when finished.
Before cooking, remove the turkey from the brine and pat dry.
Dry Rub:
2 tablespoons kosher salt
1 1/2 teaspoons finely ground white pepper
2 tablespoons granulated garlic
1 tablespoon ground ginger
1 teaspoon Bell’s poultry seasoning
1 teaspoon smoked paprika
Olive oil in a spray can
Preparation:
Start with a dry rub. Wash the turkey and pat dry. Rub the turkey inside and out with this rub or any favorite combination of spices. Spray the turkey with the olive oil, then place it, unstuffed, on the grill with the coals or burners not directly underneath. Include a pan to catch the drippings. Cook the turkey until the legs can be jiggled loosely from the thighs, (180°F on a thermometer inserted into the thigh) or in the case of a breast, until a meat thermometer inserted deep into the meat (but not touching the bone) reads 180° F. Remove the turkey from the grill, cover with foil, and allow to rest 15 minutes before carving.
Suggestion Two: Slow down and enjoy the company.
Many families load the Thanksgiving table with multiple options for entrees and side dishes. Dinner begins with the circulation of bowls and platters around the table, allowing each guest to take their portion before passing it on. By the time everyone is served, the food is cold and everyone is tired of waiting to eat.
By serving Thanksgiving dinner in courses, it is easy to fill up on low-calorie, vegetable-based dishes before confronting the tempting entrees and side dishes. An added benefit will be the wonderful conversations your family and guests will have in between each course.
Start with a soup course (a corn soup is perfect for Thanksgiving), serving it in cups or small bowls. Then serve an autumn salad, made with butternut squash, cranberries, pumpkin seeds and fresh greens, with a tangy-creamy dressing.
Try these recipes, which use traditional ingredients that were used in the 1600s.

Curried Corn Soup
Ingredients:
2 tablespoons olive oil
½ cup finely chopped green bell pepper
½ cup finely chopped red bell pepper
¼ cup minced shallots
2 teaspoons curry powder
½ teaspoon kosher salt
3 cups fresh corn or one 16-ounce bag frozen corn, thawed
1 cup vegetable stock
½ teaspoon freshly ground pepper
3 cups soy milk, 2% milk or evaporated skim milk, divided
½ cup shredded reduced fat cheese, divided (optional)
Preparation:
Heat the oil in a large soup pot over medium-high heat. Add the bell peppers, stirring occasionally, until soft. Add the shallots and stir 2 minutes. Add the curry powder and salt, and stir to combine. Stir in the corn, stock, and pepper; bring to a boil, reduce the heat to medium, cover and cook ½ hour.
Transfer 2 cups of soup to a blender, add 1 cup milk, and process until smooth. Return the blended corn soup to the soup pot, add the remaining milk, and stir gently until the soup is hot.
Serve immediately, garnished with the optional cheese and some chopped chives or parsley.
Adapted from soyfoodcouncil.com

Roasted Squash Salad with Tahini Dressing
Ingredients:
1 medium butternut squash
Olive oil spray in a can
½ teaspoon paprika
4 tablespoons pumpkin seeds
¼ cup dried cranberries
8 ounces feta cheese, crumbled
2 tablespoons fresh parsley, chopped
2 cups spring mix
2 tablespoons plain Greek yogurt
1 ½ tablespoons tahini
2 tablespoons fresh lemon juice
1 small garlic clove, finely minced
½ cup boiling vegetable stock
Preparation:
Preheat the oven to 375°F. Peel the squash, halve, remove the seeds, and cut into 1-inch cubes. Lightly spray a roasting pan with olive oil, spread the squash on the pan, sprinkle with paprika, salt, and pepper, and spray with oil. Roast 35 minutes, stirring halfway through, until the squash is tender. Put the pumpkin seeds on baking sheet and bake for the last five minutes of the cooking time.
While the squash is roasting, make the dressing: whisk together the yogurt, tahini, lemon juice, and garlic. Slowly stir in 1-2 tablespoons stock, until the dressing reaches the consistency of buttermilk.
Plate the salad greens, top with the squash, pumpkin seeds, cranberries, feta cheese, and parsley, and sprinkle the dressing on top. Season with salt and pepper and serve immediately.
Adapted from redonline.co.uk
Suggestion Three: Limit options and focus on vegetables.
In order to make your dinner lighter and healthier, consider limiting the number of options you present your guests, featuring one or two interesting new recipes in which vegetables play the starring role rather than laying out the full cast of customary starchy favorites. No one needs stuffing, mashed potatoes and sweet potato casserole, after all. New flavors may encourage new behaviors, as serving old favorites can entice your guests to heap too-large portions on their plates simply because they are accustomed to doing so.
Here is a vegetable dish that is out of the ordinary, yet made with many of the familiar ingredients of traditional Thanksgiving dinners. It is easy to make, beautiful to serve, nutritious, and much more interesting than the customary green-bean casserole with cream of mushroom soup and canned onion rings. And so much better tasting!

Polenta Dome with Roasted Autumn Vegetables
Ingredients:
4 cups vegetable stock
1 ½ teaspoons salt
2 teaspoons olive oil
Olive oil spray in a can
2 cups diced onions
3 garlic cloves, minced or pressed
2 cups cornmeal
1 medium butternut squash, peeled, seeded, and shredded
1 tablespoon fresh sage, chopped (1 teaspoon dried)
2 teaspoon ground fennel seeds
½ teaspoon freshly ground black pepper
Preparation:
In a covered pot, bring the stock and 1 teaspoon salt to a boil. Spray a medium-sized mixing bowl.
While the stock heats, heat olive oil in a heavy skillet on medium heat. Cook the onions, garlic, and remaining salt for about 25 minutes, until the onions are caramelized. Stir the squash, sage, fennel, and pepper into the sautéed onions and cook for 3-4 minutes. Remove from heat and cover.
When the stock boils, gradually pour in the cornmeal, stirring vigorously. Reduce the heat until the thickening cornmeal simmers gently. Cook, stirring frequently, until the polenta is thick (but still pourable), adding hot water as necessary, and tastes done. Fine cornmeal cooks in a few minutes; courser meal takes longer. The consistency is key.
When the polenta is done, stir in the sautéed vegetables and cheese. Pour into the oiled bowl and set aside to cool for at least 30 minutes, until set.
About a half hour before serving, turn the cooled polenta dome onto a baking pan or ovenproof platter sprayed with olive oil and bake for 30 minutes, until hot. Serve on a bed of steamed spinach or Swiss chard and surround with toasted autumn vegetables.
Roasted Autumn Vegetables
Ingredients:
Marinade:
1/3 cup olive oil
2 tablespoons Balsamic vinegar
5 cloves garlic, minced
½ teaspoon kosher salt
¼ teaspoon freshly ground black pepper
1-2 teaspoons fresh rosemary or sage, chopped
Vegetables:
2 medium onions, peeled, cut into 8 pieces
1 cup baby carrots
2 sweet potatoes or ½ seeded butternut squash, cut into 1-inch pieces
1 red and 1 yellow bell pepper, cut to 2-inch squares
2 cup tiny patty pan squash or 2 medium zucchini, 1-inch slices, halved
8 ounces fresh whole cremini, baby portabella or white mushrooms, halved
6 firm, fresh plum tomatoes, halved
Preparation:
Preheat the oven to 425°F.
In a bowl mix together the marinade. Toss the hard vegetables (onions, carrots and potatoes) in the marinade, and spread on a baking sheet. Roast for 20 minutes, turning once. Toss the remaining vegetables in the marinade. Lower the heat to 400°F, place on a second baking sheet and roast another 20 minutes, turning once, and turning the hard vegetables again. Serve on a large platter around the polenta dome. Watch carefully that the vegetables don’t burn.
Adapted from Moosewood Restaurant Celebrates
Suggestion Four: Change Your Thinking about Stuffing and Gravy
Probably the most troublesome parts of the Thanksgiving meal for people endeavoring to eat light and healthy are the stuffing and the gravy. The notion that stuffing and gravy are integral to the meal is deeply ingrained in our consciousness. A simple way to cut some of the fat from stuffing is to bake it outside of the turkey. Likewise, traditional gravy can be made without calorie-laden pan drippings. Even better, try a new approach to stuffing and gravy altogether, replacing bread cubes with high-fiber whole grains such as quinoa or barley and combining interesting new flavors into an almost fat-free gravy.

Wild Mushroom Barley Stuffing
Ingredients:
2 tablespoons kosher salt, divided
1 ½ cups uncooked pearled barley
2 teaspoons olive oil, divided
1 medium onion, chopped
5 slices turkey bacon
2 small carrots, diced
1 pound fresh wild mushrooms, assorted varieties
2 cloves garlic, minced
2 tablespoons fresh thyme, minced
2 tablespoons fresh sage, chopped
¼ teaspoon freshly ground pepper
2 cups vegetable broth, heated to a simmer
1 tablespoons fresh parsley, chopped
Preparation:
Bring eight cups of water and 1 ½ teaspoons salt to a boil in a large saucepan; add barley. Cover, reduce the heat, and simmer until tender, about 30 minutes; drain.
Meanwhile, heat 1 teaspoon oil in a large pot over medium-high heat; add onion, bacon, and carrots. Cook, stirring often, until onion is lightly browned and almost tender, about five minutes. Add mushrooms and garlic; cook, stirring often, until the vegetables are tender, about five minutes more.
Stir in herbs, pepper, remaining salt and olive oil. Reduce heat to low, stir in broth and barley, toss to coat. Remove from heat, transfer to a serving bowl, and sprinkle with parsley.
From weightwatchers.com

Caramelized Onion Gravy
Ingredients:
2 teaspoons olive oil
6 cups thinly sliced sweet or Spanish onions
1 tablespoon sweet paprika
½ teaspoon salt
¼ teaspoon dried thyme or ¾ teaspoon fresh thyme, chopped
½ teaspoon fresh rosemary, minced
½ teaspoon dried marjoram
¼ teaspoon nutmeg
3 tablespoons dark soy sauce
2 cups vegetable broth
¼ cup dry sherry wine
2 tablespoons cornstarch
¼ teaspoon freshly ground pepper
Preparation:
Warm the oil in a large saucepan on medium-high heat. Add the onions and sauté for 2-3 minutes, until the onions are coated with oil. Add the paprika, salt, herbs, and nutmeg. Reduce the heat to medium and continue to cook, uncovered, stirring occasionally, for about 30 minutes, until the onions are limp and very brown. You should have about a generous cup of caramelized and very sweet onions.
Add the soy sauce, 1 ¾ cups broth, and the wine to the onions; bring to a simmer. Dissolve the cornstarch in the remaining broth and mix into the gravy in a slow but steady stream. Stir constantly until the gravy is thickened.
From Moosewood Restaurant Celebrates
Suggestion Five: Serve smaller plates and individual portions
A cherished part of Thanksgiving for many is filling one’s plate with heaps of good food. Slow everyone down a bit by serving your meal on smaller salad plates rather than dinner plates. Your guests will retain the pleasure of combining delicious foods together without committing themselves to more than they can – or should—eat in one sitting. If, by some chance, they are still hungry after cleaning their plate, they are welcome to come back for more.
 The same strategy works well with dessert. Instead of baking a pumpkin pie, bake the pumpkin custard (substituting egg whites and evaporated skim milk to lower the fat) in ramekins. Serve each guest their own portion with a ginger snap in a ramekin, saving them the fat and calories of the crust and the temptation to eat more dessert than they should.
The secret to losing weight or maintaining a healthy weight is to make a series of small changes and then be consistent in retaining those changes; but in the end, food and the experience of sharing a meal with loved ones should still be pleasurable. This Thanksgiving, try one or two of these tips to save yourself unnecessary fat and calories without losing any of the enjoyment of spending this special day with the people you love. Who knows? Maybe you will be creating new, healthier traditions for years to come.
Braised Short Ribs with Red Wine and Leeks
 Here’s the recipe for my braised short ribs with leeks. It’s a recipe I adapted from one by Wolfgang Puck, but much simpler and more accessible. It came out beautiful and tasty.
Braised Short Ribs with Red Wine and Leeks
Ingredients:
1 bottle Cabernet Sauvignon
2 tablespoons vegetable oil
6 beef short ribs
Kosher salt
1 teaspoon freshly ground black pepper
1 tablespoon ground ginger
4 tablespoons all-purpose flour
1 head garlic, peeled
4 large shallots, peeled, trimmed, rinsed, split and dried
2 medium carrots, peeled and cut into 1-inch lengths
2 stalks celery, cut into 1-inch lengths
2 medium leeks, white and light green parts only, coarsely chopped
6 sprigs Italian flat-leaf parsley
2 sprigs thyme
2 bay leaves
2 tablespoons tomato paste
4 cups beef (or chicken) stock
1 can beef consommé
Preparation:
Center a rack in the oven and preheat the oven to 350 degrees F.
Heat the oil in a Dutch oven or large casserole, large enough to hold 6 ribs, over medium-high heat. Mix the flour, salt, ground ginger, and black pepper in a large plastic food storage bag. Two at a time, place the short ribs in the bag with the flour mixture, blow up the bag, tie it off, and shake well until the short ribs are coated with the flour (you can also use a traditional flour-dredging pan, but I prefer the plastic-bag method. It’s much neater). When the oil is hot, slip two ribs into the pot and sear for 4 to 5 minutes on each side, until well browned.
Transfer the browned ribs to a plate and repeat with the remaining ribs, two at a time. Remove all but 2 tablespoons of fat from the pot; lower the heat to medium, and toss in the vegetables and herbs. Brown the vegetables lightly, 5 to 7 minutes, then stir in the tomato paste and cook for 1 minute to blend.
Add the reduced wine, browned ribs, stock and consommé to the pot. Bring to a boil; cover the pot tightly, and place it into the oven to braise for 2 to 2 ½ hours, or until a kitchen fork pierces the meat easily and comes back out without lifting the meat. Every 30 minutes or so, lift the lid and skim and discard whatever fat may have bubbled up to the surface.
Nutty Pumpkin Bread
 Here’s the pumpkin bread recipe I promised in my October 7 column. Morgan made it last week, and it’s wonderful. A great complement to a fall soup.
Ingredients:
1 1/2 cups all-purpose flour
1 12 cups whole wheat flour
1 cup wheat germ
1 cup white sugar
1 cup brown sugar
2 teaspoons baking soda
1 1/2 teaspoons salt
2 teaspoons ground cinnamon
1/2 teaspoon EACH ground ginger, nutmeg, and cloves
2 cups cooked pumpkin (1 14- to 16-oz. can)
1/2 cup unsweetened applesauce
4 eggs, lightly beaten
1/2 cup canola oil
1/2 cup chopped pecans
1 cup golden raisins
Preparation:
1. Soak the raisins 1/2 hour in warm water. Preheat the oven to 350 degrees Fahrenheit.
2. Combine the first nine ingredients (AP flour thru spices) in a large bowl, mix well, then form a well in the center of the mixture.
3. Add the remaining ingredients into the well of the dry mixture and combine gently until the dry ingredients are moist. Do not overmix.
4. Pour the batter into two 9x5x4 loaf pans that have been sprayed with baking spray or canola oil.
5. Bake until the tops are browned and a toothpick inserted into the center comes out clean, about 45 – 50 minutes. Cool the loafs on a wire rack for 10 minutes, then turn them out onto the rack to cool completely before serving.
Possible substitutions: Brown raisins or dried cranberries can be used instead of golden raisins; walnuts can be used in place of pecans, and cooked butternut squash can replace the pumpkin.
Serve with a nice thick, hot soup or toasted with butter or cream cheese, or just plain plain.
Yummy.
Vietnamese Shrimp Spring Rolls
Morgan and her mom made these incredible spring rolls the other night for company, and they were a huge hit. I thought they were every bit as good as any I have had at a restaurant. Fact is, this is a restaurant recipe, from la Patisserie in Birmingham, Alabama, where a large Vietnamese population has resettled after the floods in New Orleans. There is a wonderful video that accompanies this recipe, for which I will post the link at the end of this recipe. Try these. You will need to find a good Asian market to get the rice wrappers, but if you haven’t found one already, you owe it to yourself to find one. Now. The one near us is wonderful, and always smells great. Very nice people, too.
Shrimp Spring Rolls
Ingredients:
1/4 cup rice wine vinegar
1/4 cup fish sauce
2 tablespoons white sugar
2 tablespoons lime juice
1 clove garlic, minced
1/4 teaspoon red pepper flakes
2 ounces rice vermicelli
24 baby shrimp, peeled and deveined
6 rice wrappers (8.5 inch diameter)
3 leaves lettuce, chopped
4 tablespoons finely chopped fresh mint leaves
4 tablespoons finely chopped cilantro
4 teaspoons finely chopped Thai basil
- Whisk vinegar, fish sauce, sugar, lime juice, garlic, and red pepper flakes together in a small bowl. Set the dipping sauce aside.
- Fill a large bowl with room temperature water. Add rice vermicelli and soak for 1 hour.
- Bring a large pot of water to a boil. Drop in shrimp and cook until curled and pink, about 1 minute. Remove the shrimp and drain. Or you can buy precooked baby shrimp with the tails on. Defrost and pinch off the tails. Transfer rice vermicelli noodles to the pot of boiling water and cook for 1 minute. Remove and drain in a colander. Immediately rinse the vermicelli with cold water, stirring to separate the noodles.
- To assemble the rolls, dip 1 rice wrapper in a large bowl of room temperature water for a few seconds to soften. Place wrapper on a work surface and top with 4 shrimp halves, 1/4 of the chopped lettuce, 1/2 ounce vermicelli, and 1/4 each of the mint, cilantro, and Thai basil. Fold right and left edges of the wrapper over the ends of the filling and roll up the spring roll. Repeat with remaining wrappers and ingredients. Cut each roll in half and serve with dipping sauce.
Makes 6 spring rolls
Servings: 1 roll, 2 tablespoons dipping sauce
PP3
Why I’m Here…
 Why I’m here…

Welcome to Jeff’s Kitchen. Inspired by friends who have sampled my cooking and by my years working at the famous gourmet shop in South Beach, this is the place where I will post those fabulous recipes we all know and love–or simply something that just moves me–along with a picture, a story, an event, a person, place or thing, or whatever I feel the need to unload. The operative pieces of equipment here are my brain, a saute’ pan, a piping bag, and the desire to make the world better because of the food I–WE–prepare with our own two hands.
Tell Me Why…
But this isn’t just about me. I want to hear from you! Don’t just post. Tell me a story. Tell me where you found the recipe, tell me what appeals to about it, tell me who you dazzled with your best moves in the kitchen (or elsewhere–as long as food is involved). I’m not just the best virtual chef you know, but also a pretty good storyteller. But I want to know yours. I do like stories with my recipes, and storytellers in the kitchen. Join me in the fun.
And if this isn’t enough to whet your whistle, Here’s the best damn Key lime pie recipe on the planet. I got this from an old guy who ran a donut shop on Key Largo, a weathered old guy who looked like he just stepped out of a Carl Hiaasen novel; he shack where he made and sold the donuts looked even worse. On any day, between the hours of six and ten a.m., he sold more Key lime-filled donuts out of that rundown shack, on the southbound side of A1A, than all the donuts sold at the local Dunkin’ Donuts down the road. He gave us the recipe–a long-held family recipe–in trade for a six-year-old Harley Softtail. He wouldn’t give it up for anything less. We turned this recipe into a legendary sweet-tart pie, which we’ve been selling at our place, and at a world-famous South Beach crab house, for more than fifty years. The pie has become the signature dessert for that crab house. It’s our recipe. We made it for them. To use with their own name attached to it. And I saw it on The Food Network.
And now, You can make it yourself. DO IT! And then, write me. Tell me the story about the results. That’s what Jeff’s Kitchen is all about. Let’s share our best recipes and make this the coolest food place on the planet. Or any planet.
Thanks,
Cheffzilla
Chefzilla’s Key Lime Pie
Ingredients:
Crust:
1 cup of Grahm cracker crumbs
1/2 cup toasted pecans chopped fine. (If you’re allergic to nuts, sub more GC crumbs)
1/2 cup white sugar
1 stick of melted butter (use margarine and I’ll take this recipe back!).
Filling:
5 room temperature egg yolks
2-14 oz. cans sweetened condensed milk. (You can use fat-free SCM if you must, but PULEEZE!!!)
1/2 cup FRESH SQUEEZED lemon juice
1/2 cup FRESH SQUEEZED Persian lime juice (you could use 1 cup of fresh key lime juice in place of the lemon and lime juices, but the world-famous restaurant doesn’t–they’re tiny, hard to find, very hard to work with, and you won’t know the difference)
Grated zest of 1 lime
Whipped cream:
2 cups heavy whipping cream
2 tablespoons 10X confectioners’ sugar
1/2 teaspoon pure vanilla extract
Preparation:
1. Preheat oven to 350 degrees F. Line the bottom tray of a 9-inch springform pan with parchment paper, secure the tray, and trim away the excess paper. Brush the paper and sides of the pan lightly with a bit of the melted butter.
2. For the crust, combine the graham cracker crumbs, chopped nuts, sugar, and the remaining butter in a medium bowl, until well blended. Place in the springform pan. Pat firmly and shape the crust on the bottom and a half-inch up the sides of the pan.
3. Bake for 12-15 minutes or until the crust begins to brown on the edges of the sides. Allow the crust to cool to room temperature before resuming the recipe.
5. Combine all of the filling ingredients until they are well mixed. Pour into the crust.
6. Bake the pie for 15 minutes. Remove from oven and cool to room temperature.
7. Smooth plastic wrap onto the cooled filling, and freeze the pie for at least six hours, and preferably overnight.
8. Remove the pie from the freezer 15 – 20 minutes before serving. NO MORE!!!!!
9. Serve with a big dollop of fresh-made whipped cream (whip the ingredients in a very cold metal bowl until stiff peaks form, but don’t overbeat, or you’ll make sweet butter). DO NOT USE READY WHIP OR MERENGUE. PLEASE!!
10. Serve to someone who will repay you handsomely for the most incredible treat you have ever prepared. They will respond, “Damn, this is the best key lime pie I ever tasted. It’s better than any I ever had in a restaurant.”
11. Duh!!!
